


This chapter is mainly explained about the information and setup which will be useful for IT Operational Team of your company. The details and setup steps for company, sites, area, devices, can be obtained from the subchapters under this chapter. Complete the setup properly will make sure that your company obtained the information as desired and smoothen the daily routines of the users of the portal in your company.
2.1 Site Settings
Site refers to a store of the company, grouping the devices installed at the respective store and summed the counting data collected from all the devices. For retail chain, one site per one store is required, so that the higher management able to review the overall company performance and individual store performance separately. Site creation is required before device can be added to the portal. In this section, we will explain about the set up related to sites such as create, edit and remove sites.
2.1.1 New Site Setting
We will brief about the three methods to create new site, which are single creation of site, bulk create site and bulk import site.
2.1.1.1 How to Create New Site
- Click on Settings > Site > New Site button to access the Site Info page.
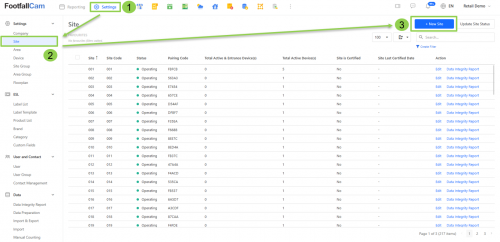
- Fill in the relevant information for the required fields and click on the Create button.
- Site Info


|
Item |
Description |
| 1. Pairing Code |
Display the pairing code required for installation. (Info: Refer to here for details steps.) |
| 2. Site Name |
Enter a preferred site name. (Info: Site name inserted will be applied to features in FootfallCam Analytic Manager V9™.) |
| 3. Site Code |
Enter a preferred site code. (Info: Site code used to identify site within a geographic region.) |
| 4. Billing Address |
Enter a billing address. |
| 5. Site Group |
Select the site group. (Info: Site group added will be apply to report feature. For more information on setting up site group, refer to Chapter 1.3 Setting Up Site Group.) |
| 6. Country |
Select the country. (Info: Country selected will be apply to features in FootfallCam Analytic Manager V9™ for mapping the site coordination.) |
| 7. Time Zone |
Select the time zone. (Info: Time zone selected will be apply to report feature.) |
-
- Site Operations
Setting your Site Operating Hour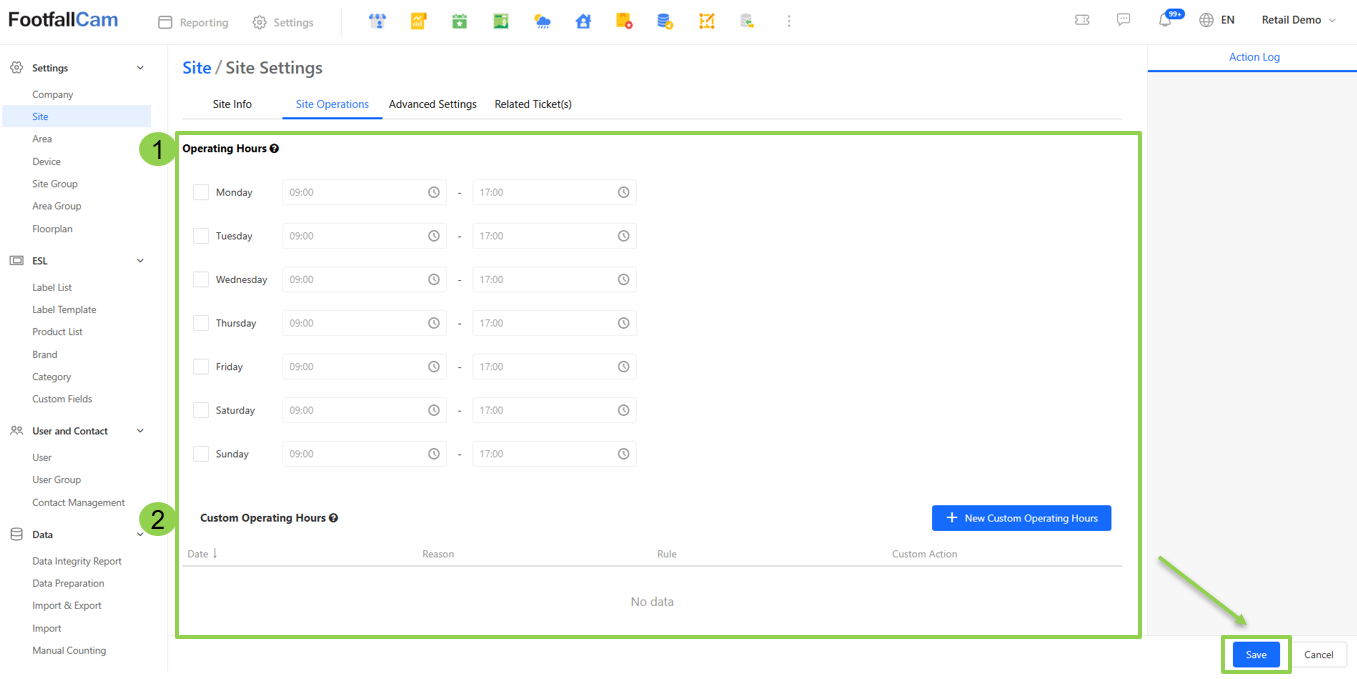
|
Item |
Description |
| 1. Operating Hours | To set the operating hour of the store and display relevant data on the dashboards and reports. For more setting information please refer here. |
| 2. Custom Operating Hour | To preset the special operating hour which different from normal days for some events or occasions and only take effect on the specified date range. For more setting information please refer here. |
-
- Advanced Setting
This is optional to fill in the Advanced Setting information
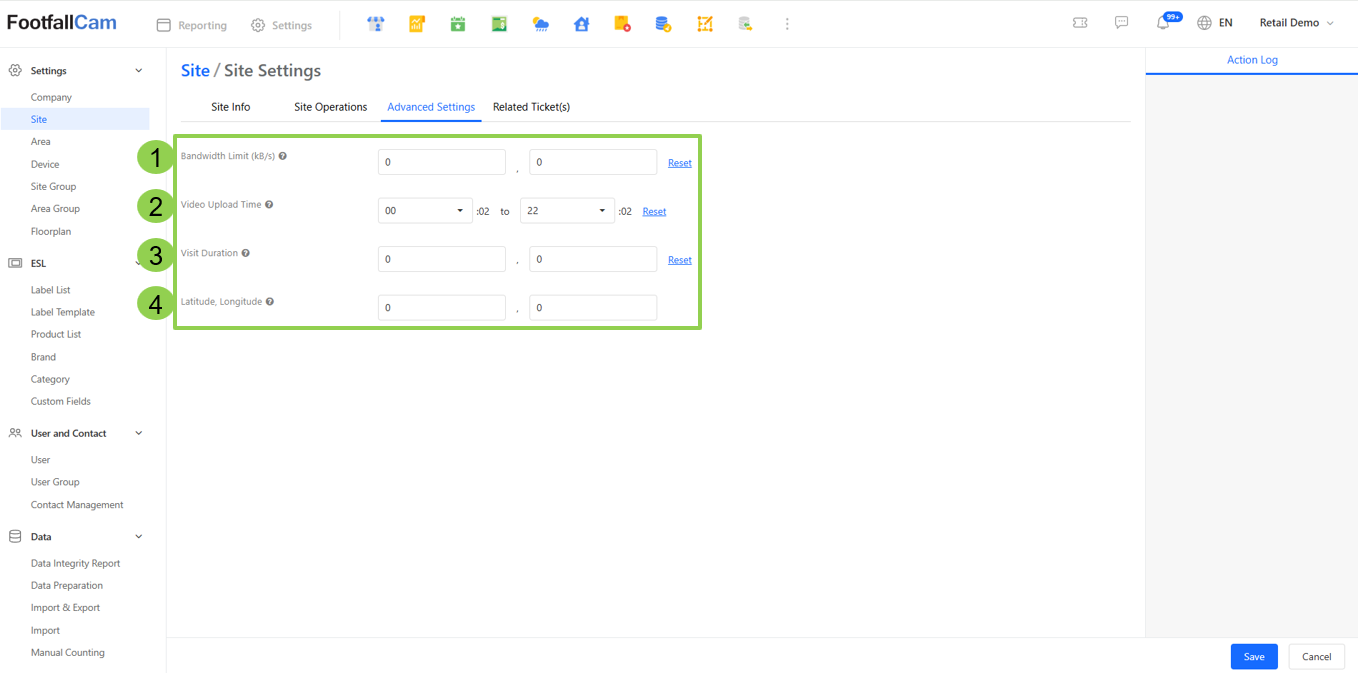
| Item | Description |
| 1. Bandwidth Limit (kb/s) | Enter bandwidth limit. |
| 2. Video Upload Time |
Enter video upload time (Info: Site name inserted will be applied to features in FootfallCam Analytic Manager V9™.) |
| 3. Visit Duration |
Enter visit duration (Info: Site code used to identify site within a geographic region.) |
| 4. Latitude, Longitude | Enter the latitude and longitude of the site. |
-
-
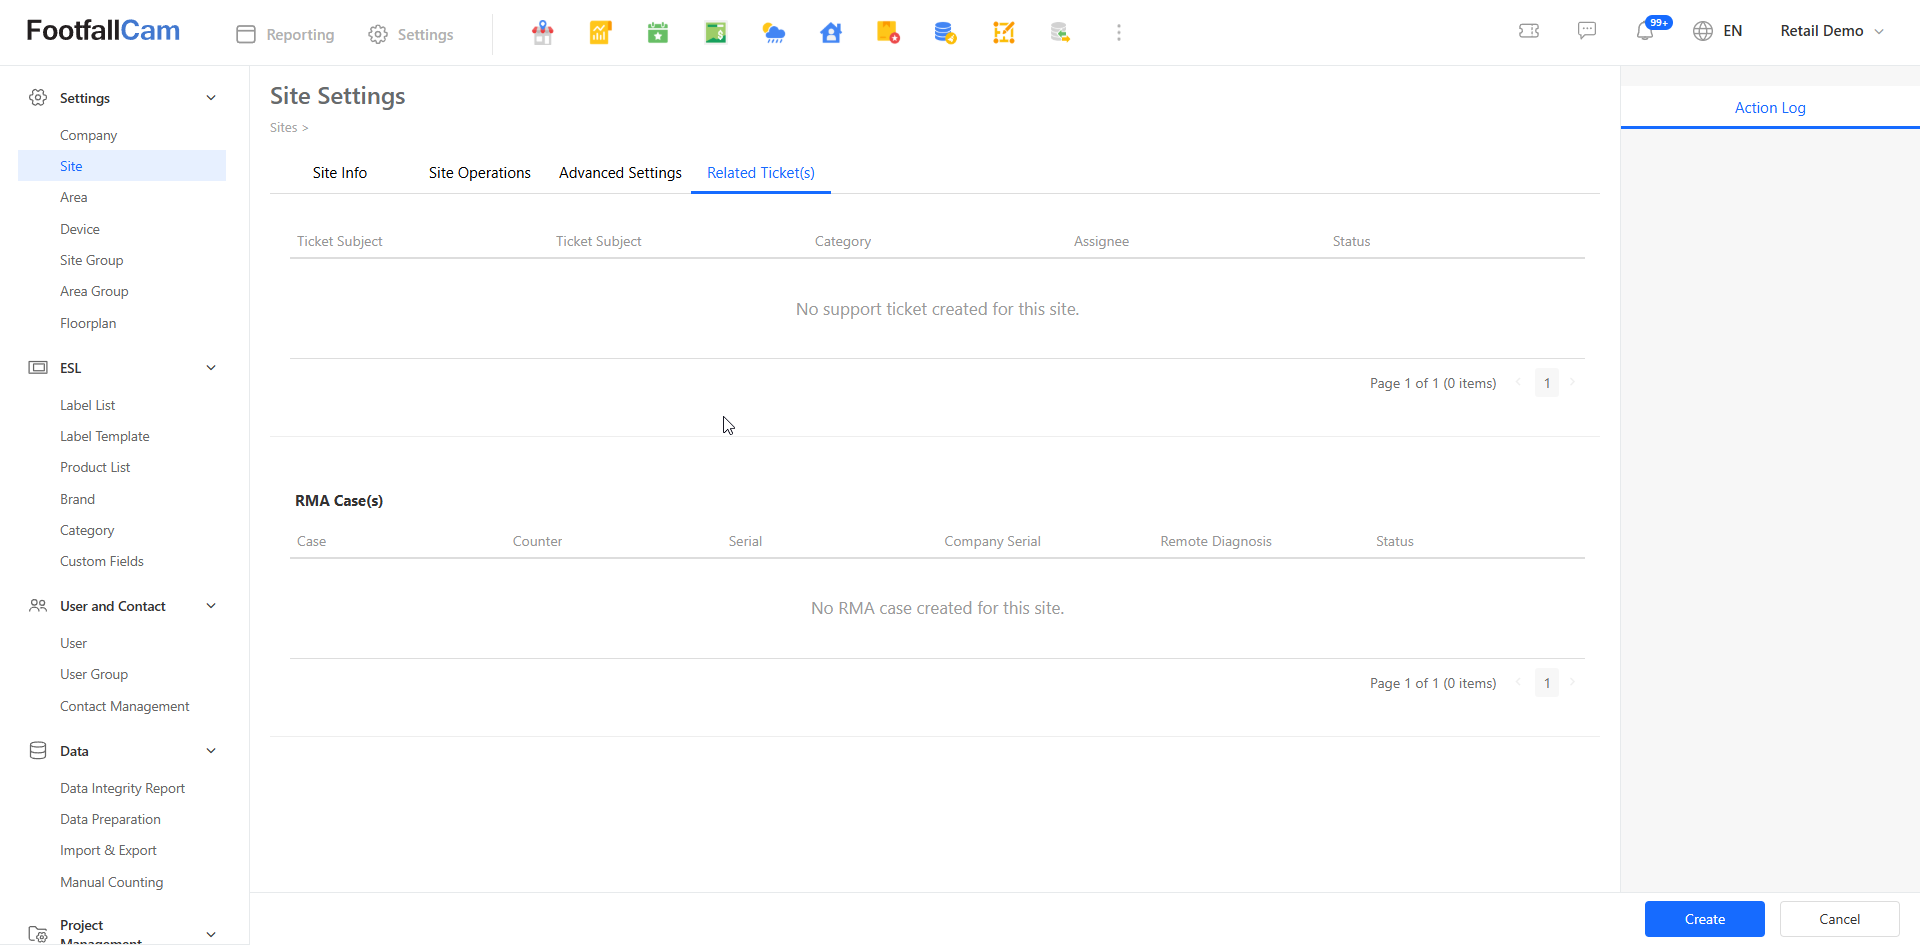
Related Ticket(s)
-
In this page, it will show all the tickets and the RMA(s) cases of this site. By using this page, you can directly reply to the ticket or view the response of the FootfallCam support team.
2.1.1.2 How to Bulk-Create/Bulk-Import Sites
Bulk-creating sites can be made easy by importing a list of sites into FootfallCam V9™. With this feature, a user can efficiently create multiple sites by uploading a spreadsheet with the required information for the sites to be created.
Without this feature, a user will need to create each site individually, which is exhausting and time-consuming.
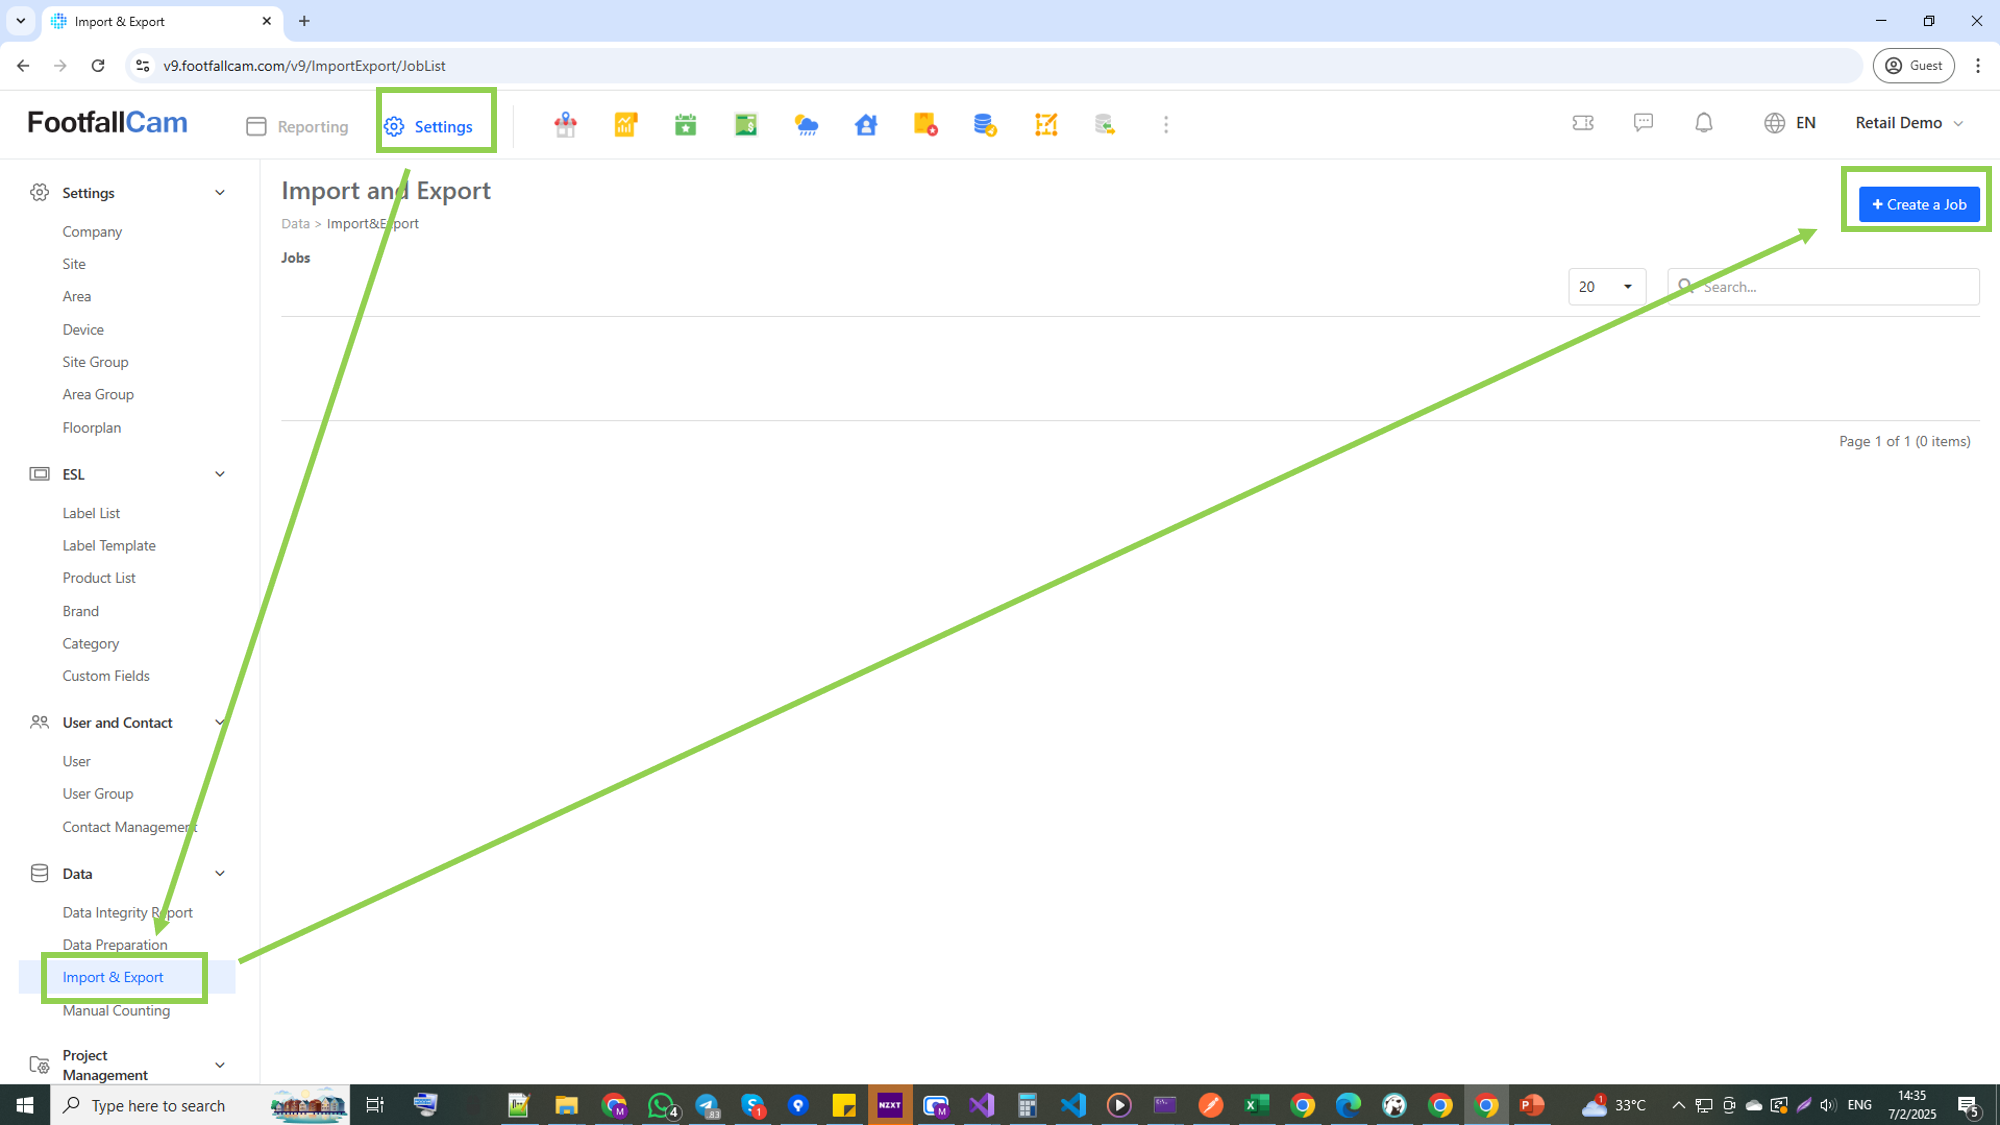
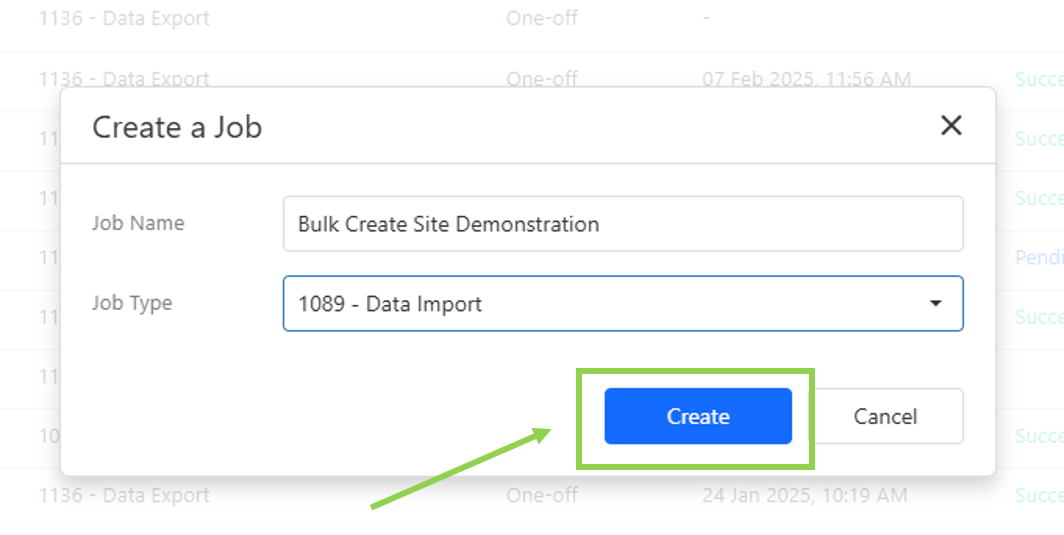
- Click "Settings" in the top navigation bar. Then, under "Data" in the left navigation bar, click "Import & Export". After that, click the "Create a Job" button.
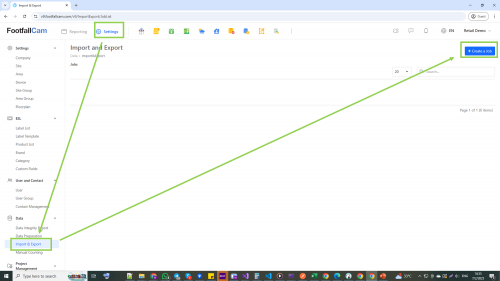
- Insert a recognisable name for your job to import the list of sites in the "Job Name" field. For the "Job Type" option, select "1089 - Data Import". Click "Create" to proceed.

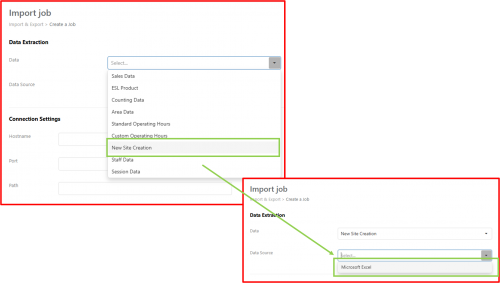
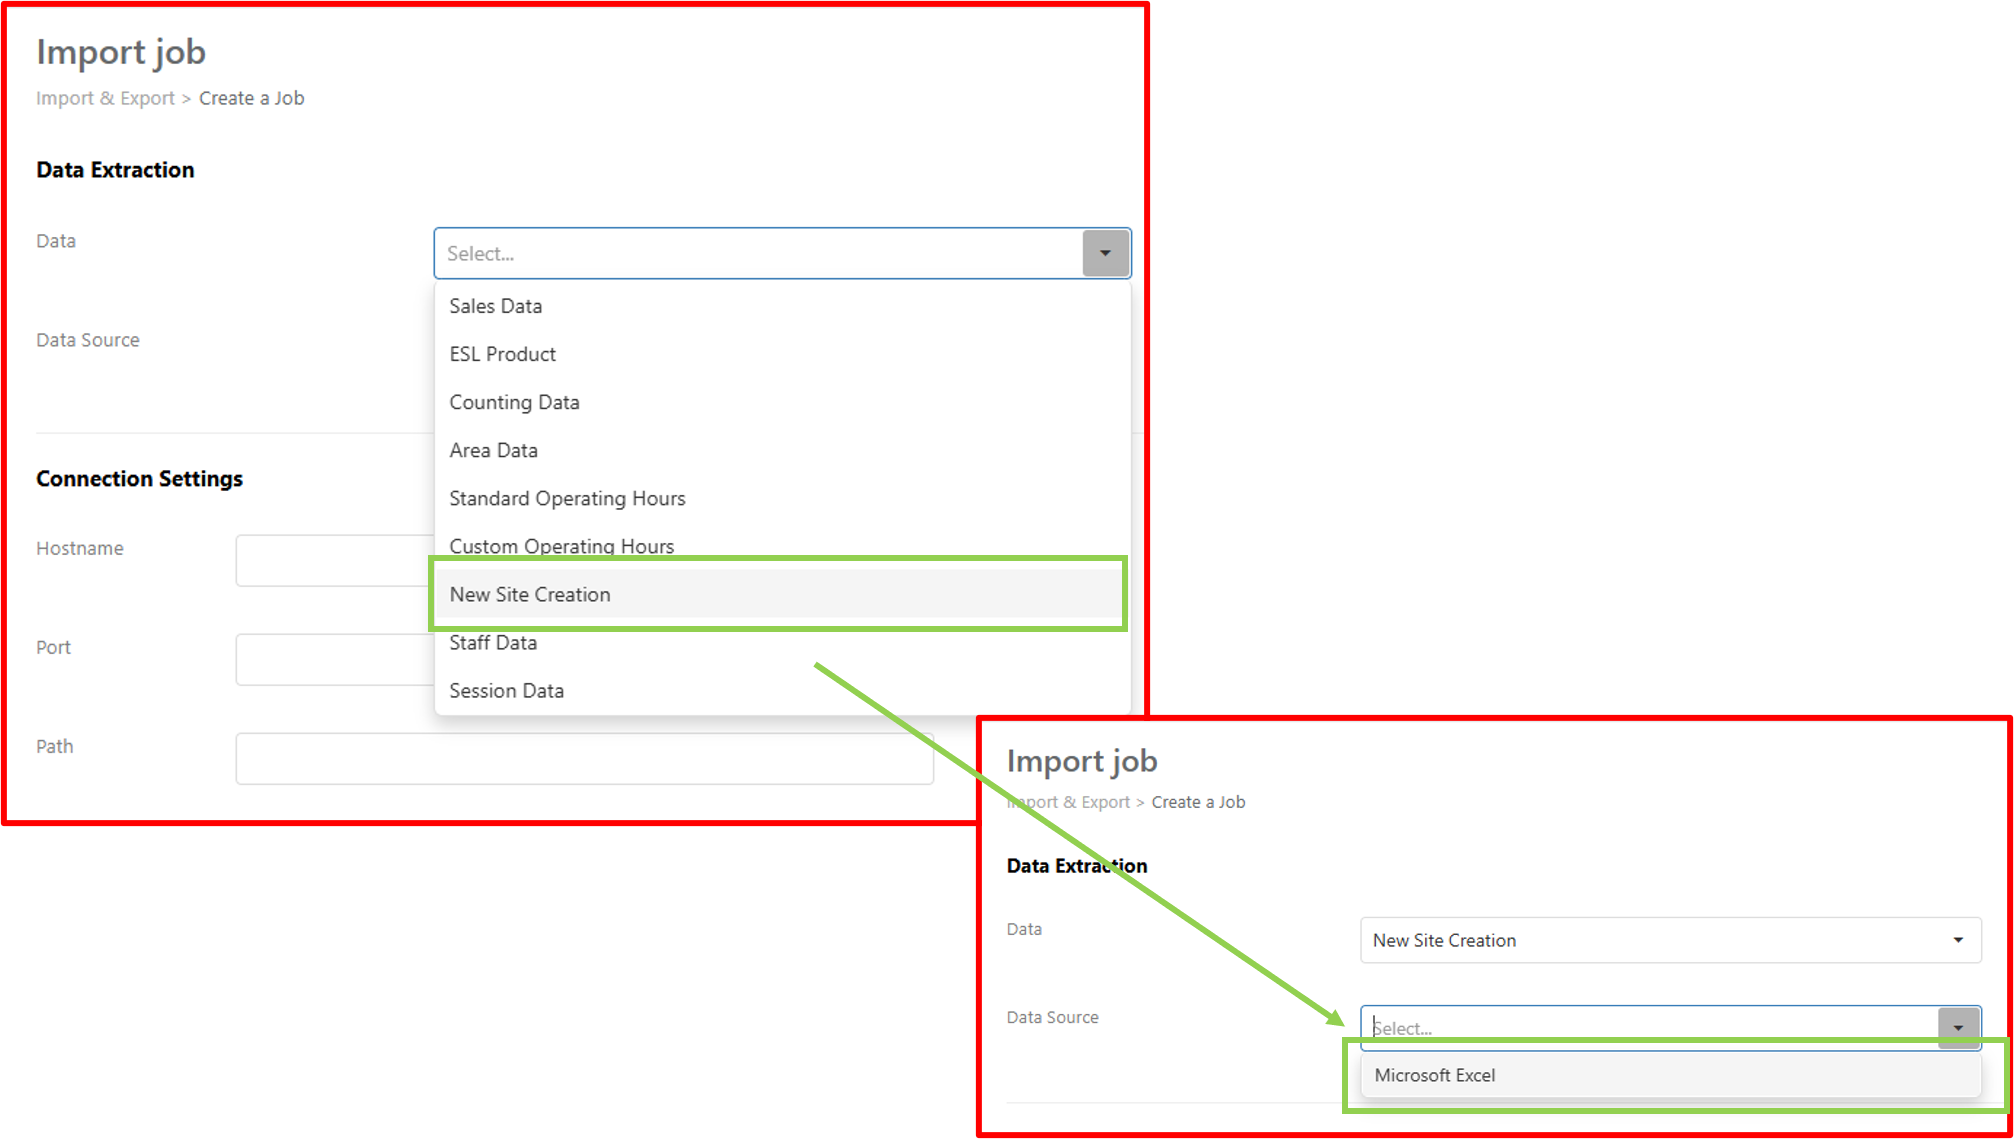
- You're now directed to the "Import Job" page. Under the "Data Extraction" section, click on the "Data" field and select "New Site Creation". In the "Data Source" field, select "Microsoft Excel".
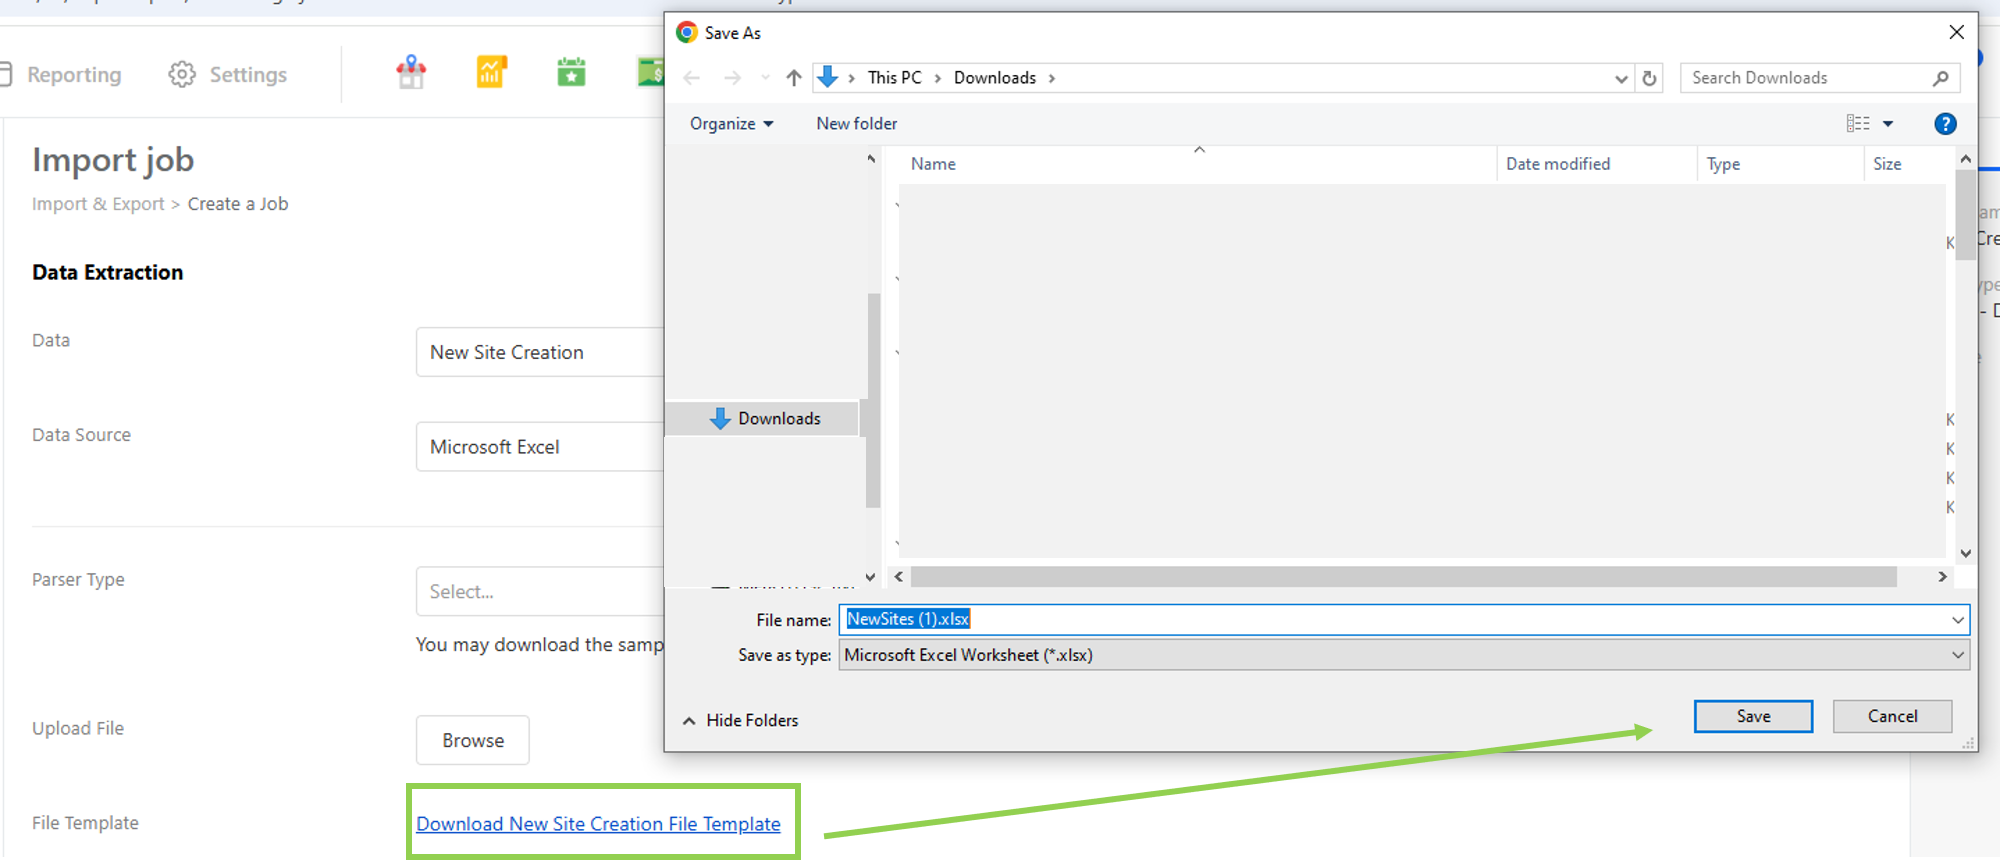
- In the "File Template" row, click the link to download the file template.

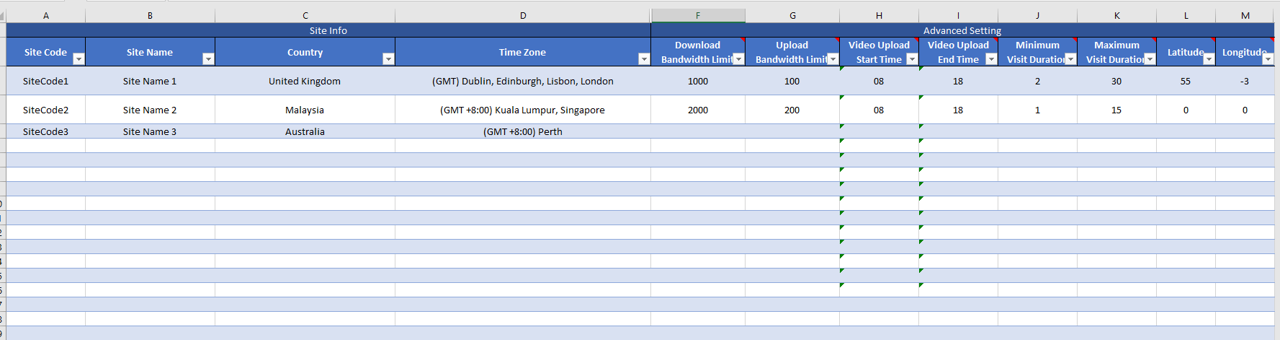
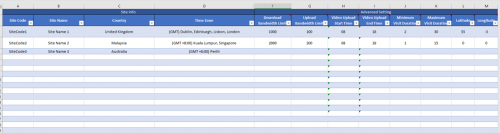 Open and edit the file. Below is the explanation for each column:
- Site Code: An easily recognisable code for the site. Only alphanumerical values and hyphens "_" are permitted for this field.
- Site Name: The full name of this site.
- Country: The country in which the site is located.
- Time Zone: The time zone that the site is observing.
- Download and Upload Bandwidth Limit: The limit on download and upload speed (kB/s). To use the system-assigned default value for any of these fields, set it to "0".
- If the site's internet connection is slow, setting this restriction will prevent the download and upload processes of the devices in this site from hoarding all the bandwidth and thus adversely affecting the normal operations of this site.
- Video Upload Start and End Time: The time range in which the devices of this site will attempt to upload any recorded videos for accuracy training purposes. Devices will attempt to upload at the second minute of every even-numbered hour (e.g. at 0802 hours, 1002 hours, 1202 hours, 1402 hours, etc.).
- If the site's internet connection is slow, restrict the time range for video uploading to non-operational hours so that the upload processes will not compete for internet bandwidth with the site's normal operations.
- Minimum Visit Duration: The minimum duration (in minutes) that a person must stay within the site for its visit duration to be recognised as meaningful data by the system. Set it to "0" to not impose such a restriction.
- When processing the data related to the "visit duration" of this site, the system will ignore data incurred by visitors whose visiting duration is less than the given duration. This is useful if the site sees plenty of human traffic that is just transiting through the premise to reach another destination and/or does not intend to interact with the premise at all.
- For example, the site is a shop that is conjoined with a mall. A lot of people use the shop as an alternative entrance to the mall without the intention of browsing the store at all. These individuals typically take less than a minute to pass through the site. By setting the "Minimum Visit Duration" to 1 minute, the data incurred by these passersby will be ignored during data processing.
- Maximum Visit Duration: The maximum duration (in minutes) that a visitor can accumulate before having their visit duration disqualified as meaningful data. Set it to "0" to not impose such a restriction.
- When a visitor enters a site, his visiting duration will begin to accumulate. If this limit has been defined, the system will observe the person's visiting duration and when it reaches the limit, the data that he has incurred will be ignored during data processing.
- This is useful if a site sees a category of human traffic that is not its customers and stays within the site longer than normal customers. For example, if the site is a shop that normally sees customers (visitors) staying on the premises for not more than 10 minutes, setting this attribute to "10 minutes" will filter out data incurred by non-customers, e.g. cleaners, repairmen, etc.
- Latitude and Longitude: The coordinates of the site.
- Return to FootfallCam V9™ and select the "Parser Type" as "Site". In the "Upload File" section, click the "Browse" button and upload the edited spreadsheet. After all these have been done, click "Next".

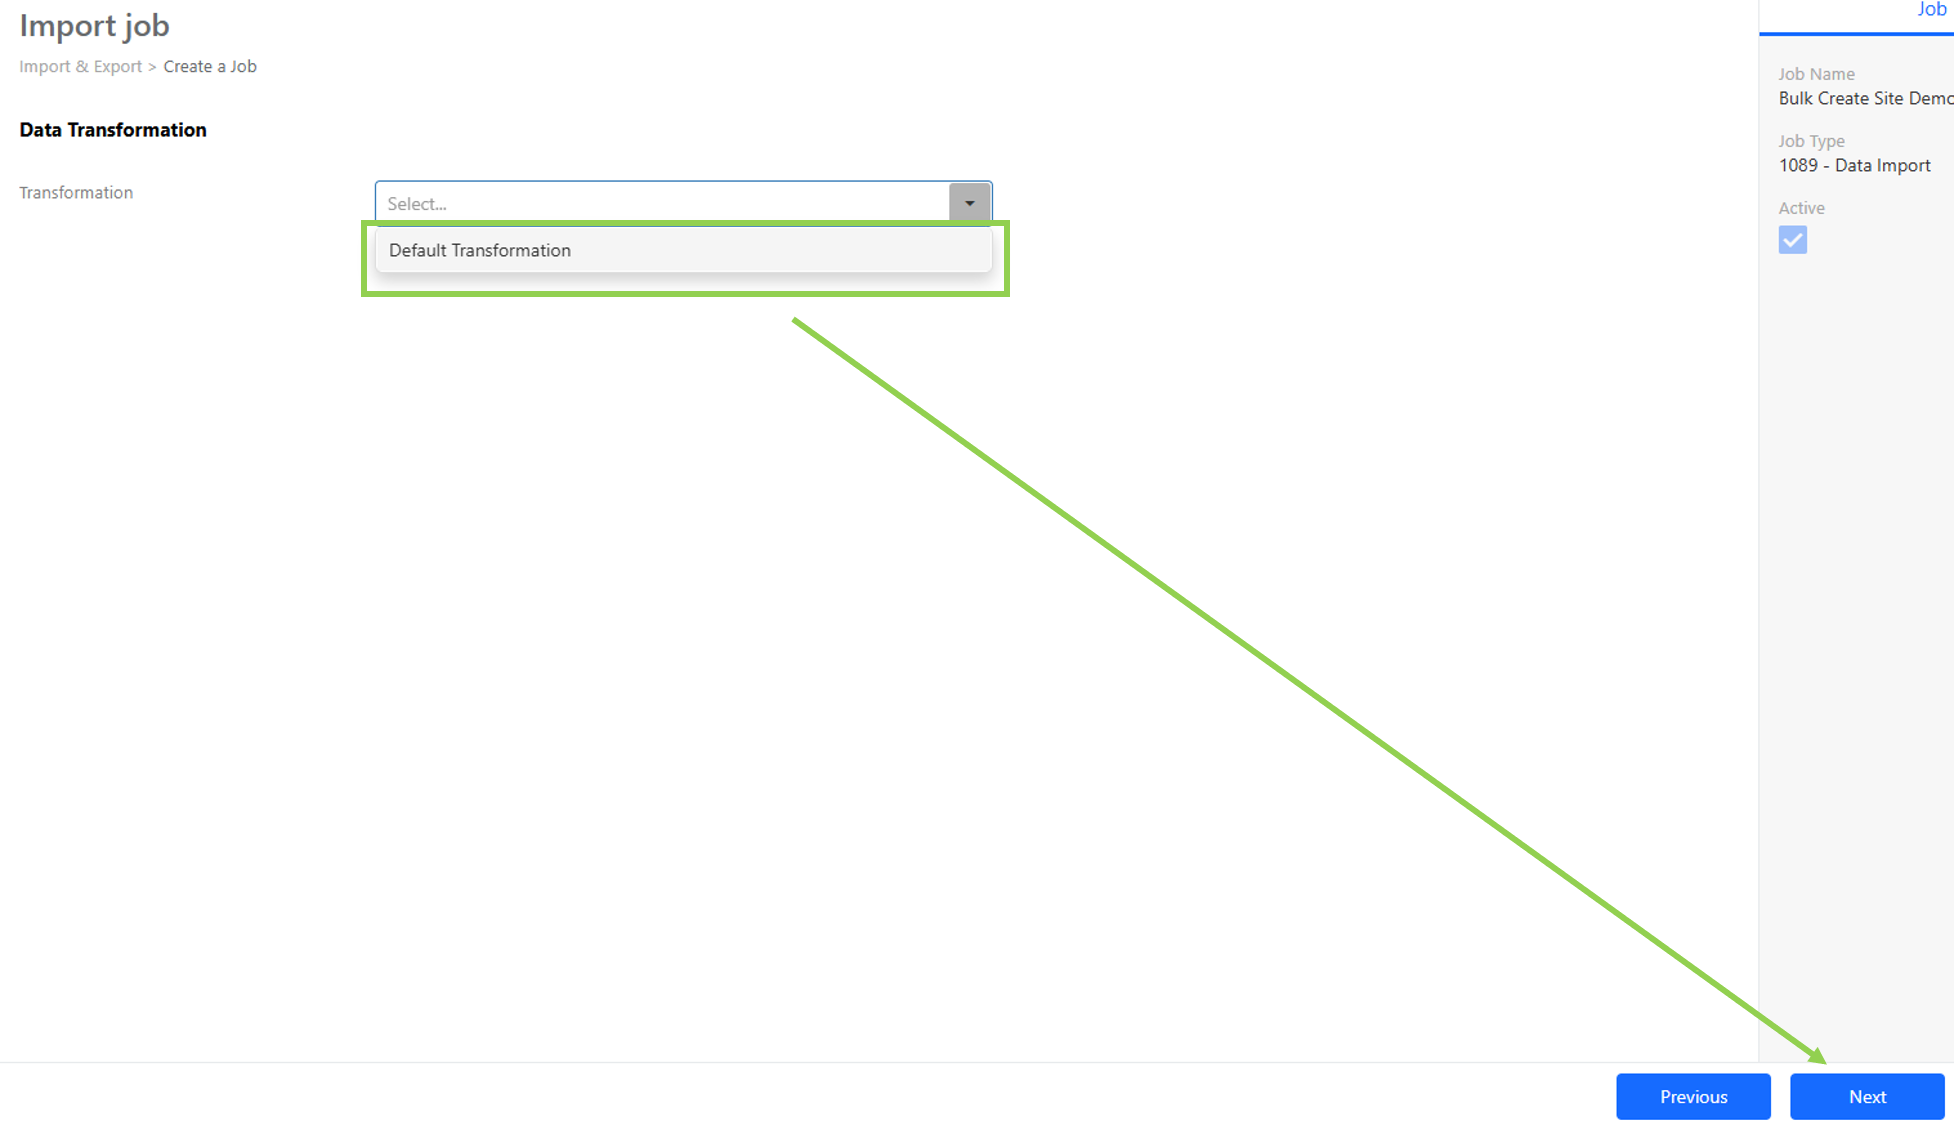
- Select "Default Transformation" and click "Next".

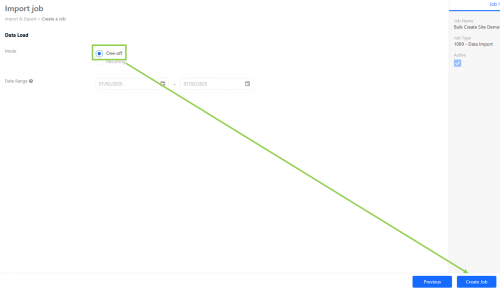
- Select "One-off" as the "Mode" and click "Create Job". Only "One-off" is the only option for this type of job. Notice that the "Date Range" has been selected for you as today's date, indicating that the job will begin right away.
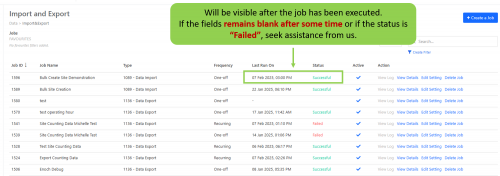
- You are now returned to the "Import and Export" list where you may observe the list of jobs. Here, you will see that your job has been created. Observe the "Status" column which indicates the progress of your job. The speed of your job is proportional to the number of sites to be created. If your job hasn't finished in a reasonable amount of time (e.g. 15 minutes), kindly contact "[email protected]".
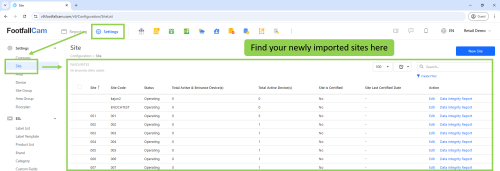
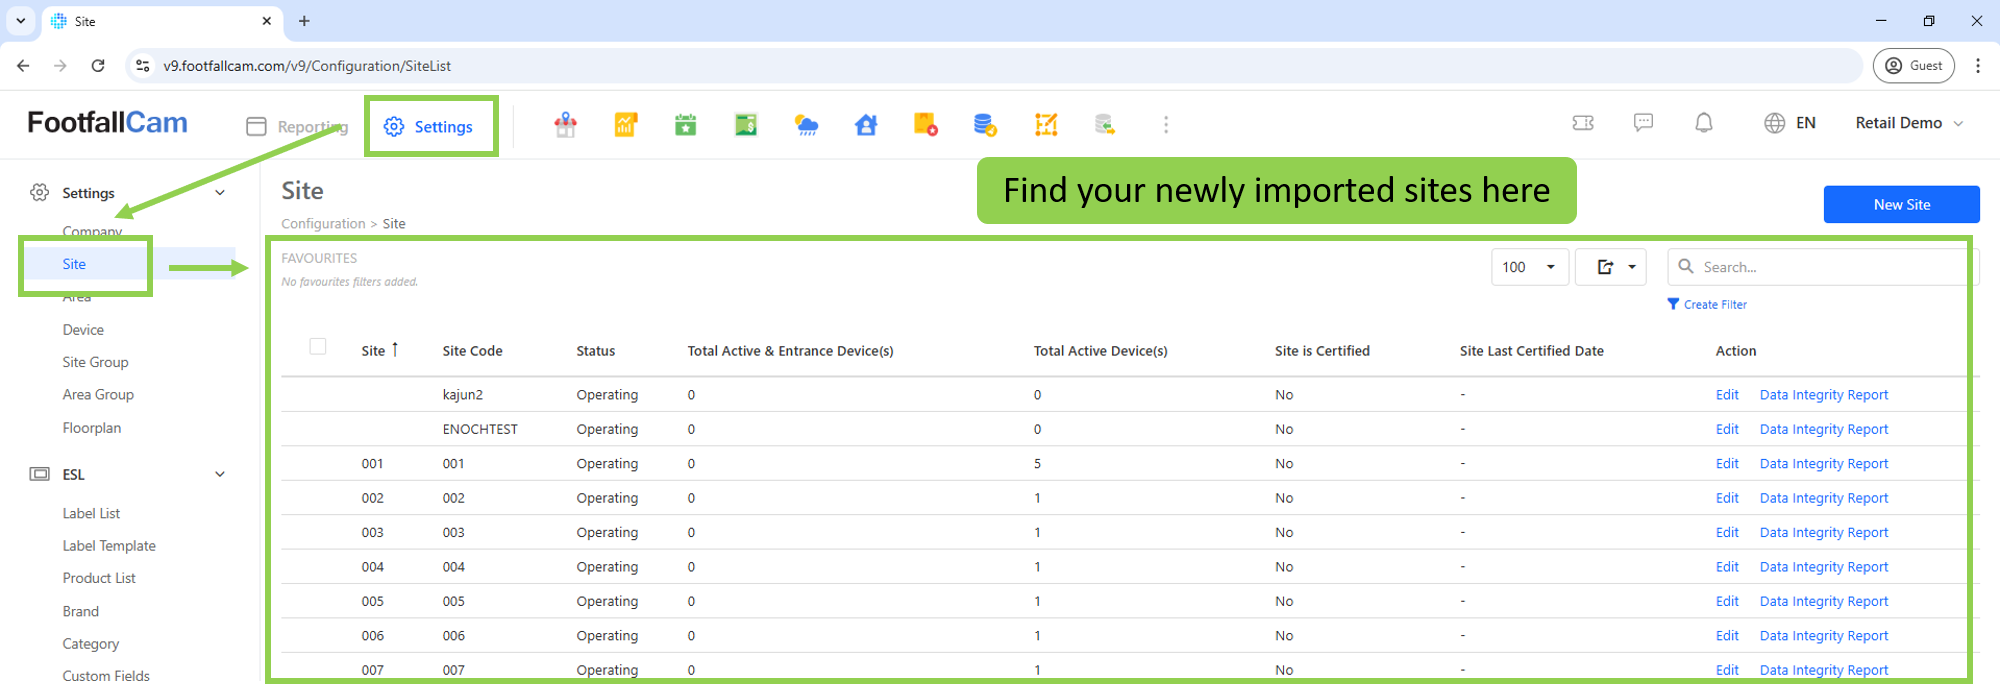
- After the "Status" of the job has been updated to "Successful", go to "Settings" in the left navigation bar and click "Site". Here, you will observe that your sites have been successfully created.


2.1.2 Existing Site Management
2.1.2.1 How to Edit Existing Site
This section is mainly about edit the details of the existing site such as Site Name, Site Code, Country, TimeZone, and Site Group.
-
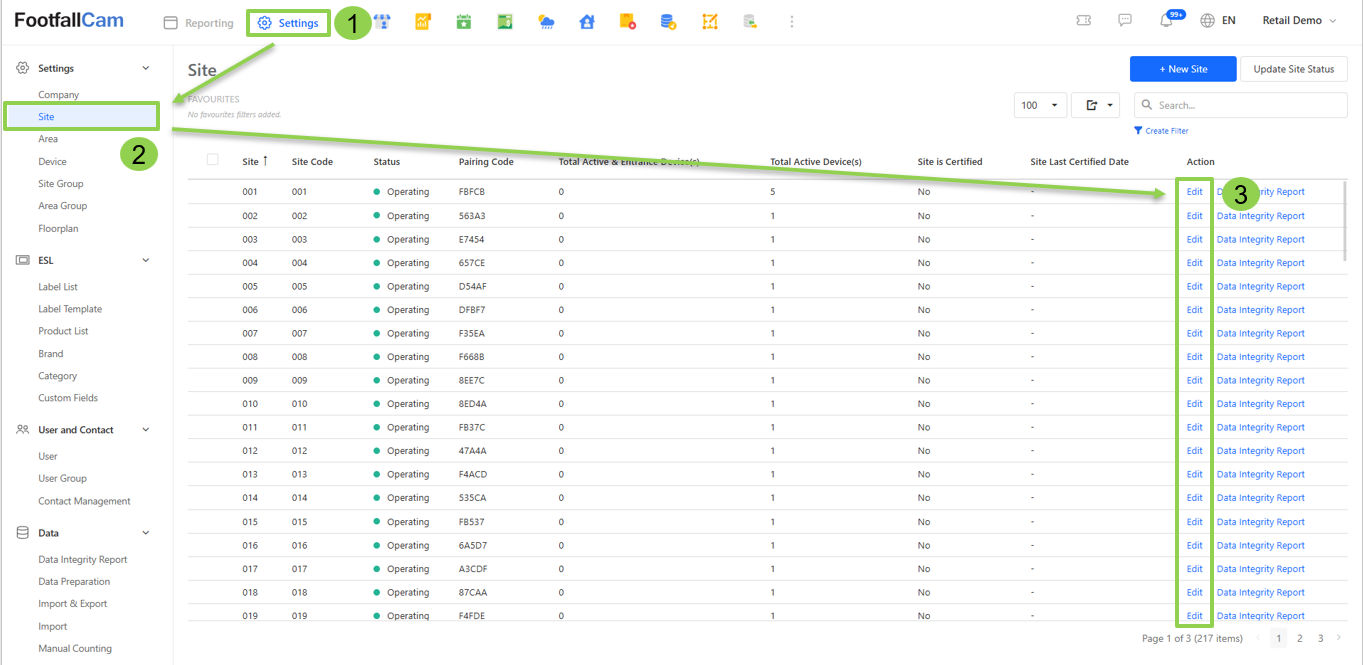
Click on Settings > Site > Edit button in Action column to access the specific Site page.

-
Update the desired field and click the Save button to save the changes.

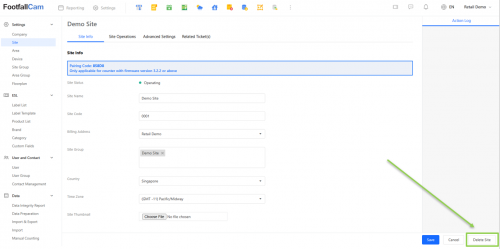
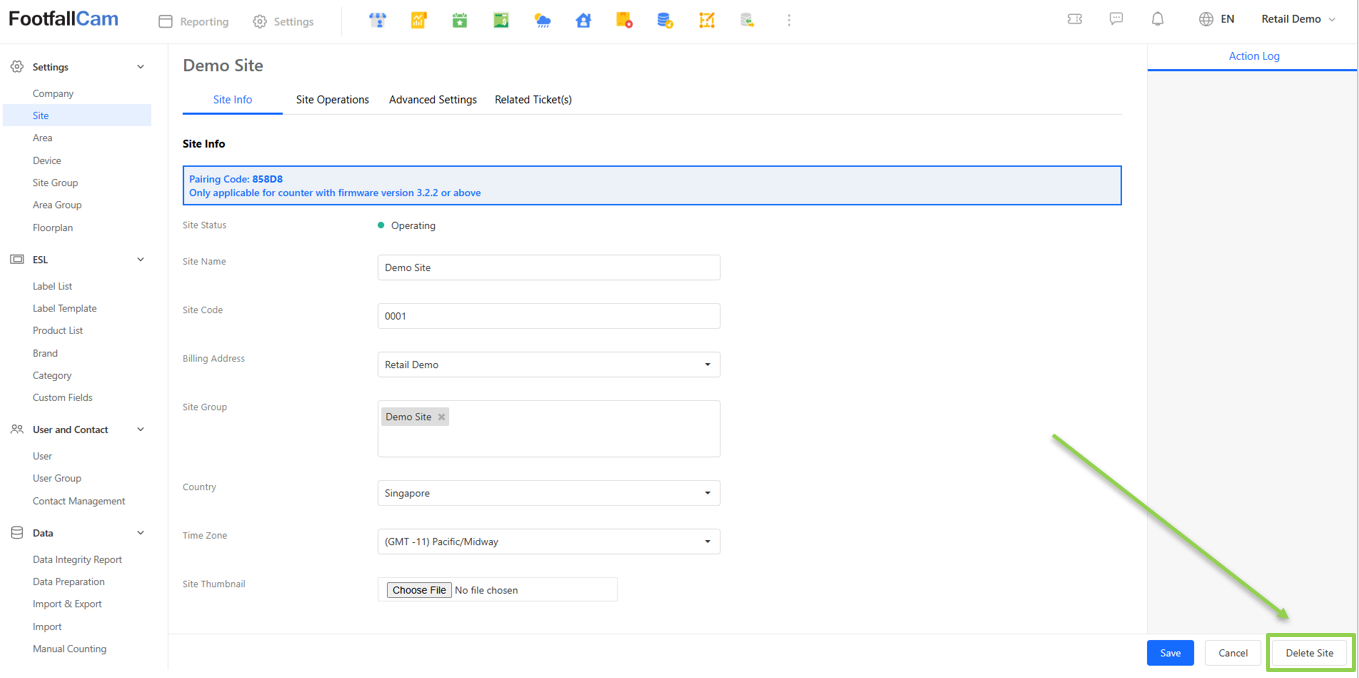
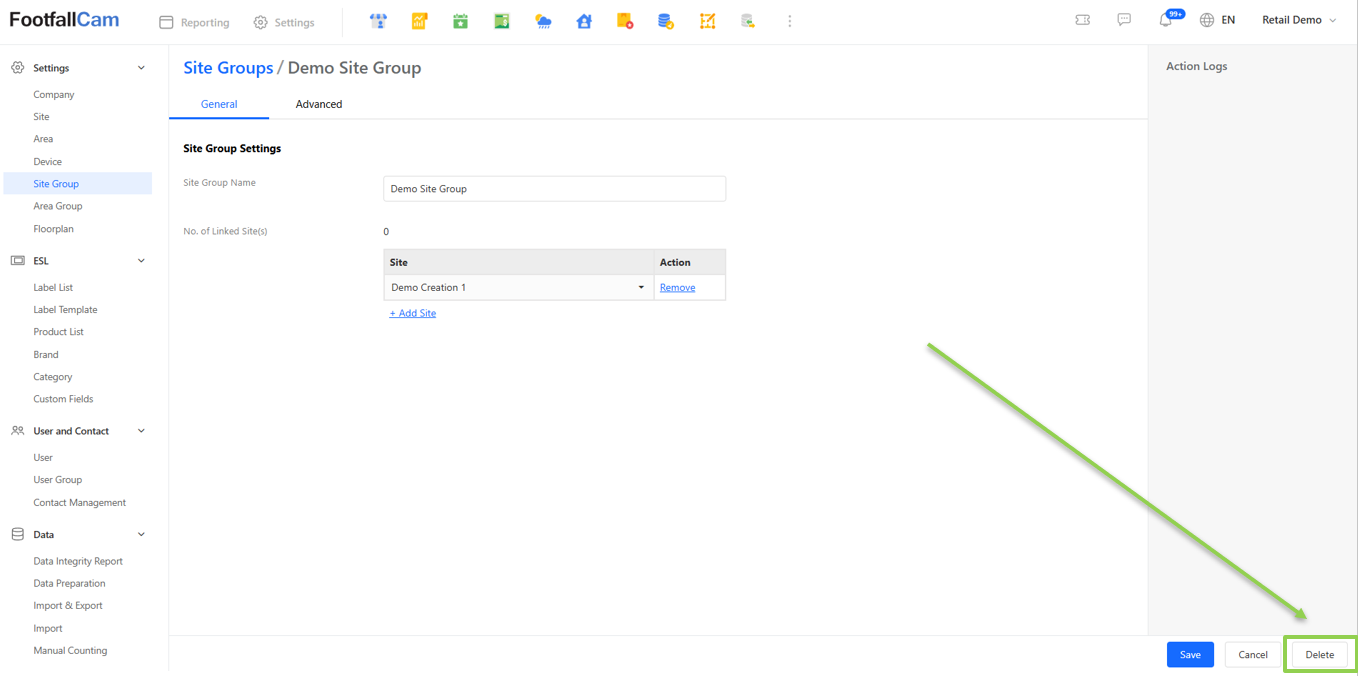
2.1.2.2 How to Remove Existing Site
We do not encourage to remove sites, this is because when remove a site, all the historical data related to the site will also be removed. This will bring to a scenario that the data is missing or not tally. If you are sure that all the data related to the site will no longer be required, then you may refer to the steps below to remove a site.
If the data of the site will still be useful to your company, we recommend you to select Store Closure for Site Profile.
-
Click on Settings > Site > Edit button in Action column of the site to be deleted to access the specific Site page.
-
Complete the process by clicking on the Delete Site button at the bottom right corner of the page.
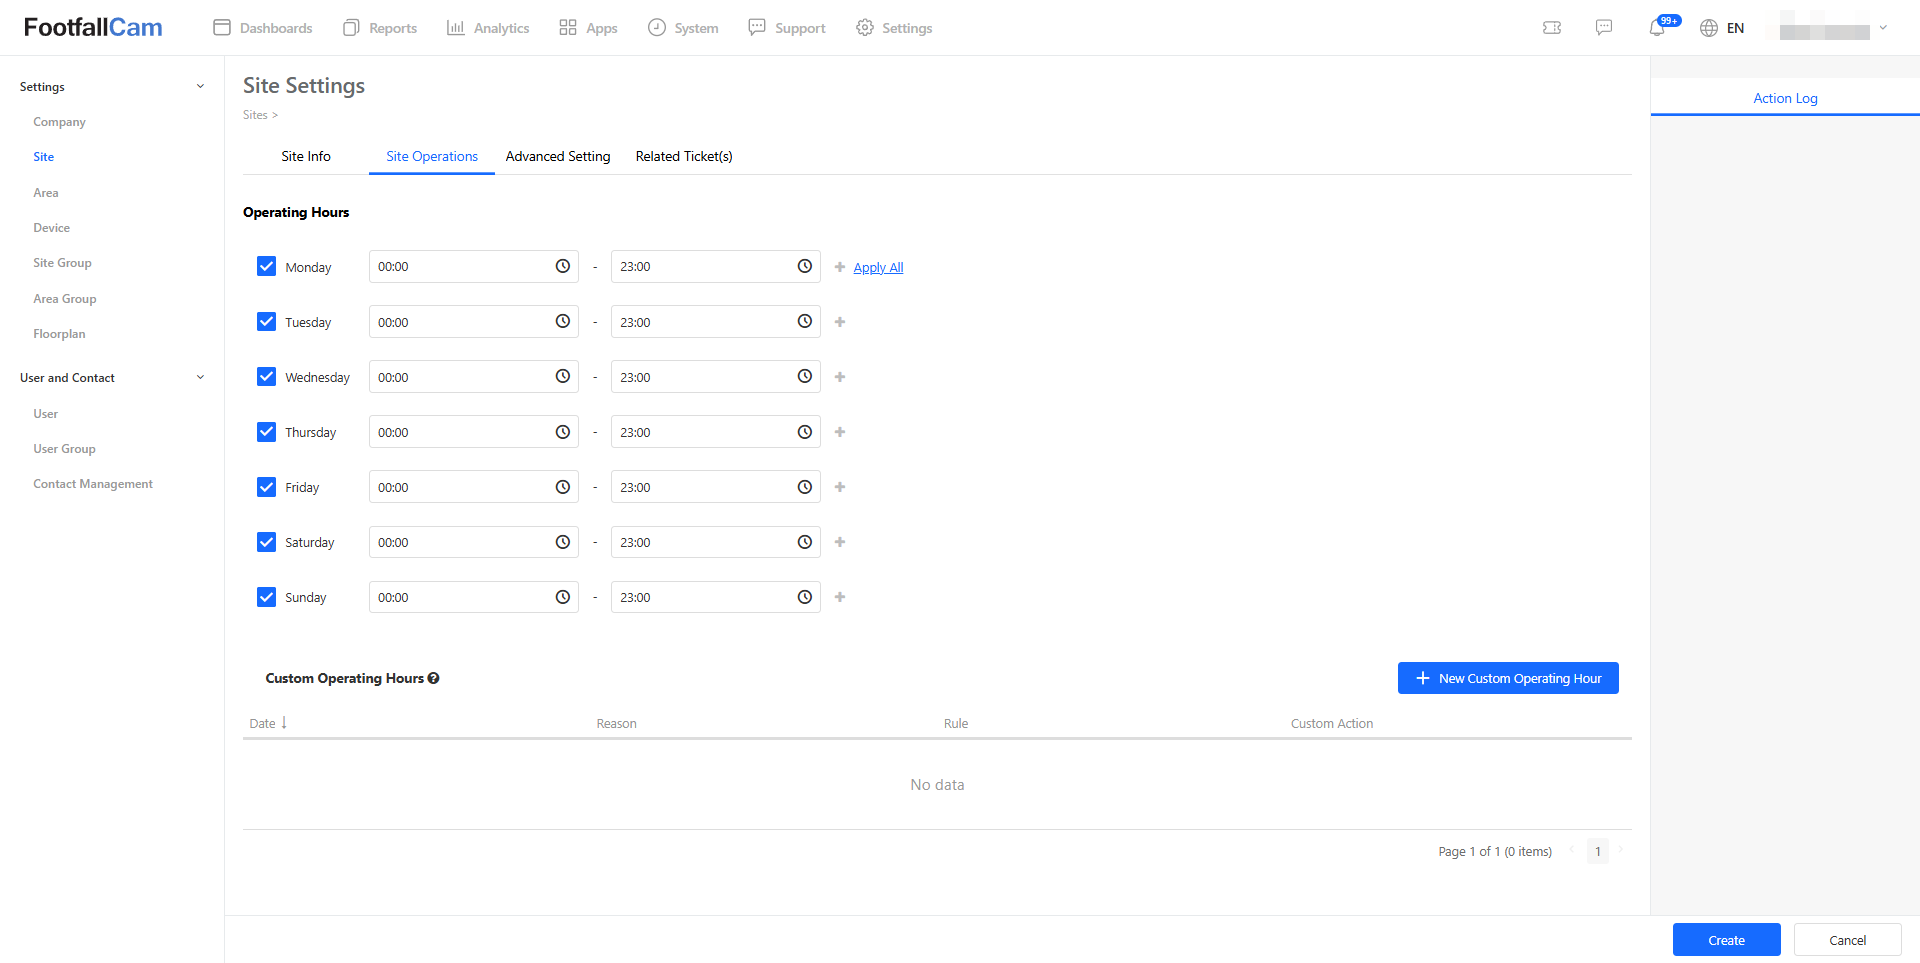
2.1.2.3 How to Modify Operating Hours of Site
Users who would like to update their operating hours in their existing store may do so with an Admin account.
Basic operating hour indicates one operating hour only for a day.
-
Click on Settings > Site > Edit button in Action column to access Sites page.
-
Navigate to the Operating Hours section and amend the operating hours as desired.
-
Complete the process by clicking on Save button on the bottom right of the page.

2.1.2.4 How to Set Up Multiple Operating Hours
Multiple Operating Hour indicates a maximum of two operating hours for a day.
-
Click on Settings > Site > Edit button in Action column to access Sites
-
Navigate to the Operating Hours To create multiple operating hours, users may click on + icon at the end of each row of day.
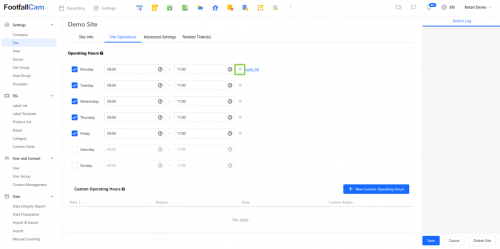

-
Complete the process by clicking on Save button on the bottom right of the page.

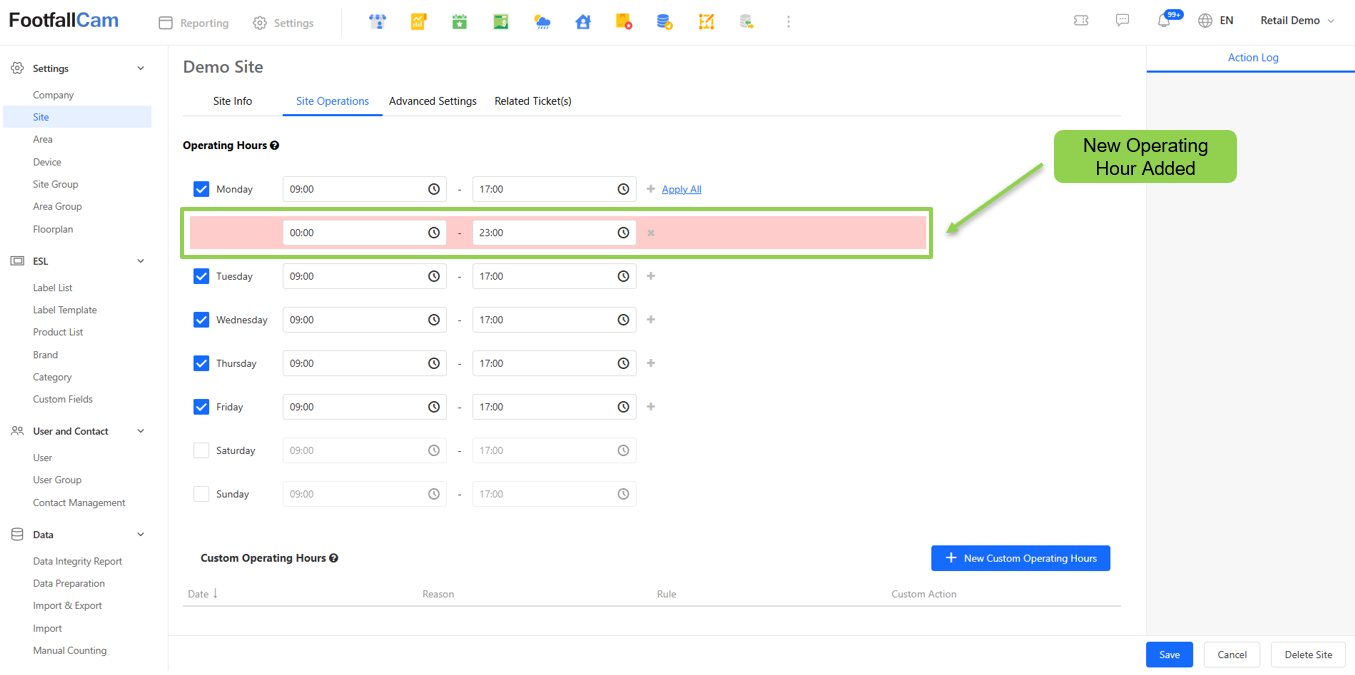
2.1.2.5 How to Set Up Custom Operating Hours
Custom Operating Hours are extraordinary configurations of operating hours for a particular date (range). The configuration must be set up 24 hours before the date (range) applied for the setting to take effect. If the custom operating hours for a site are not set despite the site operating beyond the normal operating hours, any detected activity beyond the normal operating hours will be classified as "abnormal data", affecting the accuracy of future calculations and presentations.
The custom operating hours will completely overwrite the existing operating hours.
Example:
A site operates from 0900 hours to 2100 hours on a normal day. The user wishes to extend the operating hours to 2300 hours on Christmas Eve and thus set the custom operating hours for this site on 24/12/2025 to 0900 - 2300 hours.
Important Note:
The custom operating hours overwrite and NOT overlap with the existing operating hours. An extension of 2 hours to a site operating from 0900 to 2100 hours should be set as 0900 to 2300 hours and NOT 2100 to 2300 hours. The latter setting will be interpreted as the site operating only between 2100 and 2300 hours and will cause discrepancies in the site's data.
Step 1 - Click "Settings" in the top navigation bar. Then, under "Settings" in the left navigation bar, click "Site". Then, navigate to the row of the site to edit and click "Edit" on that row.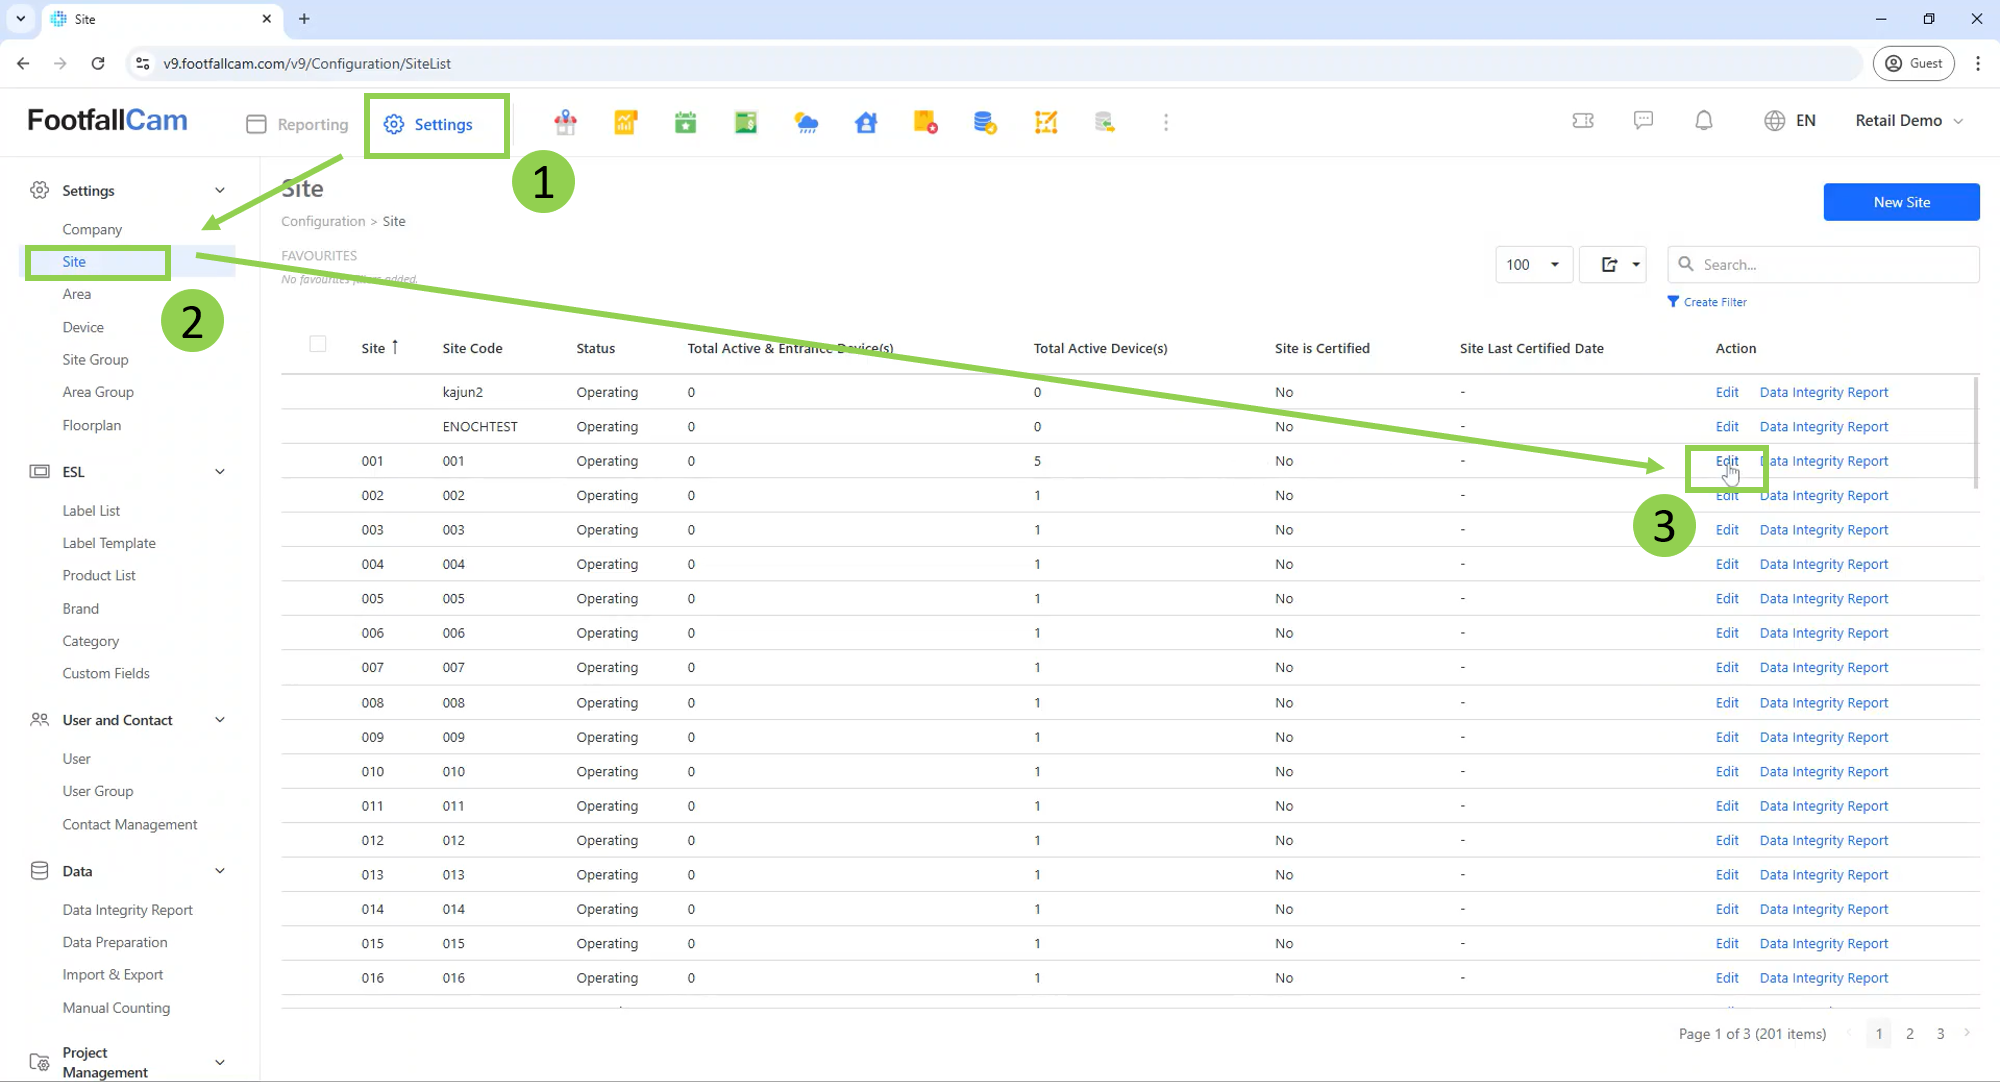
Step 2 - In the "Site Settings" page, click the "Site Operations" tab. Then, click the "New Custom Operating Hour" button.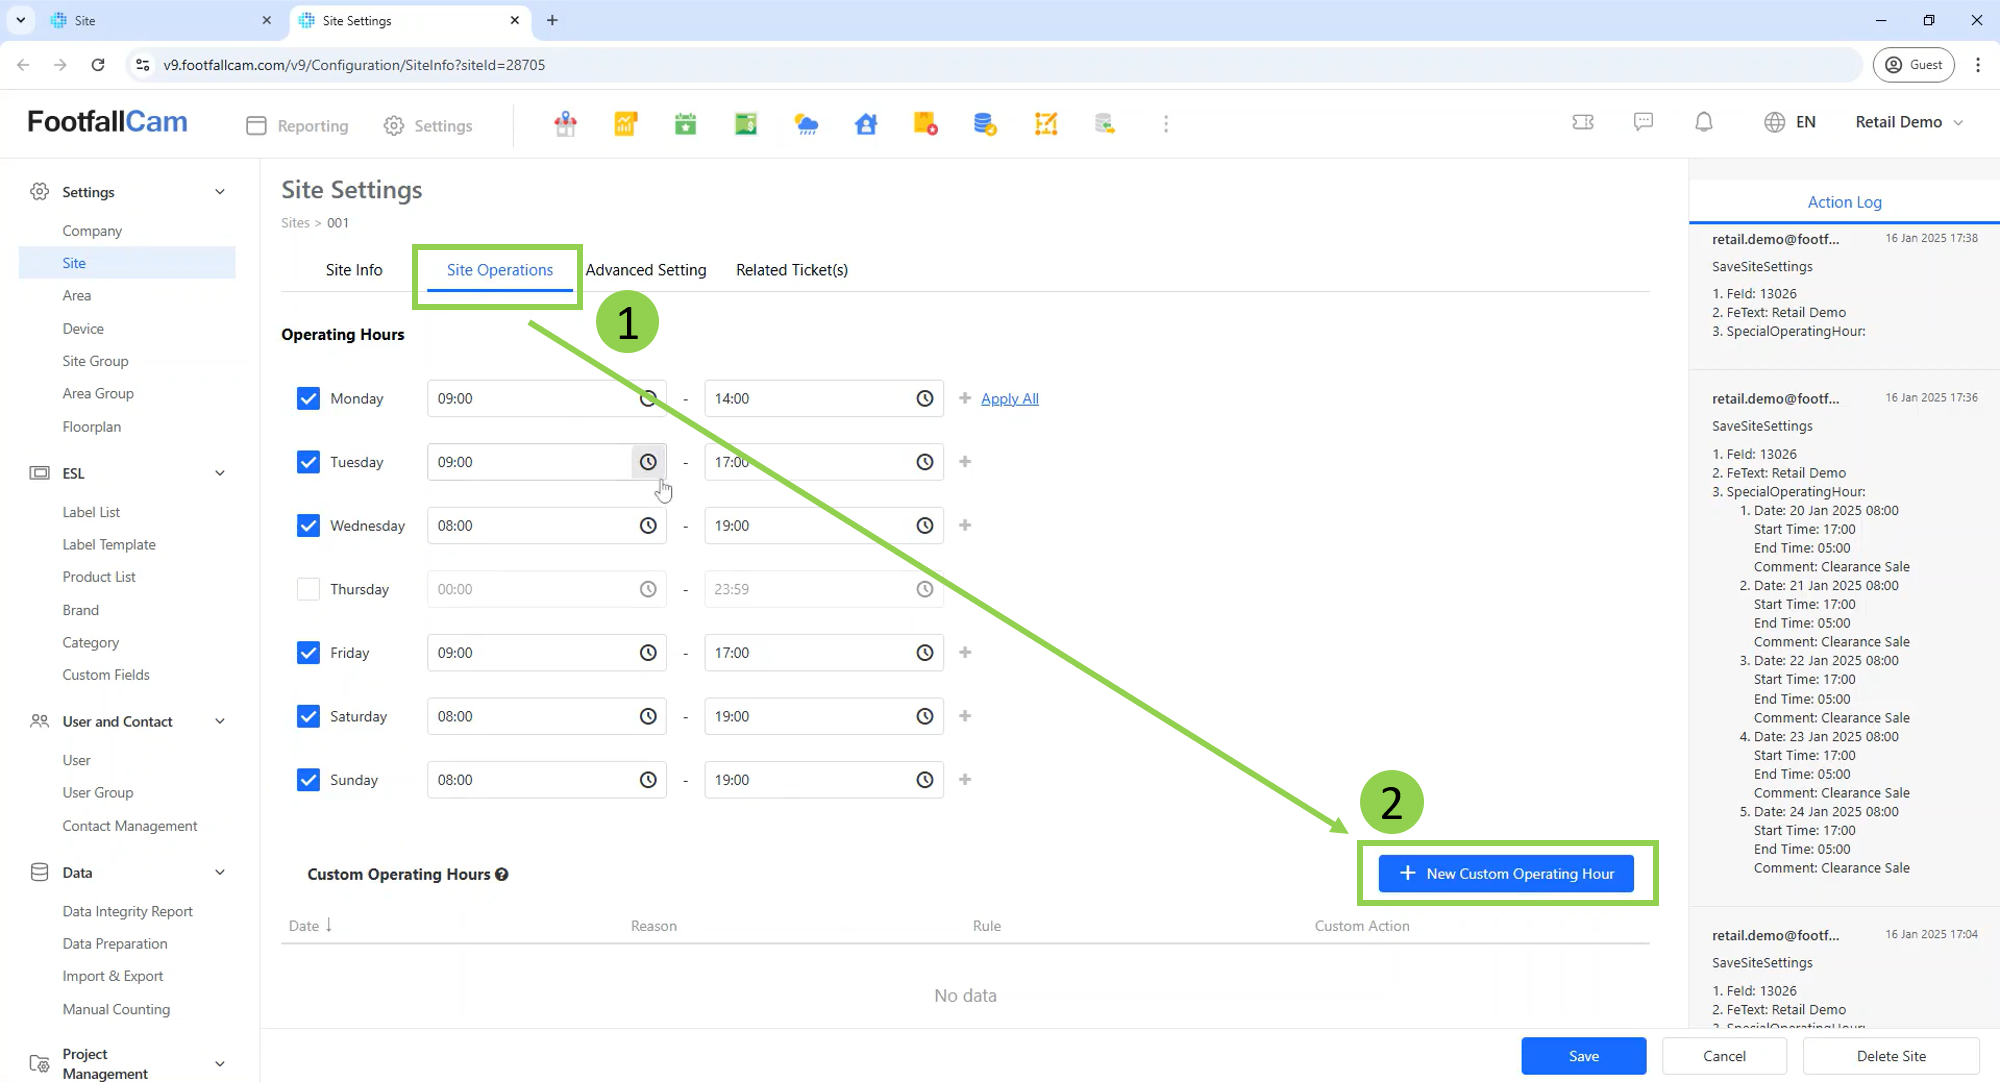
Step 3 - Fill in the form.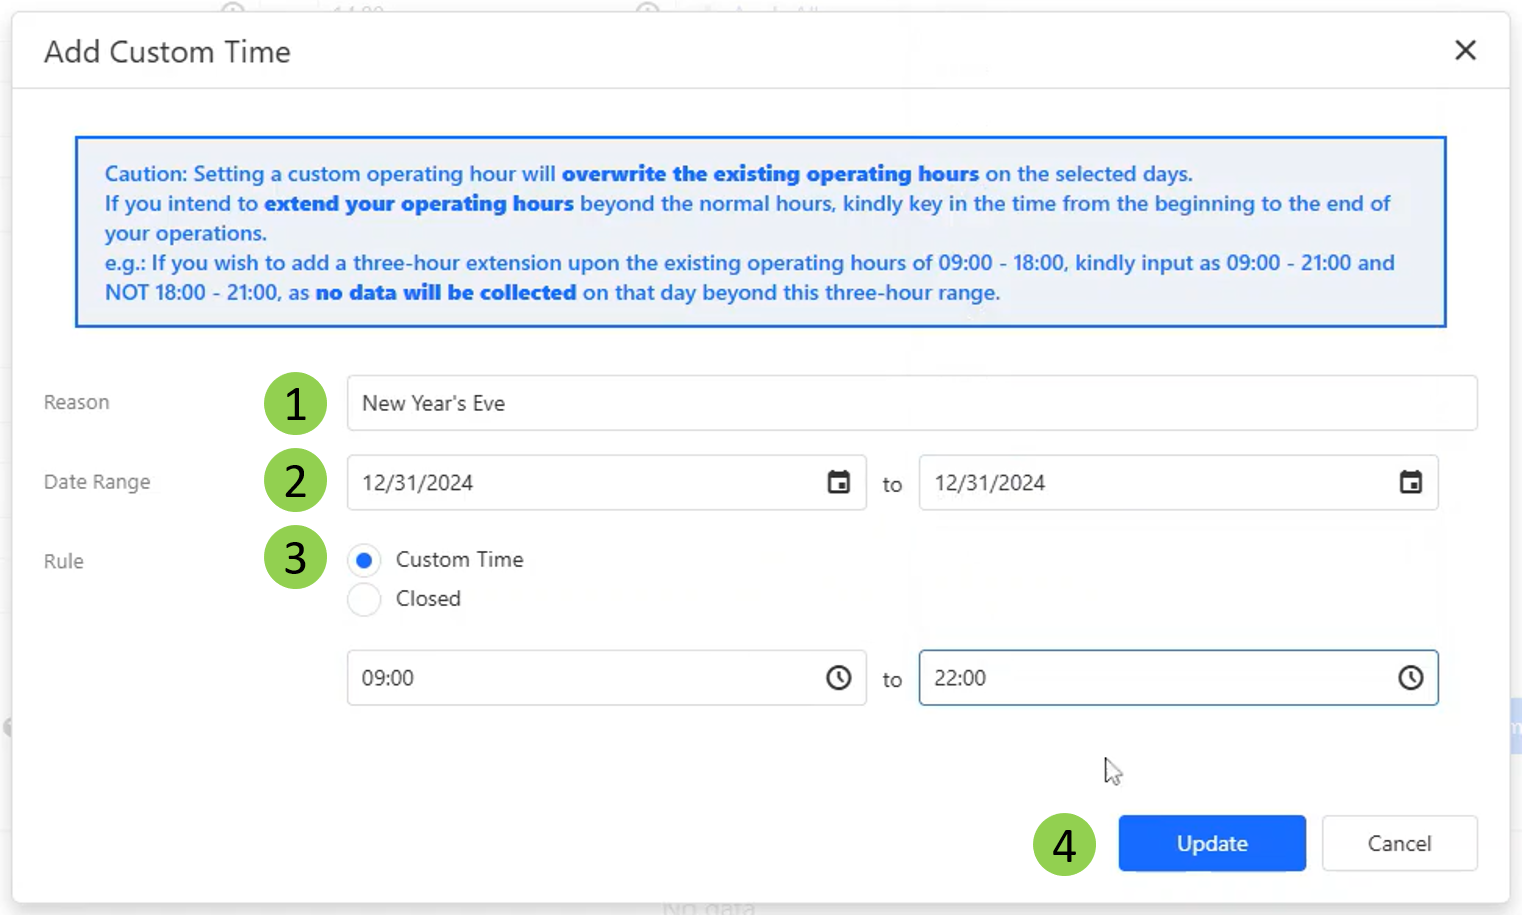
| No. | Item | Description |
| 1 | Reason | Indicates the intention to configure the custom operating hours. |
| 2 | Date Range | The two fields are for the start date and the end date of the customisation respectively. If the customisation only affects one day, set both fields as the same date. |
| 3 | Rule |
Select the desired setting. If the site will not be operating, contrary to the normal operating hours, select "Closed". Otherwise, select "Custom Time". If you have selected "Custom Time", you may now fill in the two fields with the start and end time of the day's/date range's operation. |
| 4 | Update | Click "Update" after filling out the form to complete the settings. |
Step 4 - Observe that a row has been created for your custom operating hours. Now, click "Save" to apply your changes to this site.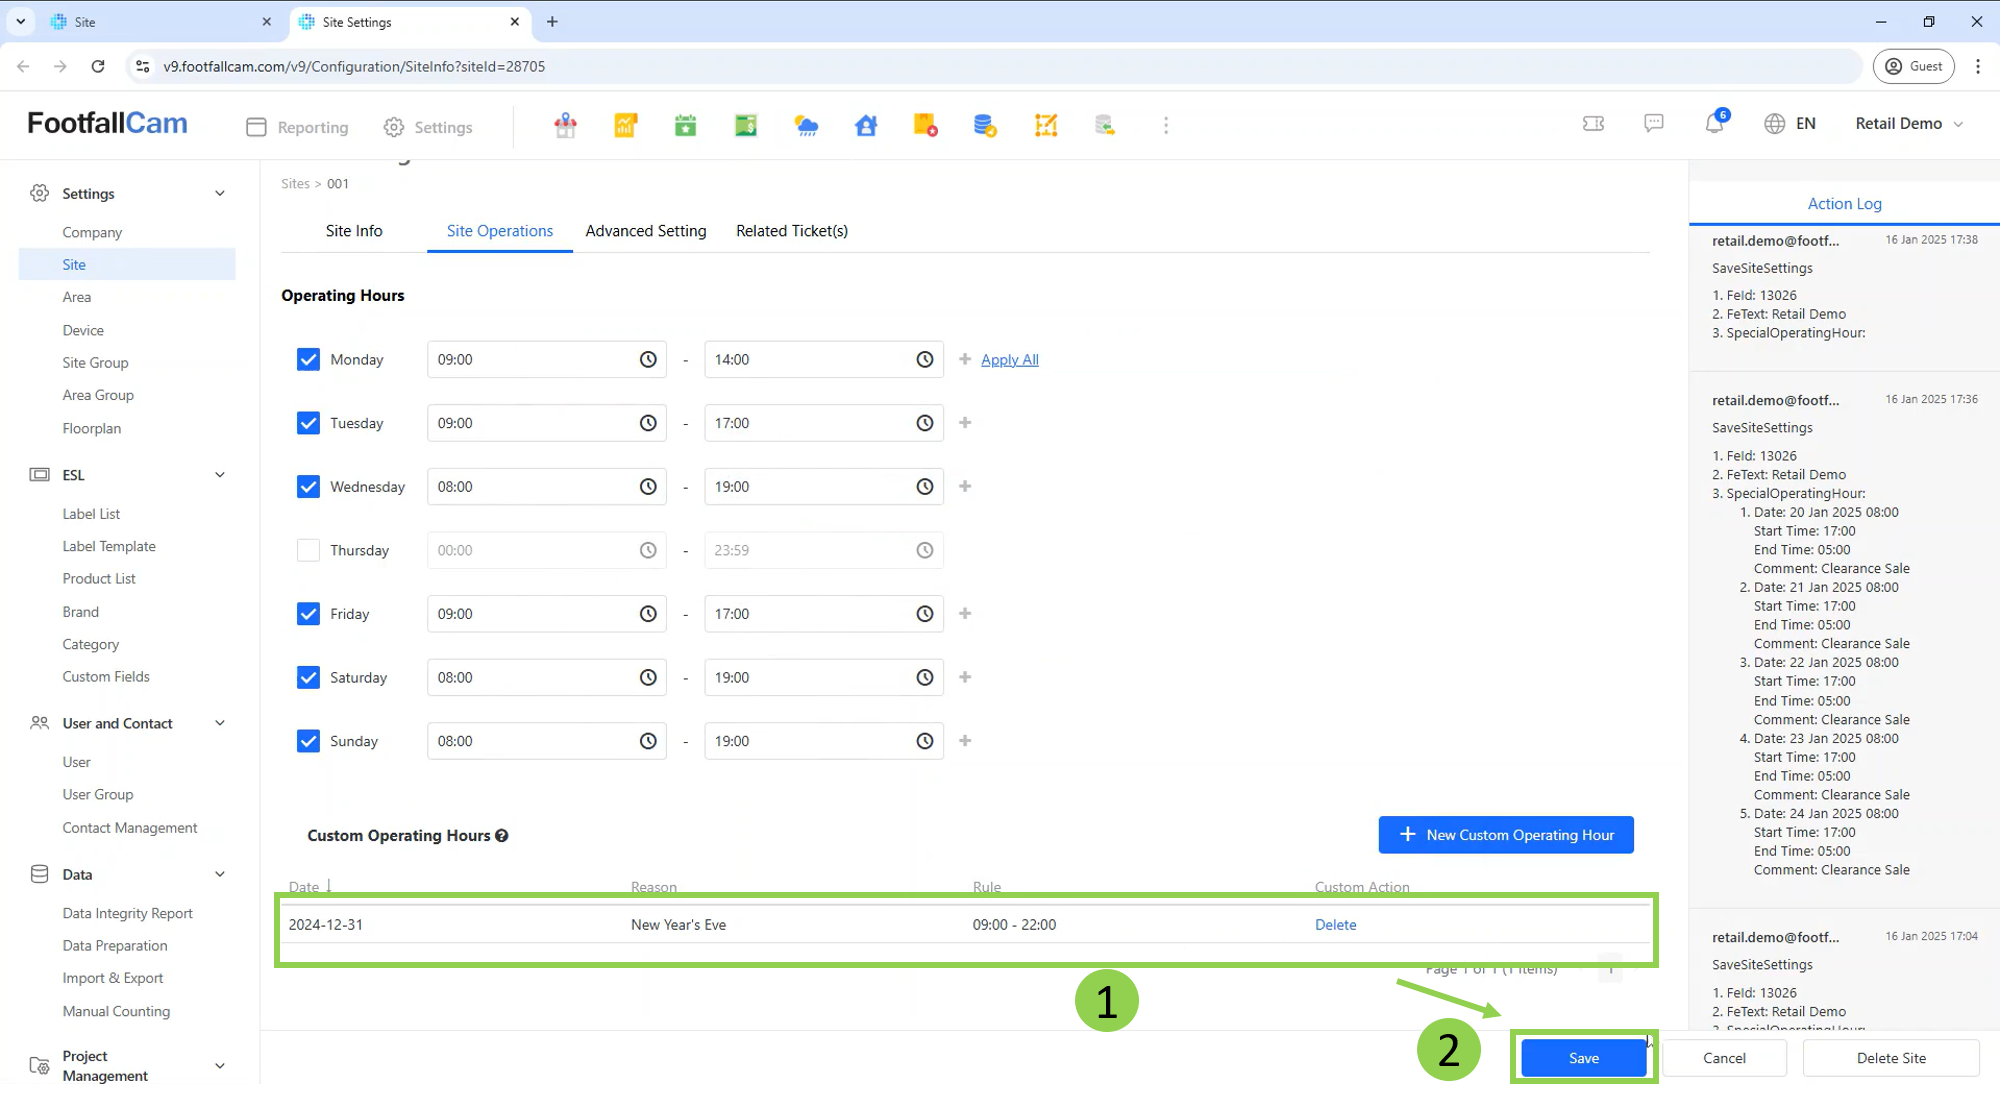
Step 5 - If you wish to remove any unwanted custom operating hours, click "Delete" on that corresponding row and click "Save" to apply your changes.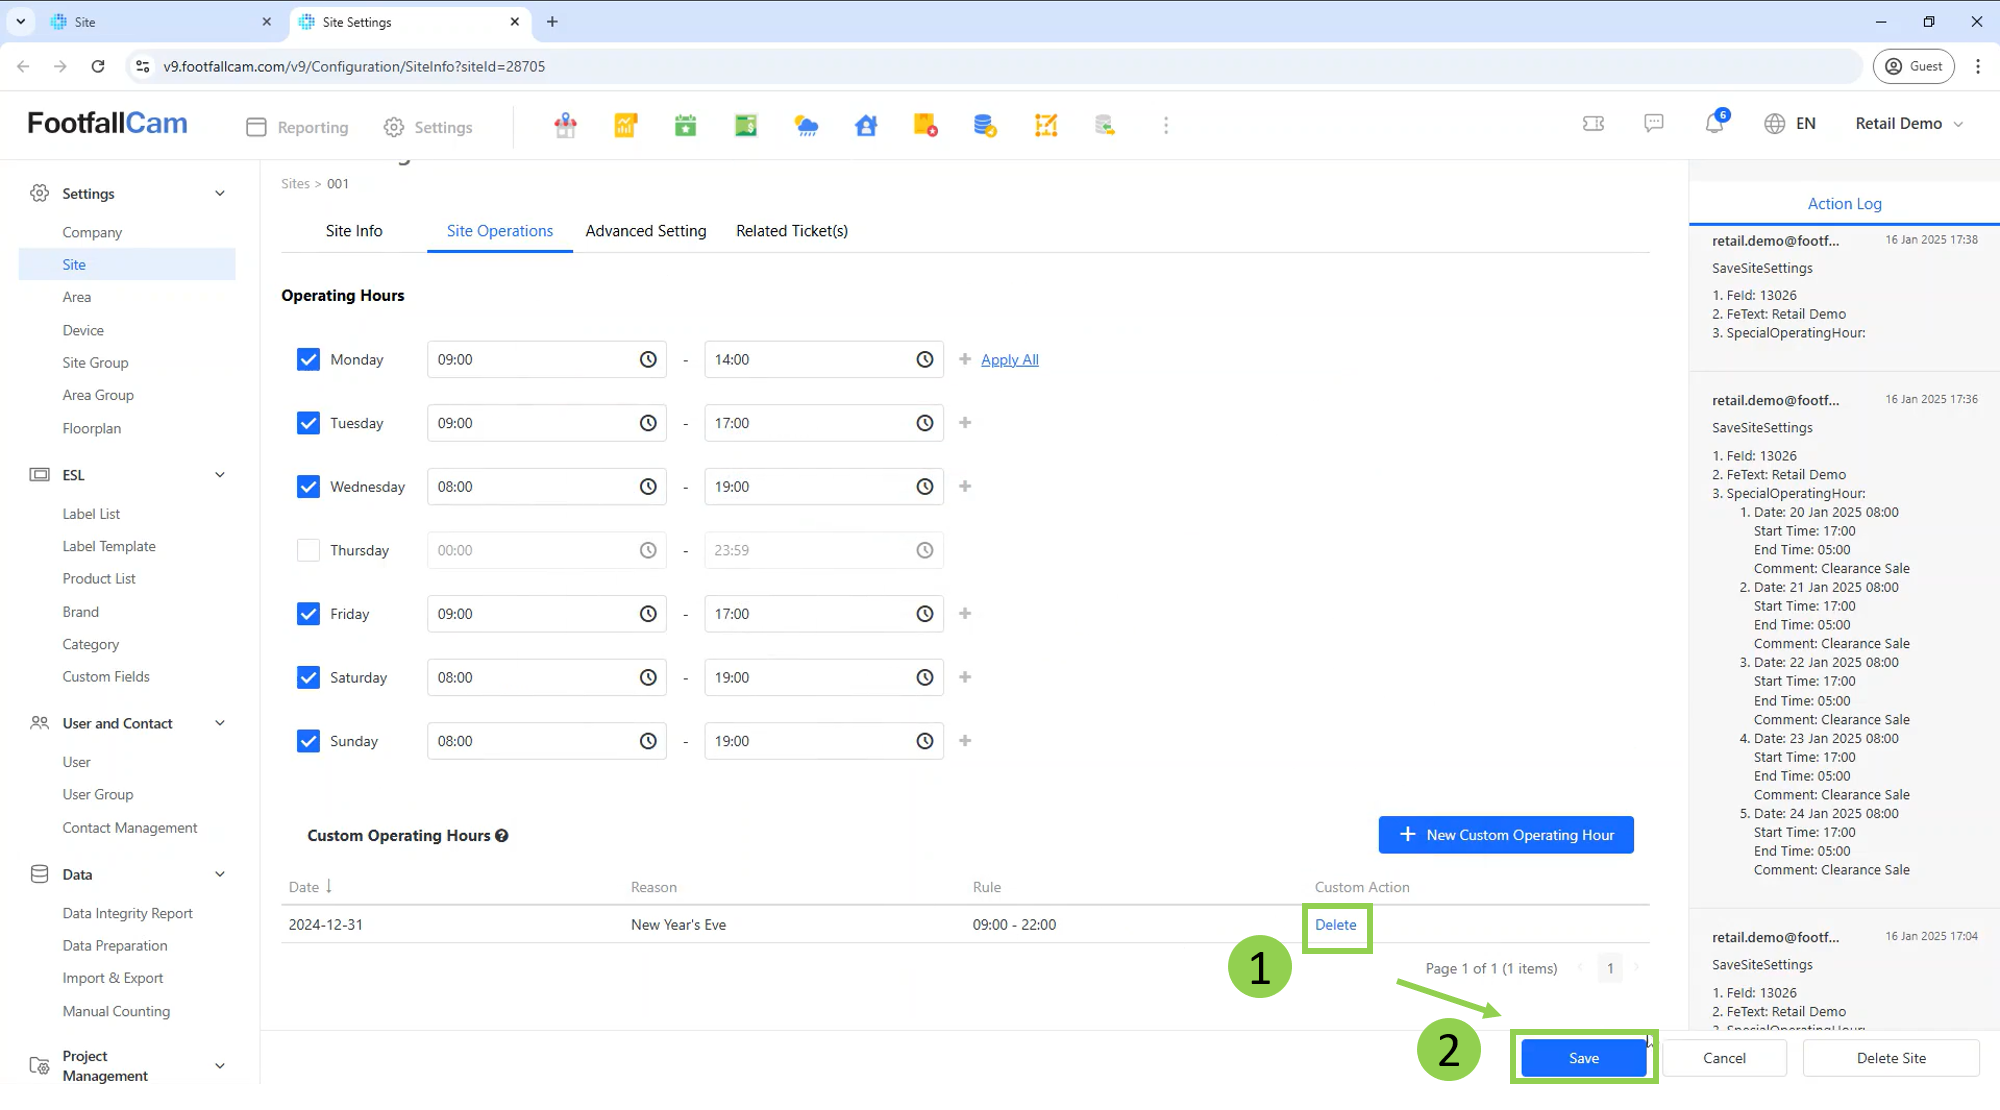
2.1.3 Site Group Settings
A retail chain company with multiple sites or multiple stores in different region can have global company views and reports in Analytics Managers. The sites can be group under different categories for the convenient of review by the regional manager. To achieve this, site group configuration is required to categorize the site within the same site group.
2.1.3.1 How to Create Site Group
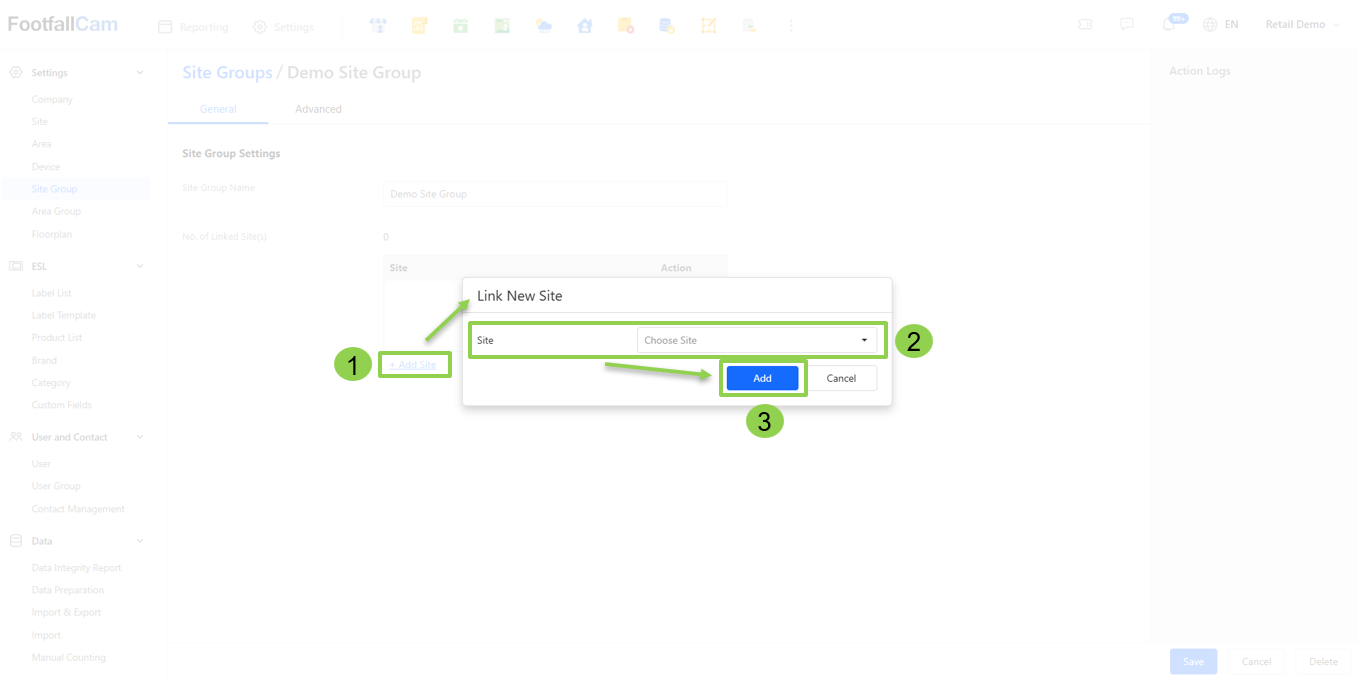
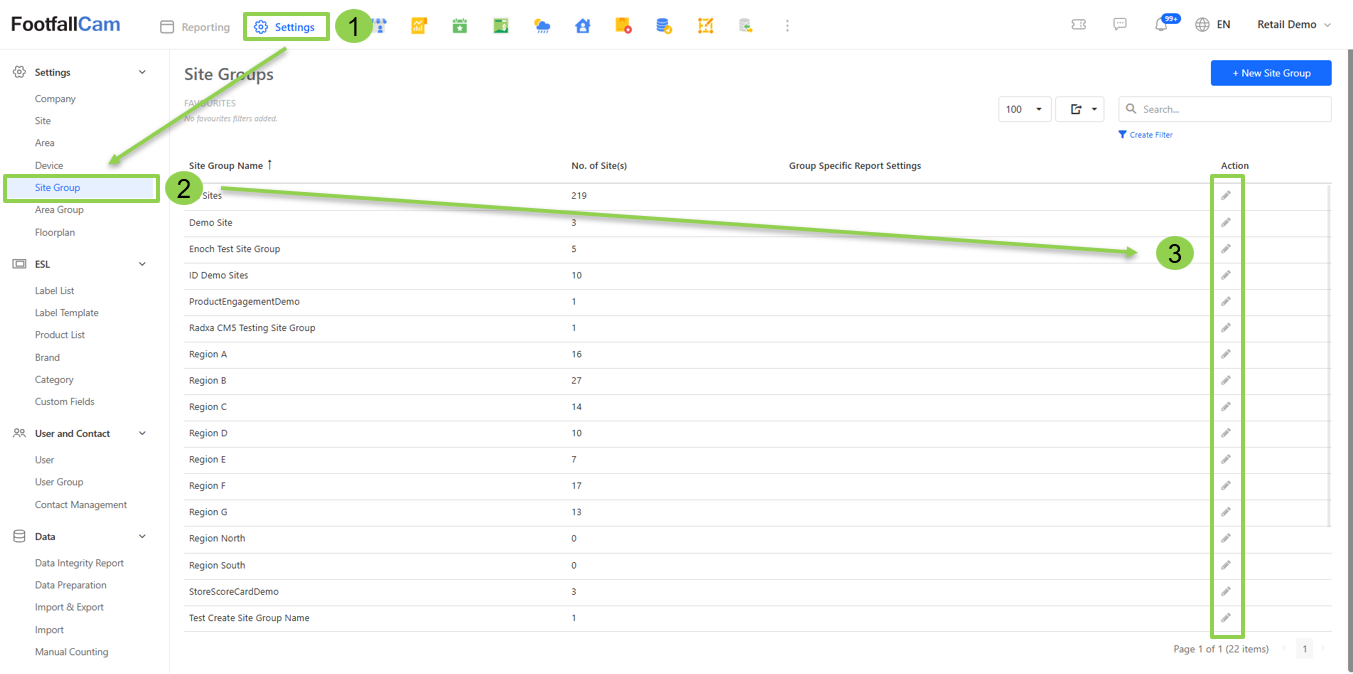
Step 1 - Go to Settings > Site Group to access the site group list.
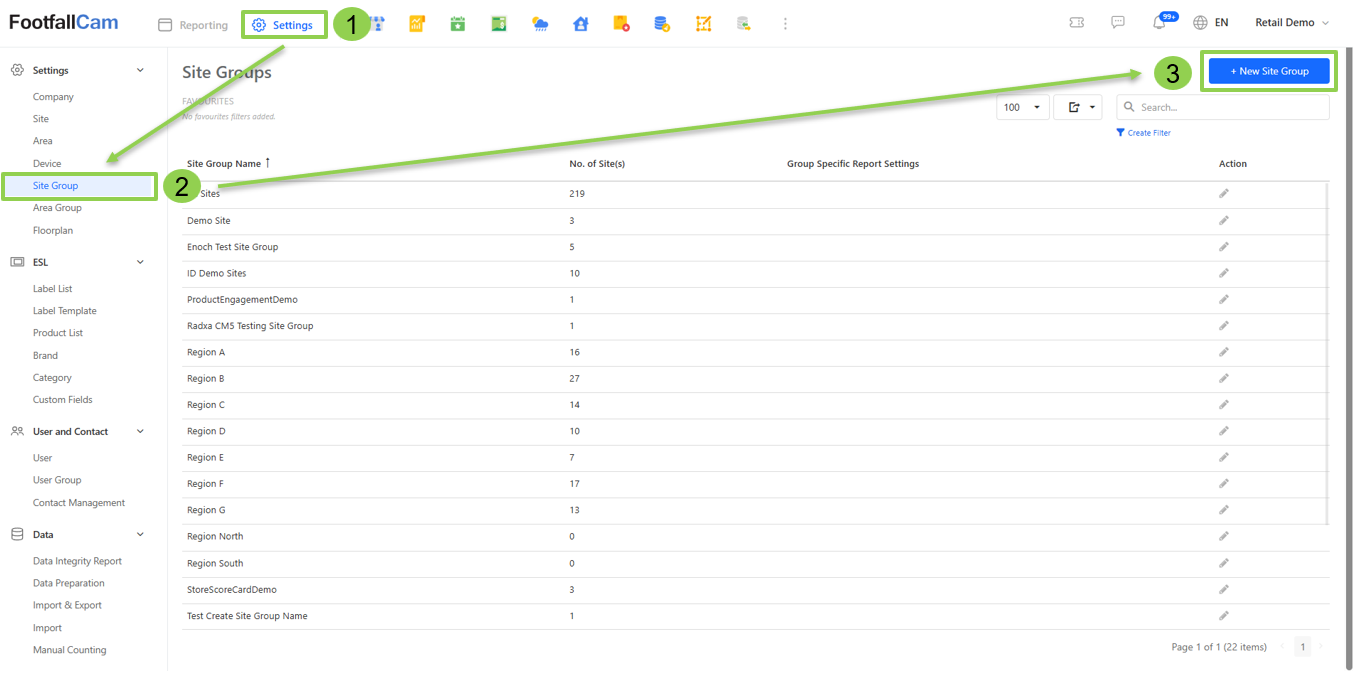
Step 2 - Click on the "+ New Site Group" button and update the site group name, then click the create button to create site group.
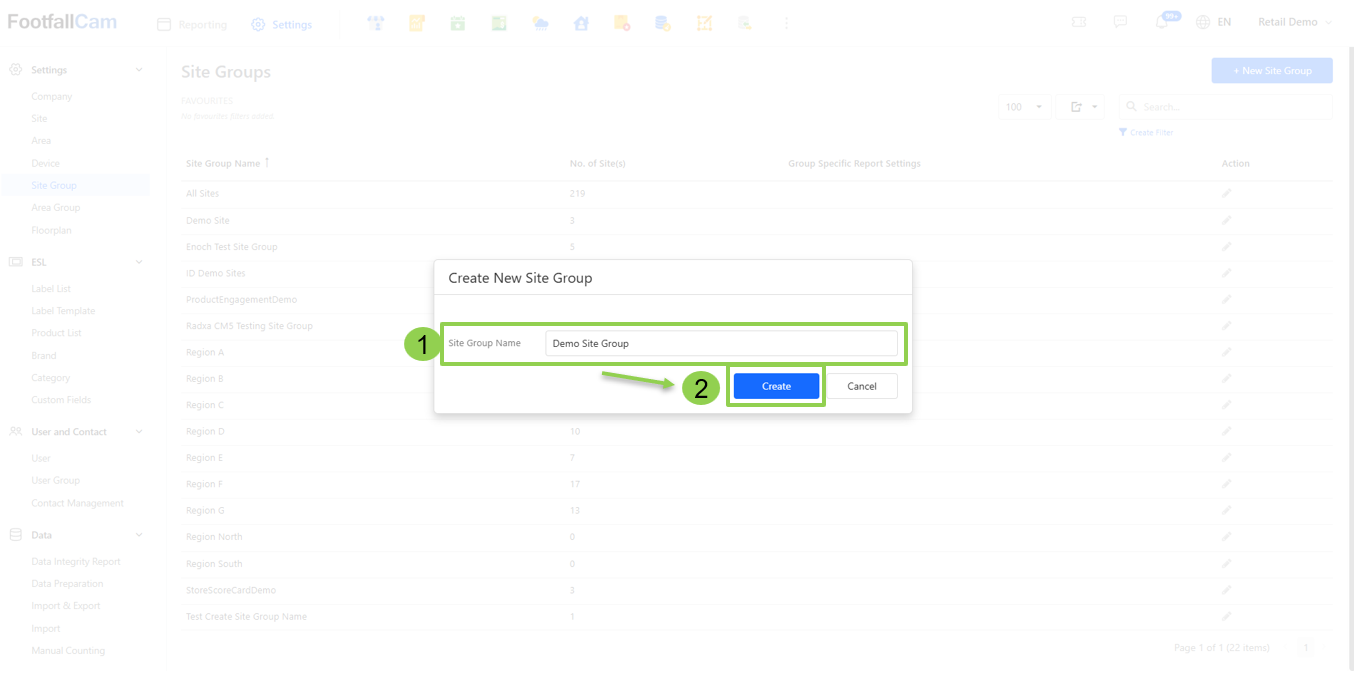
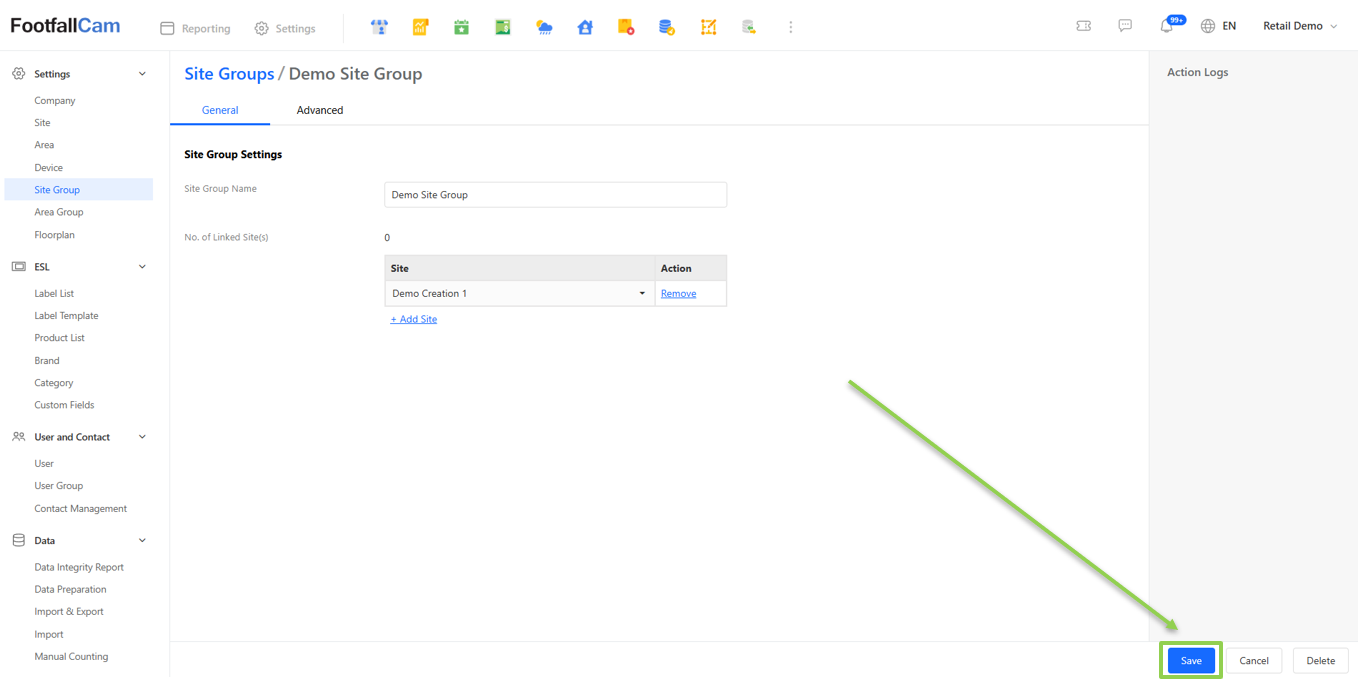
Step 3 - Update the linked site(s) and click "Save" button to save the changes.
Step 4 - Under "Advanced", there are customize site group report settings can be added.
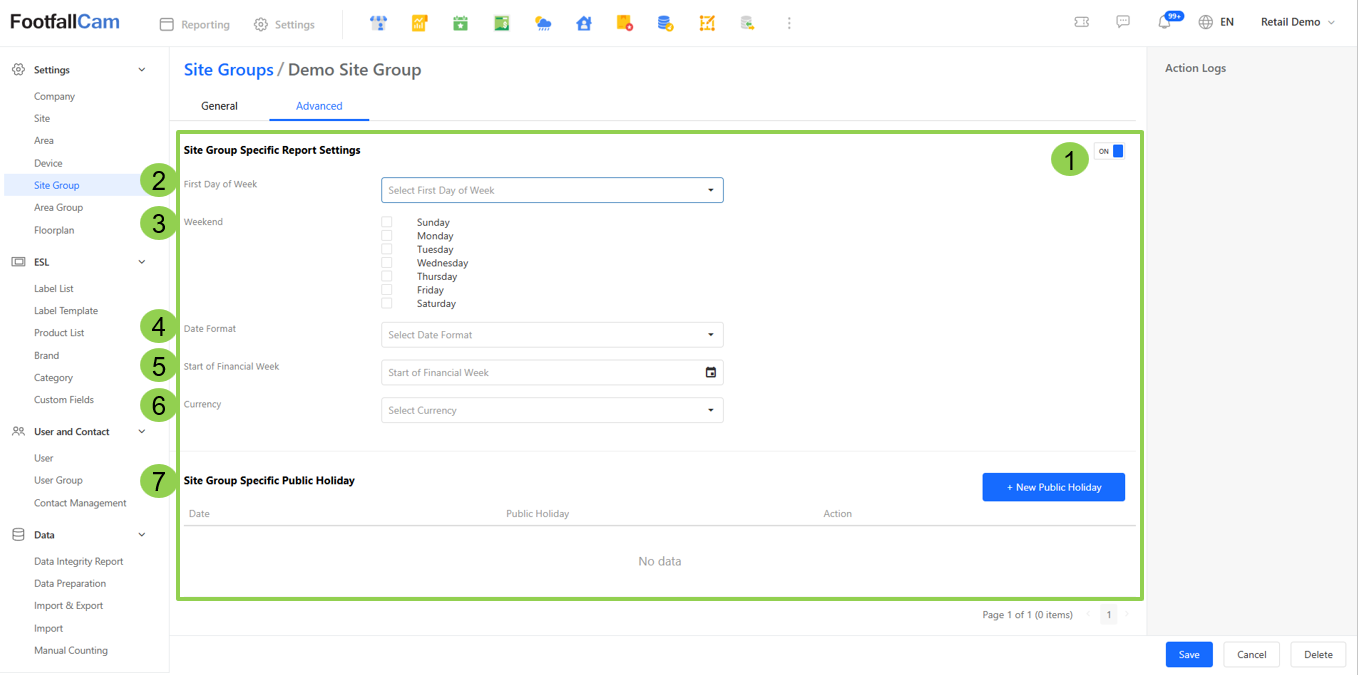
|
Item |
Description |
| 1. Advance Setting Toggle Switch | The toggle to enable or disable the custom site group specific report settings. |
| 2. First Day of Week | The first day of the week, reference for weekly number. |
| 3. Weekend | Weekend for the site group, to provide weekday and weekday & public holiday distribution in dashboard. |
| 4. Date Format | The date format show on dashboards and reports. |
| 5. Start of Financial Week | The starting of financial week. |
| 6. Currency | The currency for the site group. |
| 7. Site Group Specific Public Holiday | To add custom public holidays for the site group |
2.1.3.2 How to Update Site Group
Similarly to area group, the linked sites can be updated in both site settings and site group settings, but advance site group settings can only be updated in site group settings.
2.1.3.2.1 Update in Site Group Settings
Step 1 - Go to Settings > Site Group to view the existing site group list, click on the pen icon to edit the site group details.
Step 2 - Update the linked site(s) or advanced settings, then click on the "Save" button to save the changes.

2.1.3.2.2 Update Site Settings
Step 1 - Go to Settings > Site to view the existing site list and click on the pen icon to edit the site details.
Step 2 - Update the site group tagging and click on the "Save" button to save the changes.
2.1.3.3 How to Delete Site Group
Step 1 - Go to Settings > Site Group to view the existing site group list, click on the pen icon to edit the site group details.
Step 2 - Click on the "Delete" button to remove the site group from the server.
2.2 Device Settings
In this section, we will brief through on the set up which are related to device, such as ad device, remove device, device setting, device network specifications and some requirements for using our server.
2.2.1 New Device Basic Setting
There are 2 methods of adding new devices, which are add device during installation and ad device from portal manually. The importance of adding all your device on your company portal is to ease the process of managing all the devices, including daily checking on the status of the devices.
2.2.1.1 How to Add Device During Installation
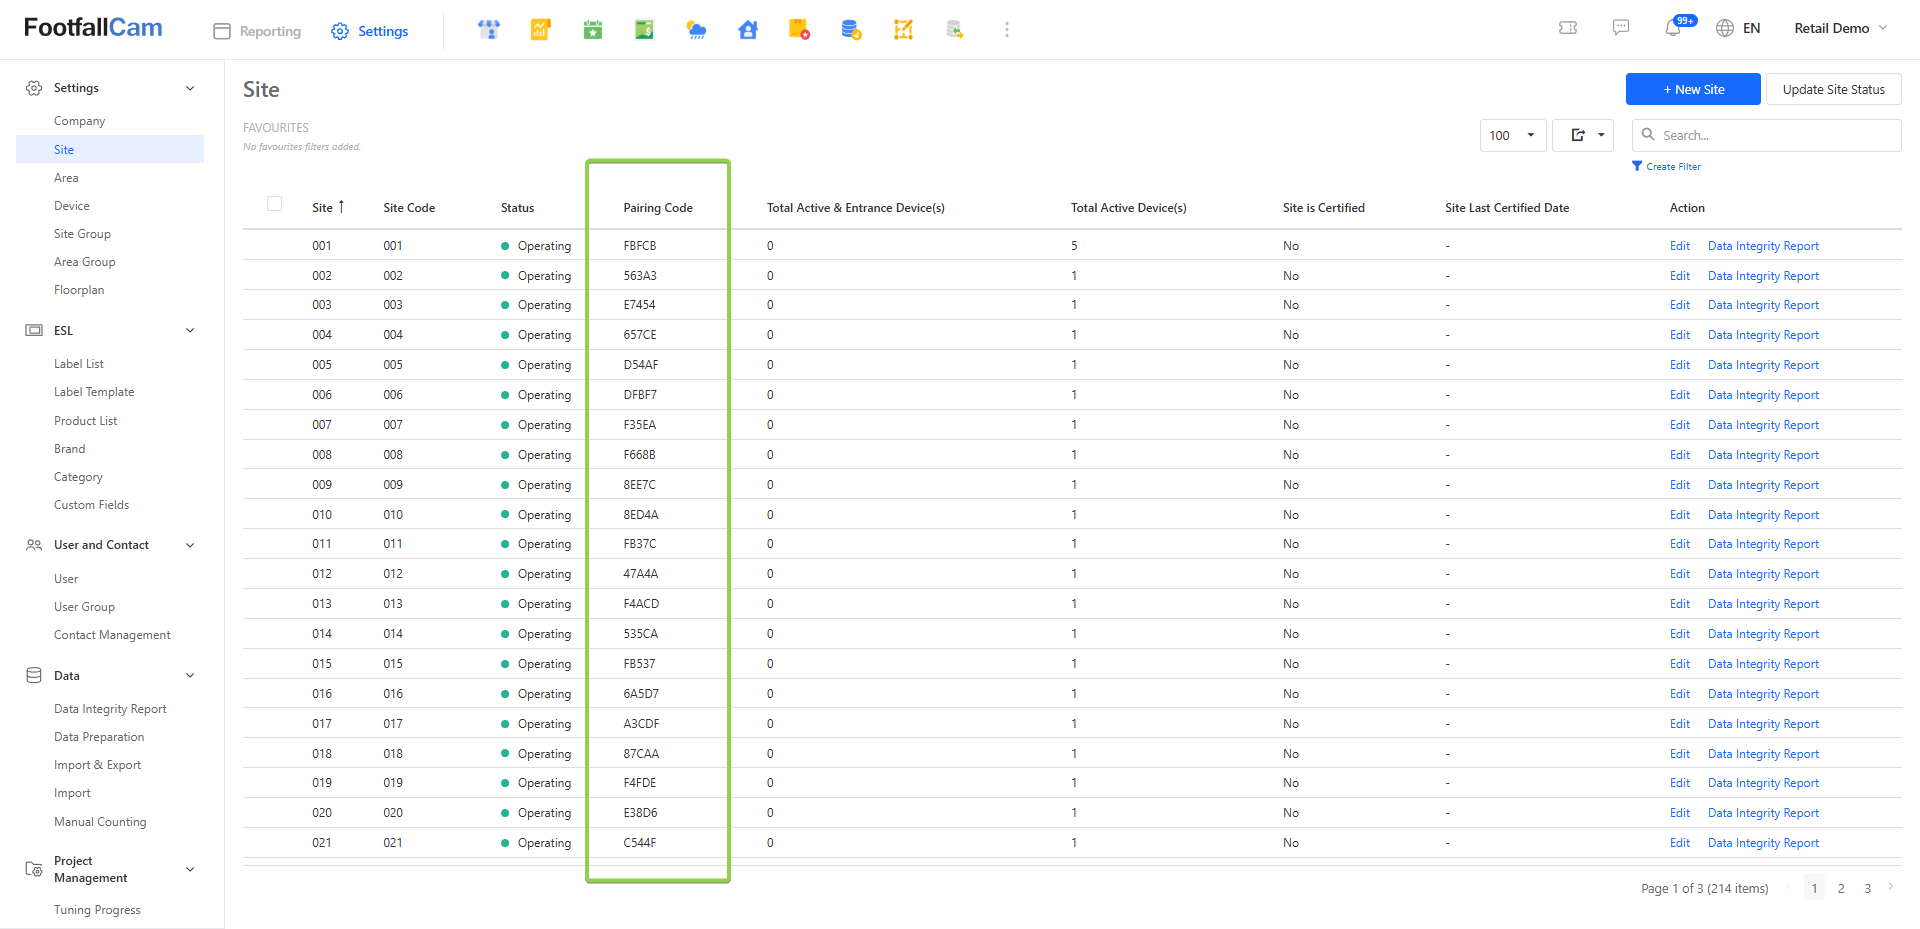
This section is mainly talk about the procedure of adding new device during the device installation by the installer. Customer would need to share the pairing code, which is unique for all site(s) to the installer when doing device installation. Without doing this, the installed device would not attach to any site and the data collected by the device would not reflect in the site report. There are two methods to view the pairing code.
Method 1: Go to Settings > Site, to copy the Pairing Code columns in the treeview and share with your installer during their installation.
Method 2:
Step 1 - Click on Settings > Site > Edit button in the Action column of the newly created site.
Step 2 - Copy the pairing code to share with your installer during their installation. (Site detail must be pre-configure before the installation.)
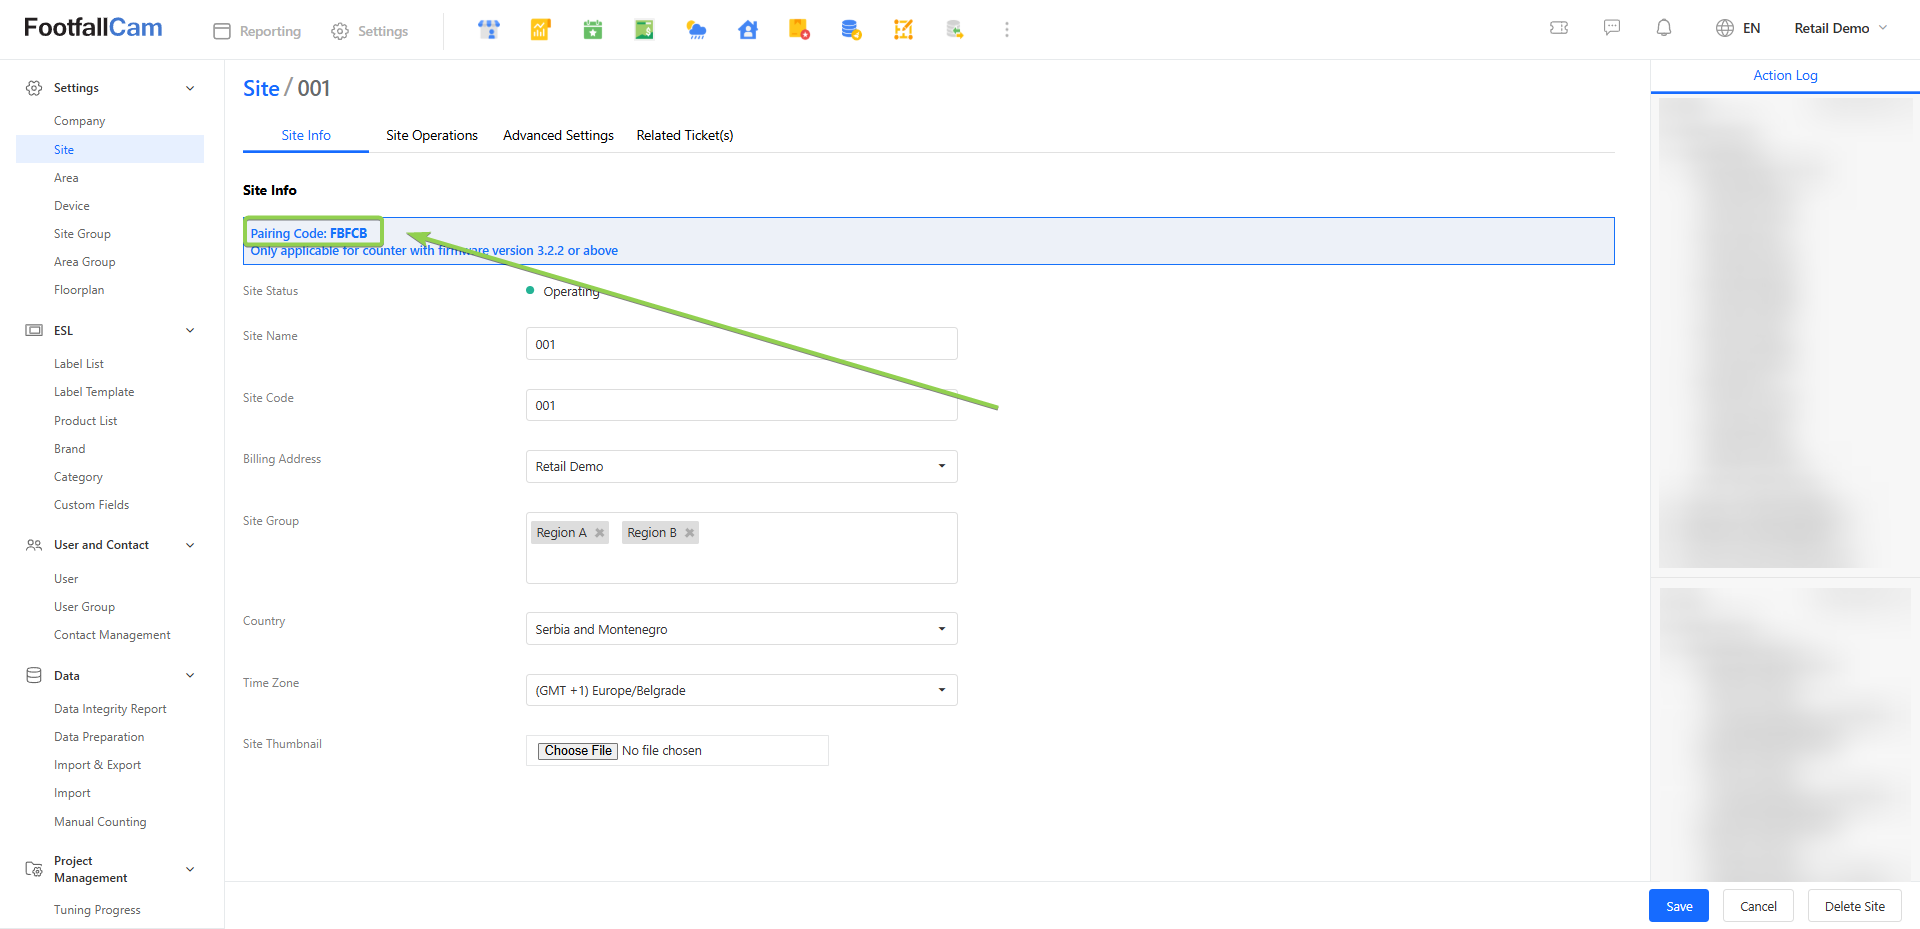
Step 3 - The installer is required to insert the pairing code by following the steps in Device Configuration to pair up the device with the site.
2.2.1.2 How to Manually Add Device from Portal
This section will guide you on the steps to add new device on the FootfallCam Analytic Manager manually after the device installation by the installer. The serial number of the device will be required when adding the device and is able to obtain on the back of the device.
Step 1 - Click on Settings > Device > "+ New Device" button to access the Add Device page.
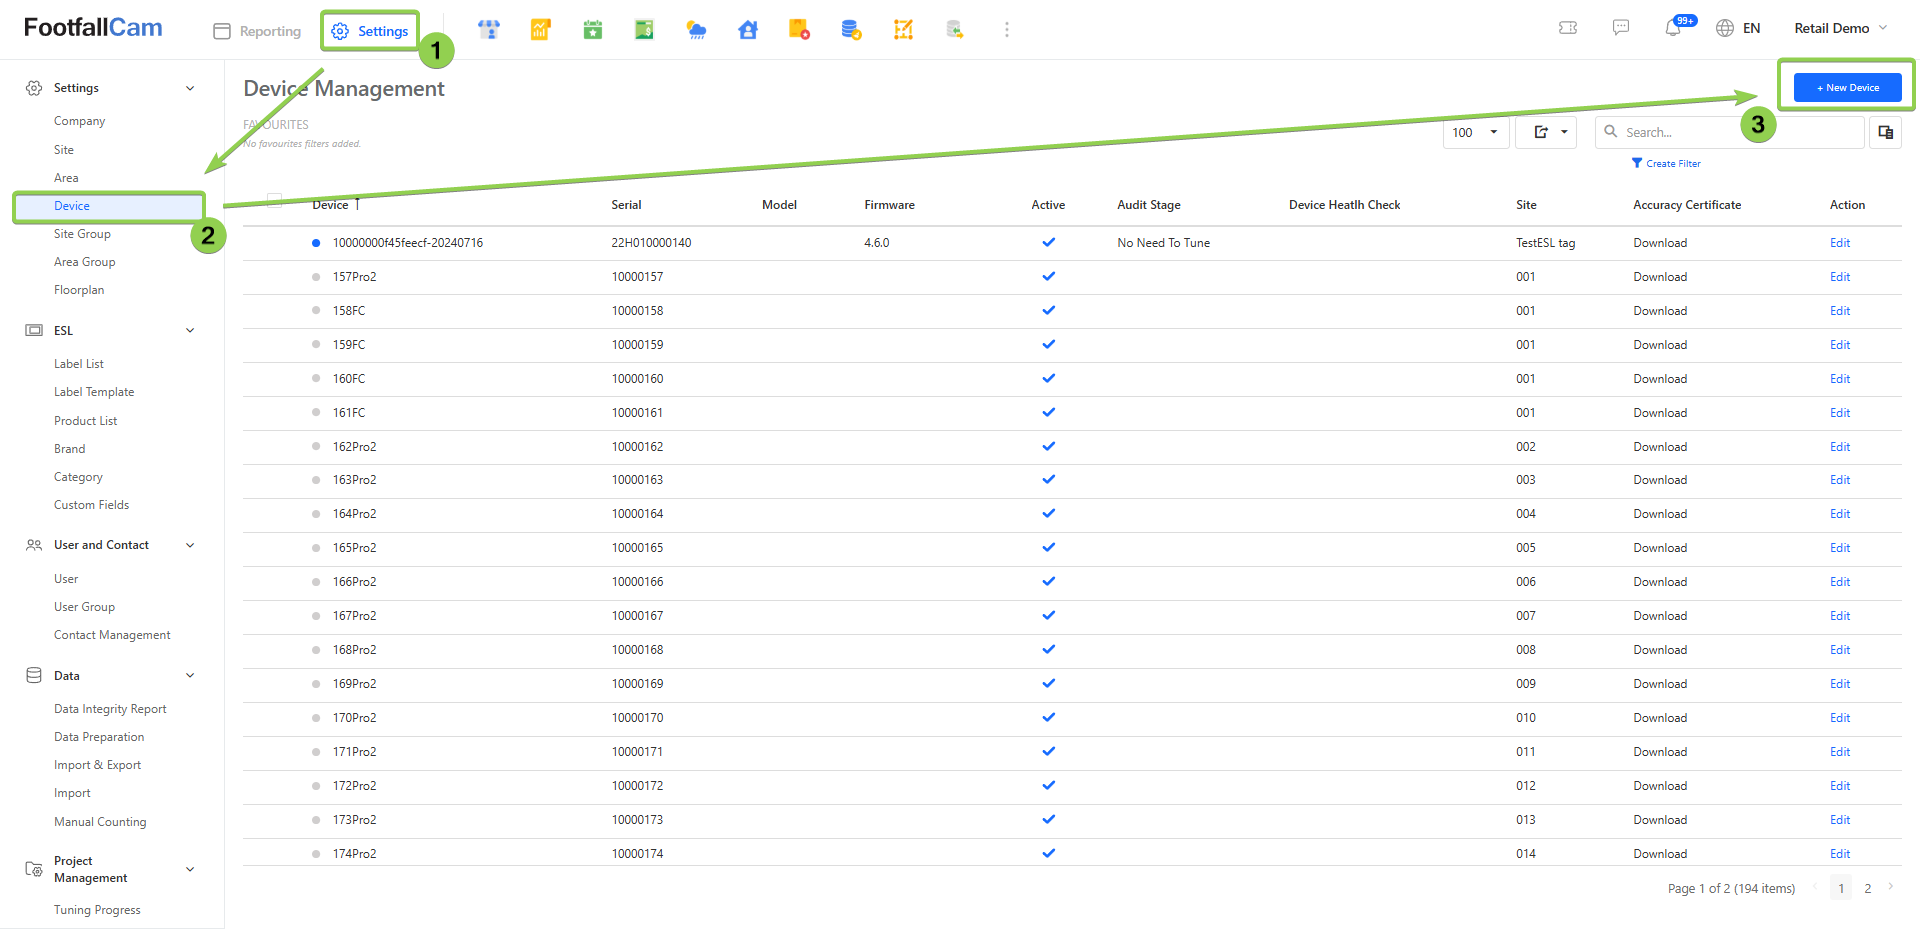
Step 2 - Complete the process by entering all the required fields and click on Submit button.
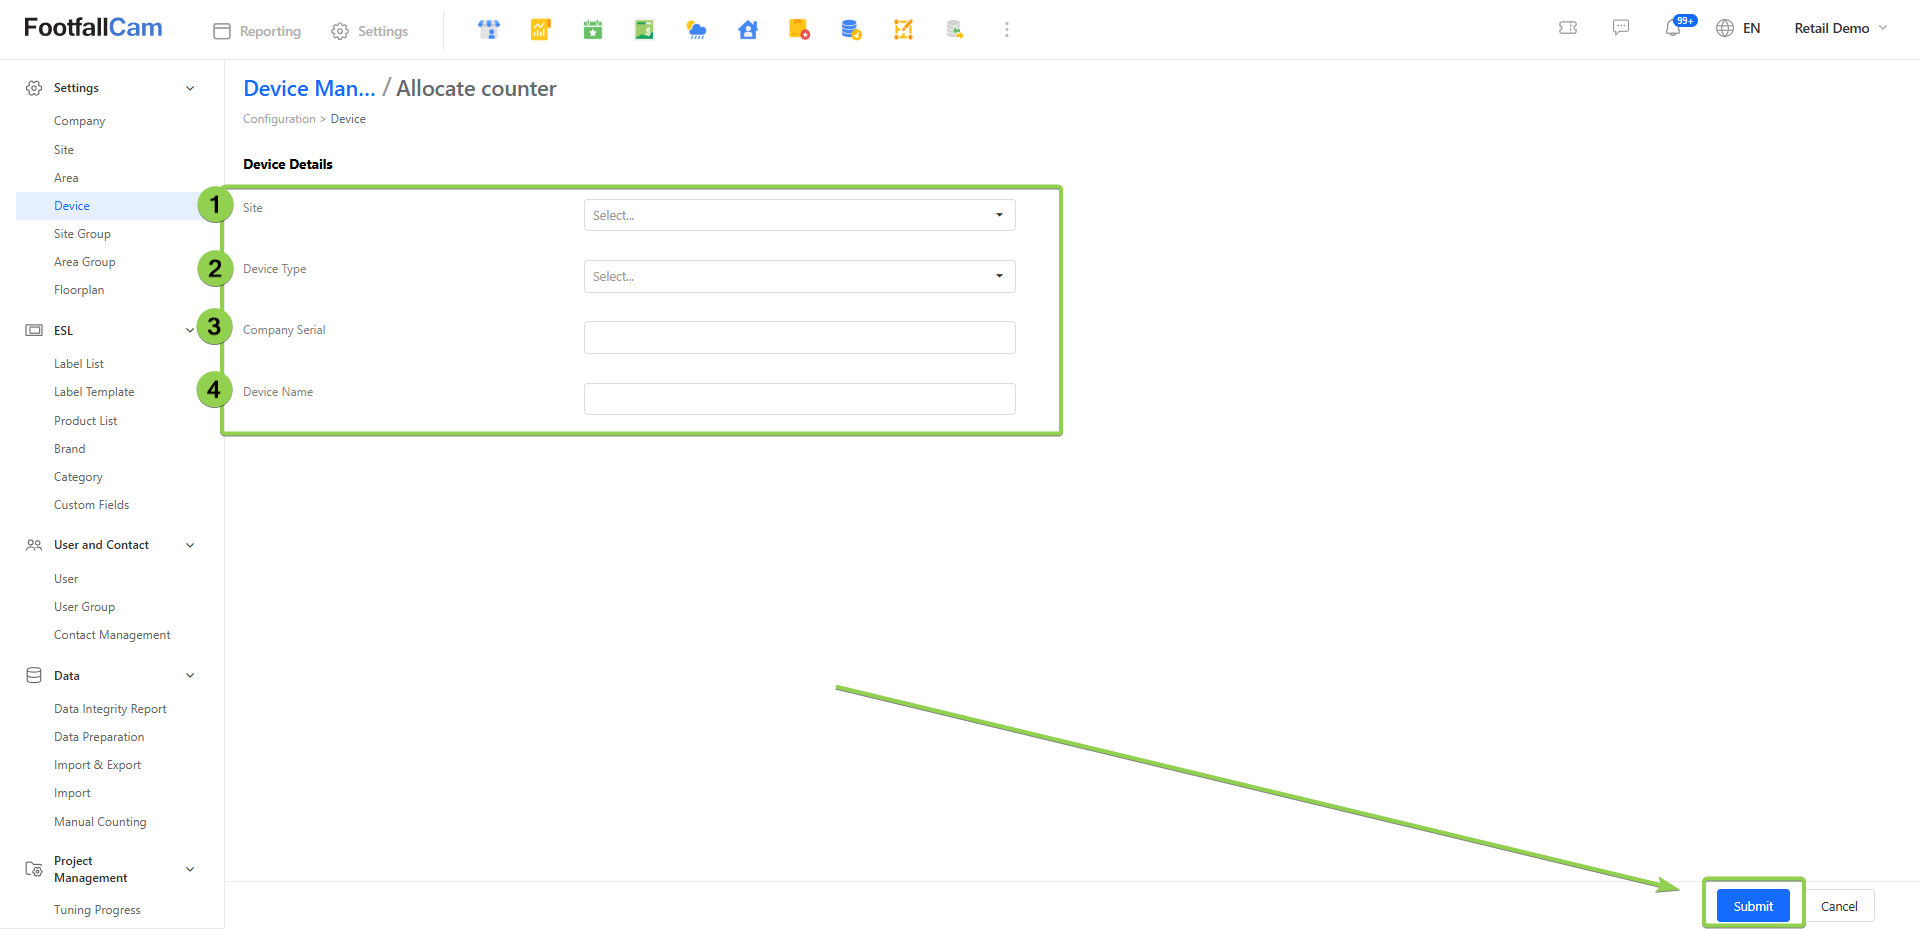
|
Item |
Description |
| 1. Site | Select the site name to add the device. |
| 2. Device Type | Select the device type. |
| 3. Serial |
Enter the device serial or company serial. (Info: Device serial can be obtained at the back of the devices.) |
| 4. Device Name | Enter a preferred device name. |
2.2.1.3 How to Remove Existing Device
Step 1 - Click on Settings > Device > Edit button in the Action column to access the Device page.
Step 2 - Click on Delete button to remove the device.
2.2.1.4 How to Reallocated Device
Step 1 - Please refer to Section 2.2.1.3 How to Remove Existing Device to remove the device you want to reassign.
Step 2 - Once the device has been removed, please refer to Section 2.2.1.2 How to Manually Add Device from Portal to re-add the device to the desired site.
2.2.2 Device Setting Configuration
2.2.2.1 Device Settings Page
In this section, we will talk about the basic setting of the devices. In this device settings page, we have six tag pages.
Click on Settings > Device > Edit button in the Action column of the device to manage to access the Device. To update or modify all the expected field and click Save button to save the changes.
2.2.2.1.1 Device Info
- Device Info
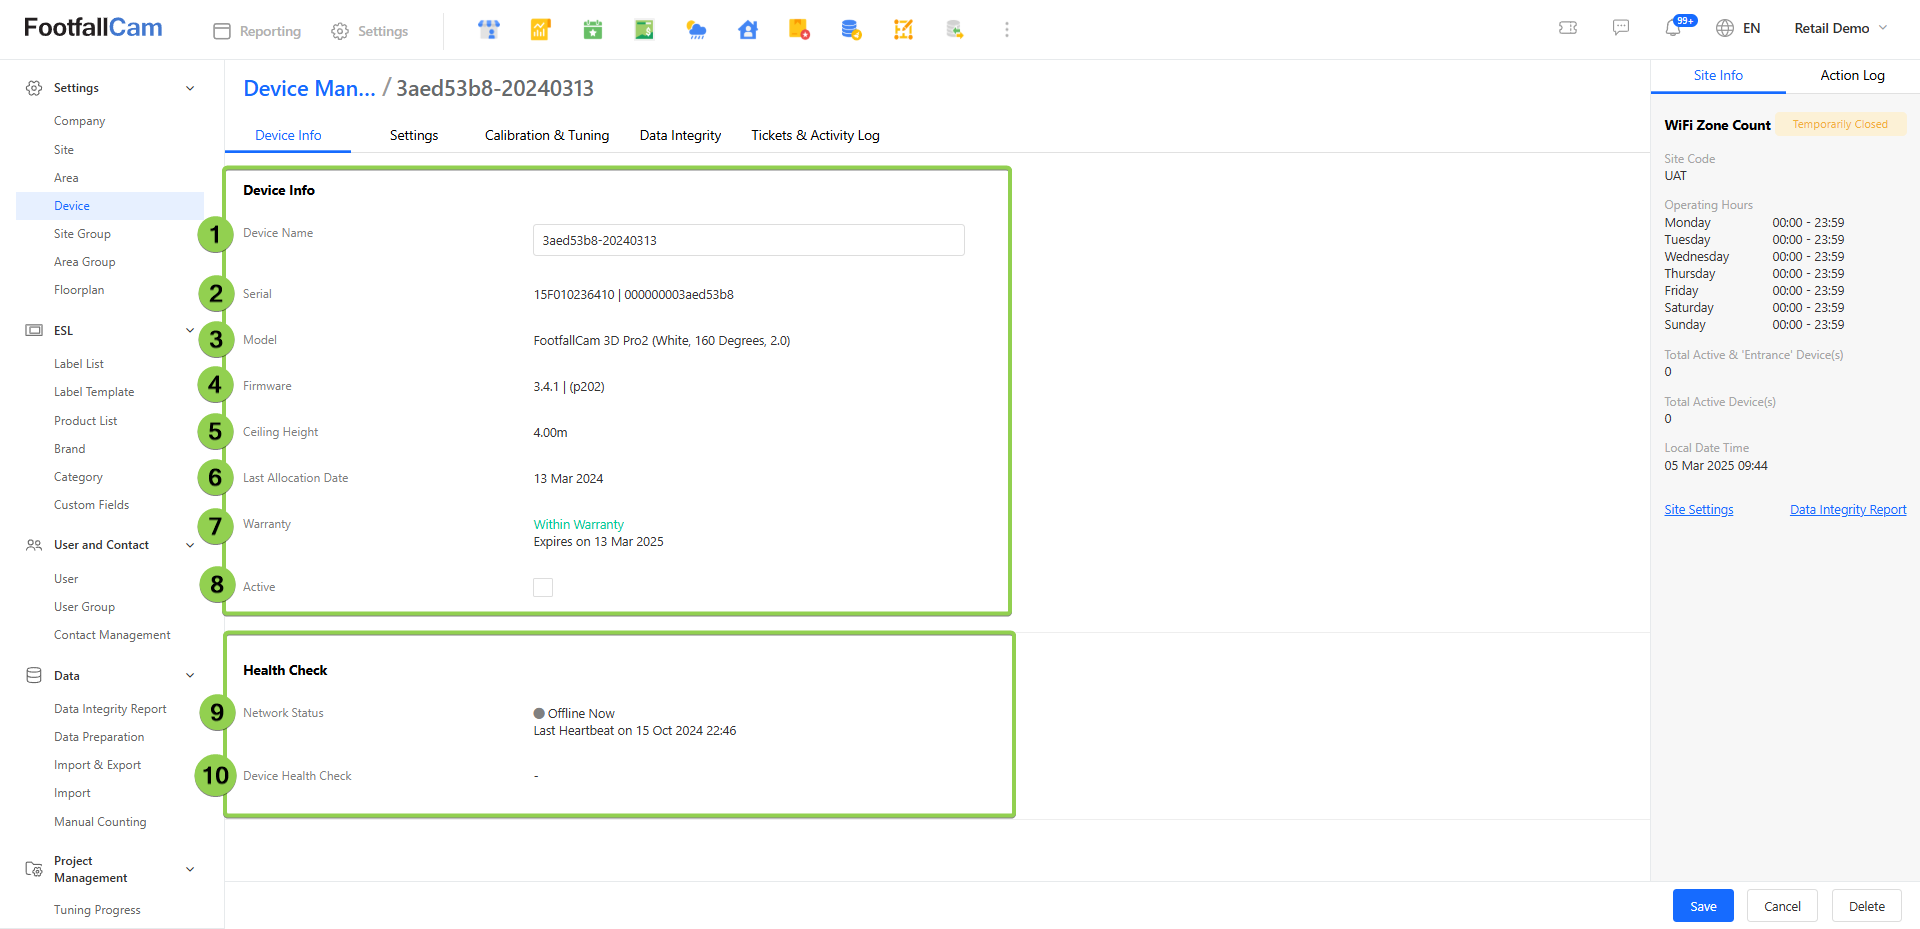
| Item | Description |
| Device Info | |
| 1. Device Name | Enter a preferred device name. |
| 2. Serial | Display the serial of the device. |
| 3. Model | Display the model of the device. |
| 4. Firmware | Display the current firmware of the device. |
| 5. Last Allocation Date | Display the date and time of the device is being allocated. |
| 6. Ceiling Height | Display the ceiling height |
| 7. Warranty | Display the expiry date of the device warranty. |
| 8. Active |
Display the status of the device. (Info: Please untick it if you want to inactive the device.) |
| Health Check | |
| 9. Network Status | Display the current network status and show the last heartbeat date time. |
| 10. Device Health Check | Display the current status of the device. |
2.2.2.1.2 Settings
- IT Settings
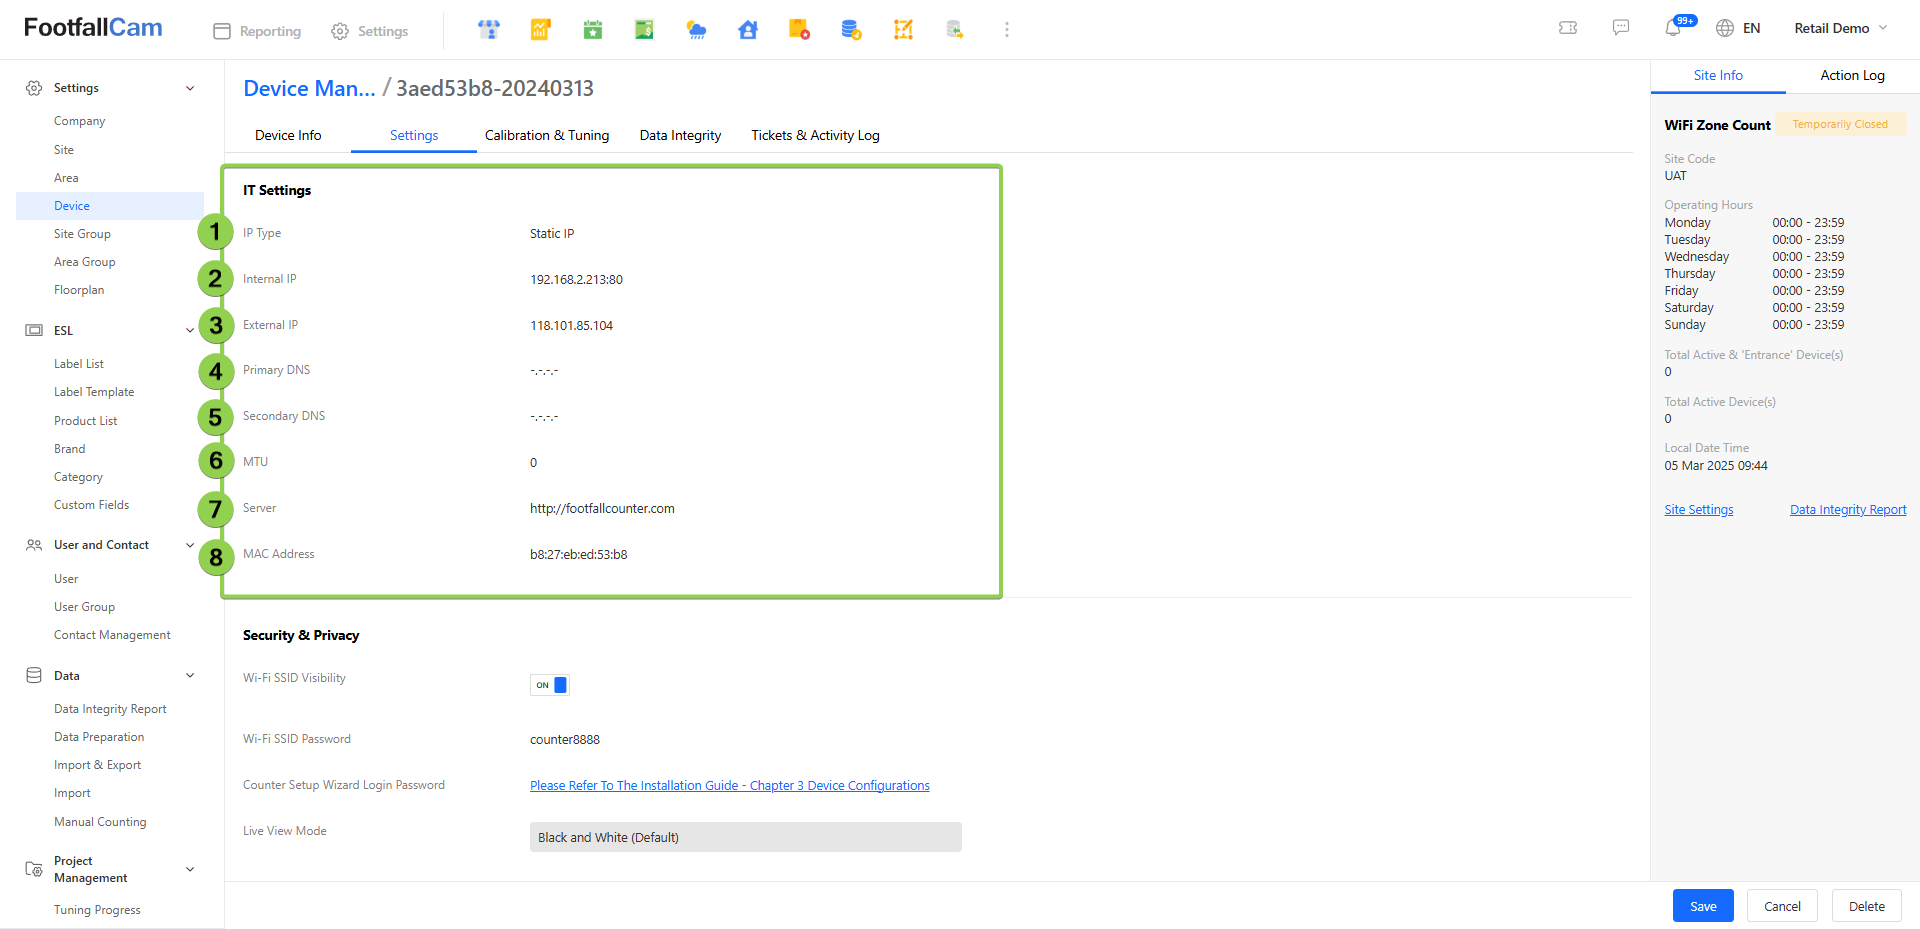
| Item | Description |
| 1. IP Type | Display the IP type. |
| 2. Internal IP | Display the internal IP address. |
| 3. External IP | Display the external IP address. |
| 4. Primary DNS | Display the primary DNS. |
| 5. Secondary DNS | Display the secondary DNS. |
| 6. MTU | Display the MTU. |
| 7. Server | Display the server. |
| 8. MAC Address | Display the MAC address. |
- Security & Privacy
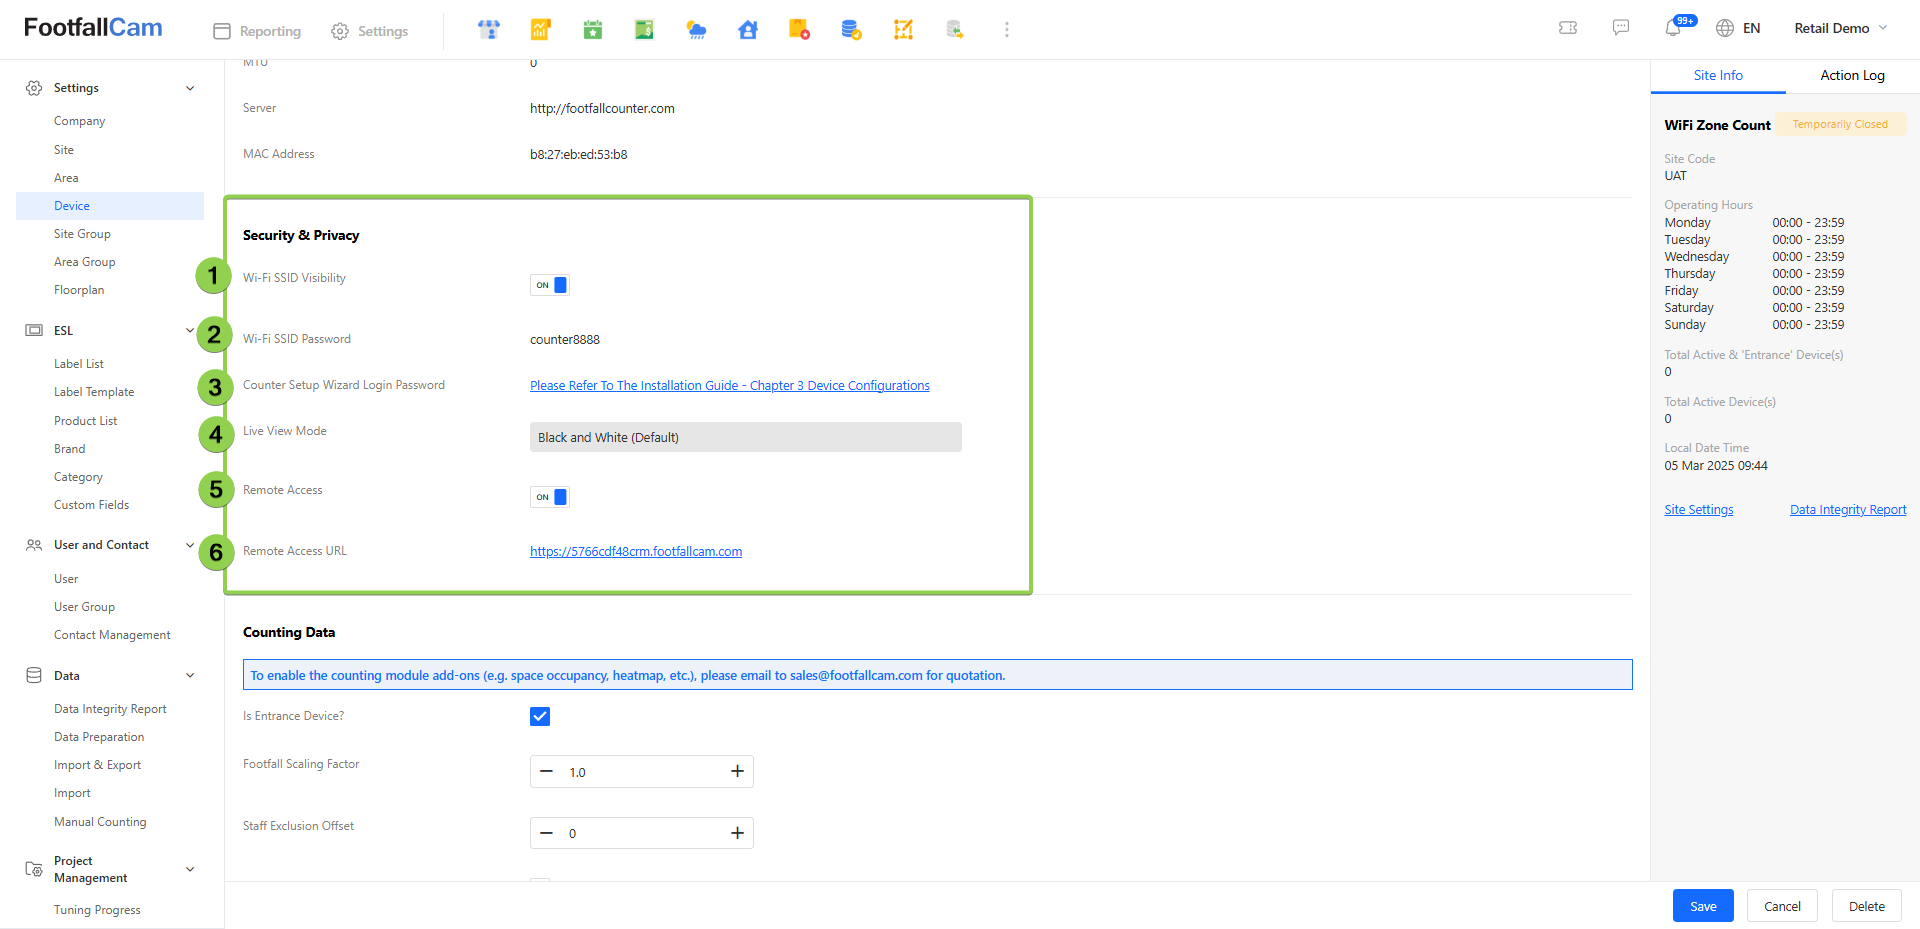
| Item | Description |
| 1. Wi-Fi SSID Visibility | To enable/disable the wifi SSID visibility |
| 2. Wi-Fi SSID Password | Display the wifi SSID password. |
| 3. Counter Setup Wizard Login Password | Display the guidelines link to set up Wizard. |
| 4. Live View Mode | Show the current live view mode. (Info: If want to change the live view mode please contact FootfallCam Support) |
| 5. Remote Access | To enable/disable the remote access URL. |
| 6. Remote Access URL | When Remote Access is turned on, the URL will be shown and redirect for remote access. |
- Counting Data

| Item | Description |
| 1. Is Entrance Device? | Click the checkbox if it is entrance device |
| 2. Footfall Scaling Factor | Show the scaling factor |
| 3. Staff Exclusion Offset | Show the staff exclusion offset |
| 4. Enable Occupancy Counting | To enable/disable the occupancy counting |
| 5. Wi-Fi Counting | To enable/disable the wifi counting |
| 6. Wifi Threshold | Show the threashold |
| 7. Wifi Calibration | Show the calibration |
2.2.2.1.3 Calibration & Tuning
This section mainly to allow user to observe the device live view with footfall counting and record live video. Currently only Live View and Tuning tab is enabled for public.
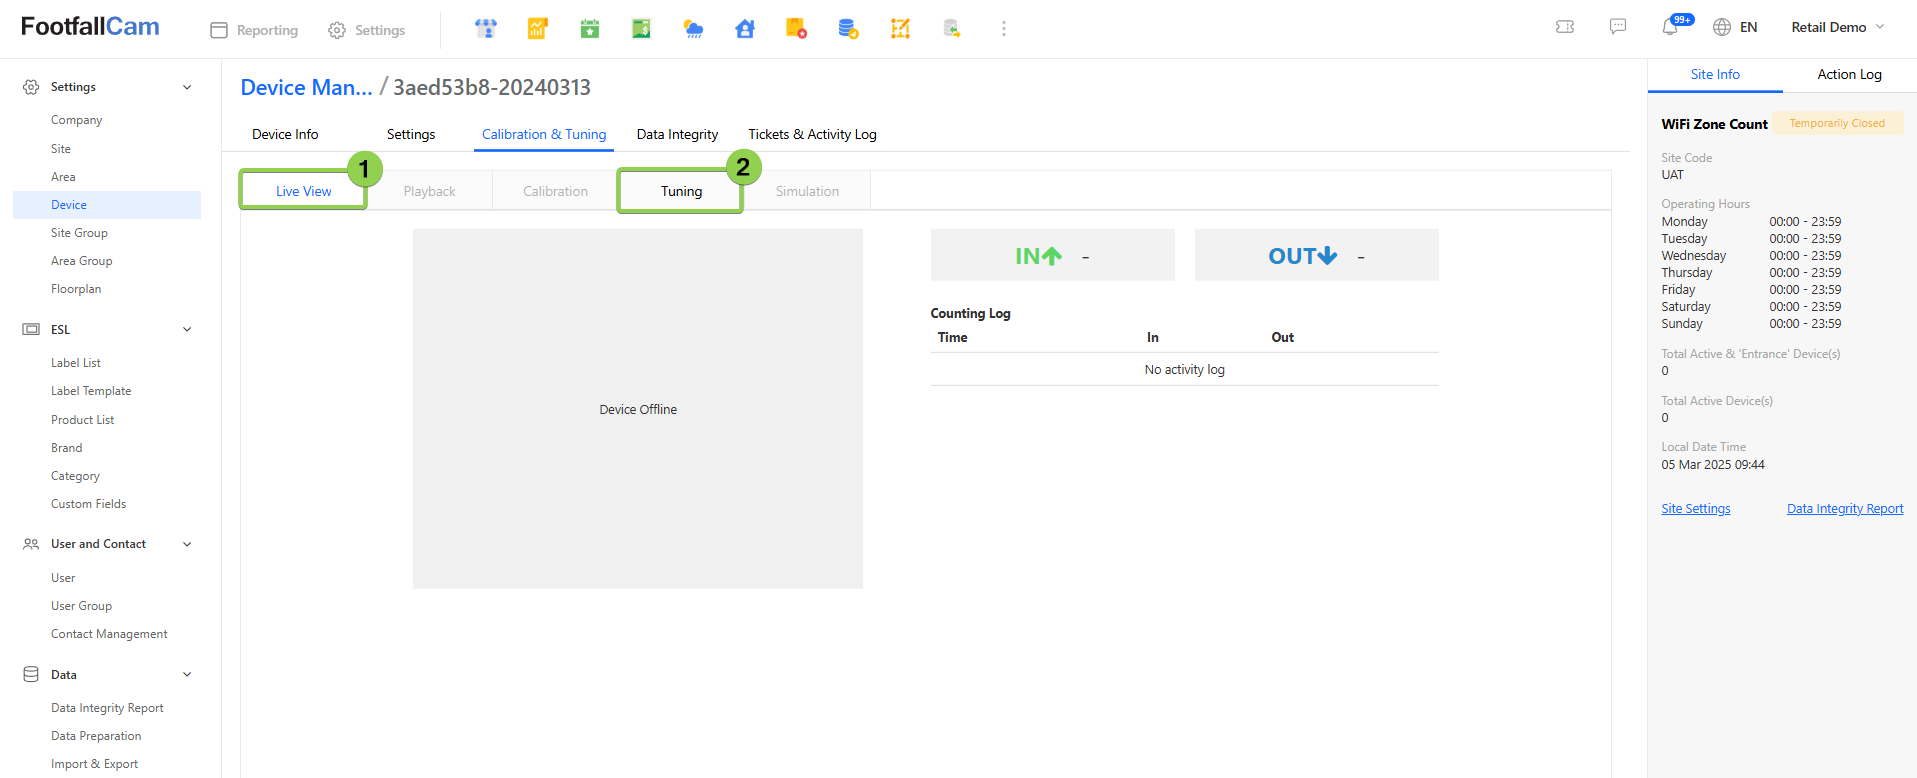

| Item | Description |
| 1. Live View | Display the live view of the device and showing the footfall in and out value when people passed by |
| 2. Tuning | Allow user to login to device setting page |
| 3. Record Video Now | Click to start video recording, can use for walk test recording. |
2.2.2.1.4 Data Integrity
- Accuracy Audit
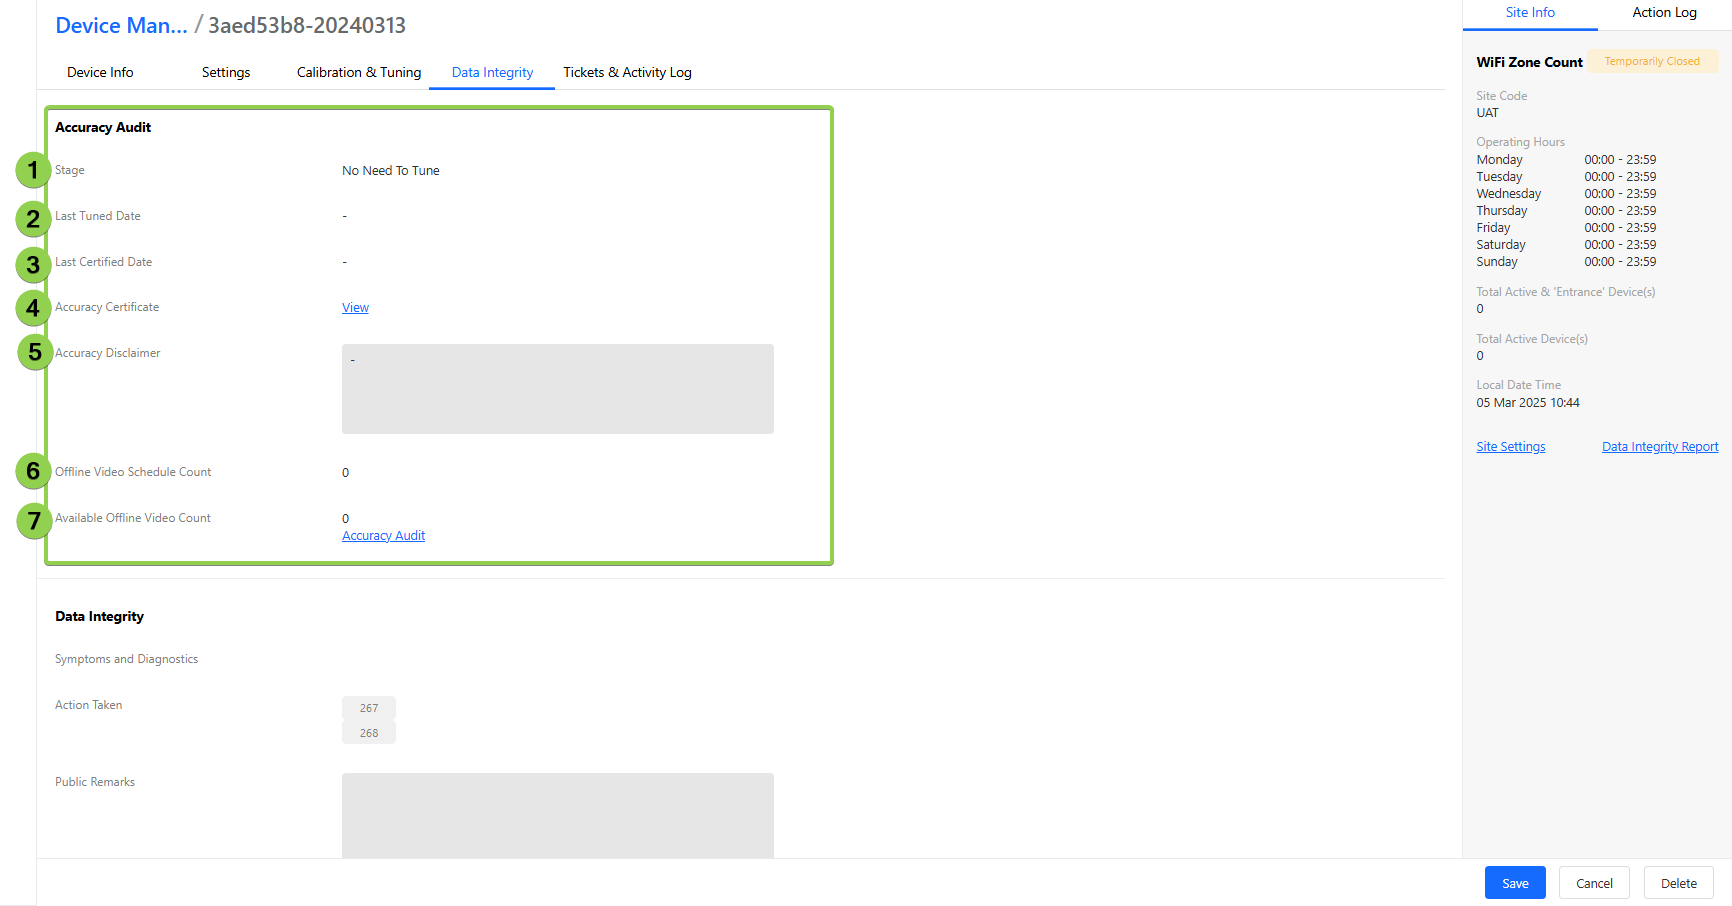
| Item | Description |
| 1. Stage | Display the stage of the device. |
| 2. Last Tuned Date | Display the last tuned date |
| 3. Last Certified Date | Display the last certified date |
| 4. Accuracy Certificate | Display the button to navigate to the accuracy certificate. |
| 5. Accuracy Disclaimer | Display the accuracy disclaimer |
| 6. Offline Video Schedule Count | Display the count of offline video |
| 7. Available Offline Video Count | Display the count of the available offline video |
- Data Integrity
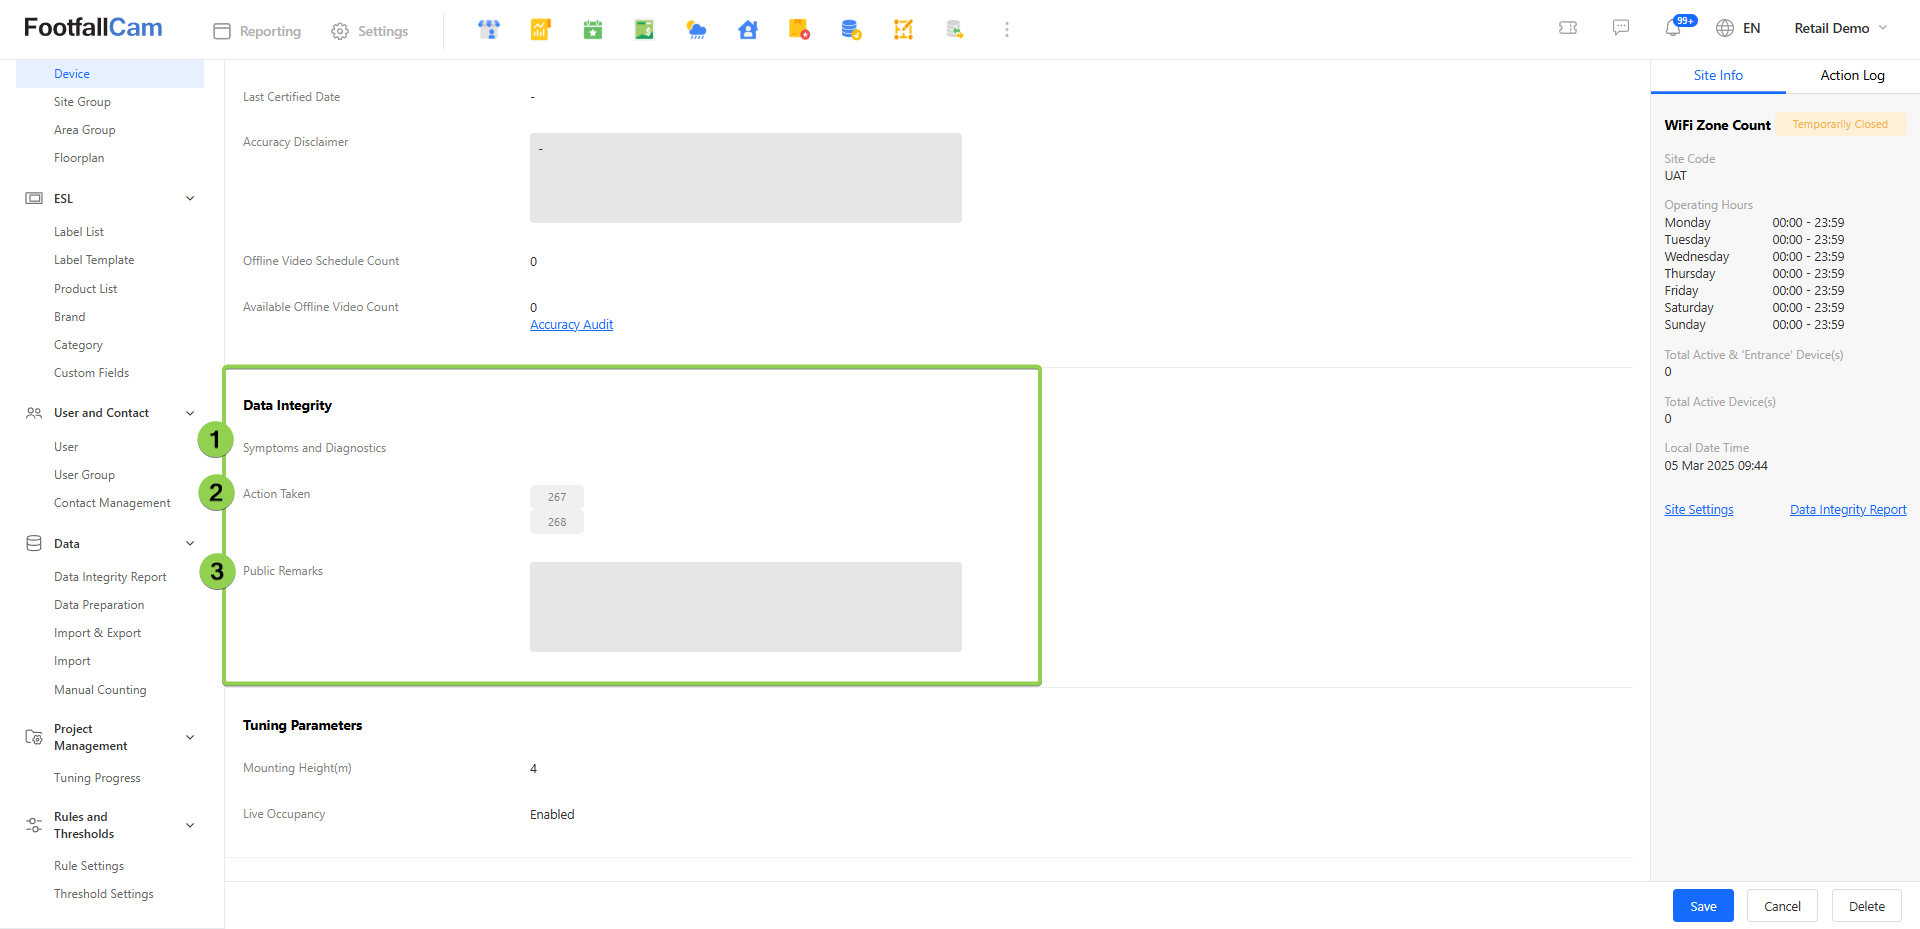
| Item | Description |
| 1. Symptoms and Diagnostics | Display the related symptoms and diagnostics of data |
| 2. Action Taken | Display the action taken. |
| 3. Public Remarks | Display the remarks |
- Tuning Parameters
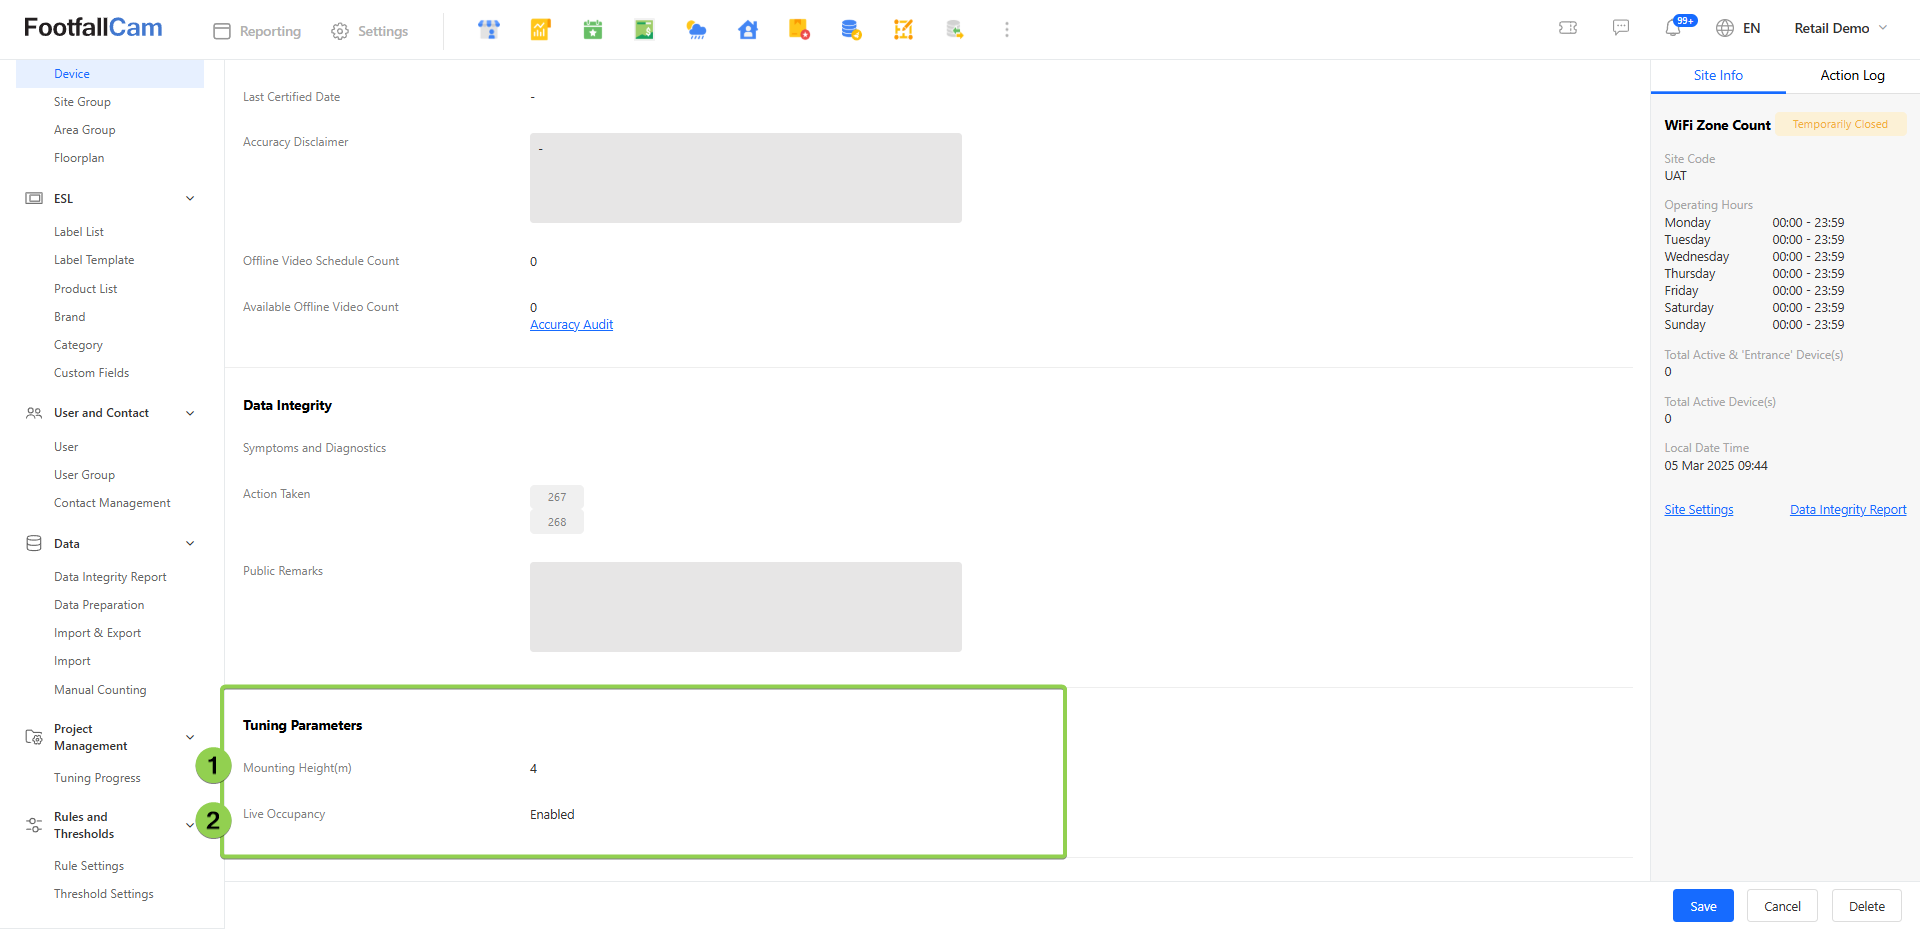
| Item | Description |
| 1. Mounting Height(m) | Display the height between the device and the ground. |
| 2. Live Occupancy | Display the status of the live occupancy. |
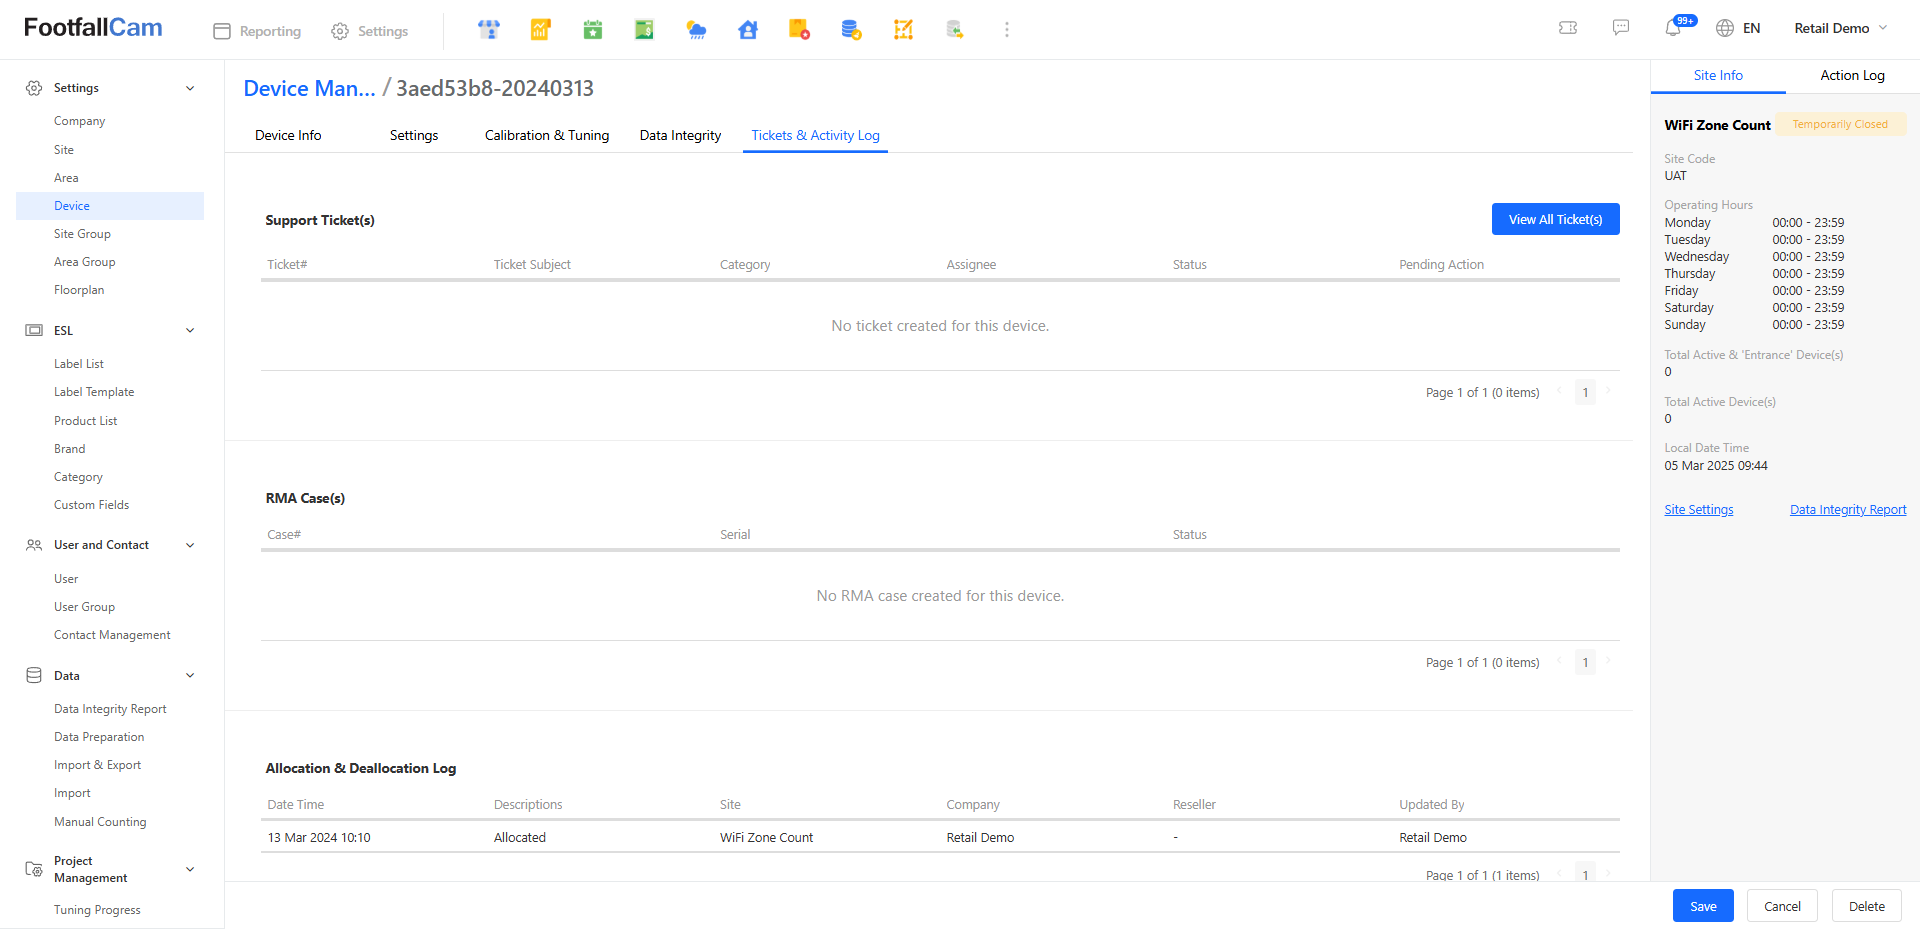
2.2.2.1.5 Tickets & Activity Log
In this page, it will show all the Support Ticket, RMA(s) cases, and the Allocation & Deallocation Log.
2.2.2.2 Device Network Specifications
FootfallCam™ Devices consumes network bandwidth, allowing servers to collect and process the data into analytical information in FootfallCam™ Analytic Manager V9. Below are the Minimum Bandwidth Usage for FootfallCam™ Devices.
MINIMUM BANDWIDTH USAGE
|
Item |
Data Type |
Approximate Bandwidth Usage |
Frequency |
|
Counting Data |
JSON |
6 KB per counter |
Every Hour |
|
Wi-Fi Data (Hashed) |
JSON |
5 KB per counter |
Every Hour |
|
Client Data |
JSON |
50 KB per 350 detected clients |
Daily |
|
Compressed Counting Video |
ZIP |
10 MB per scheduled video from portal (15 minutes duration) |
Three videos per day until Accuracy Audit is completed |
|
Space Occupancy Data |
JSON |
5KB per counter |
Event Driven (person detection by device considered as an "event". Once device detected person, it will push data to server.) |
MINIMUM BANDWIDTH USAGE (FootfallCam Centroid and FootfallCam Centroid Outdoor only)
|
Item |
Data Type |
Approximate Bandwidth Usage |
Frequency |
|
Counting Data |
JSON |
100 KB per input source* |
Every Hour |
|
Compressed Counting Video |
ZIP |
500 MB** per scheduled video per input source* |
One video per day until Tuning is completed |
* FootfallCam Centroid and Centroid Outdoor supports up to 8 input sources simultaneously.
** Measured with a 30-minute long 1080p 25 FPS recording.
2.2.2.3 Requirements for using FootfallCam™ Cloud Server
This section required attention from the customers that chosen to use our FootfallCam™ Cloud Servers. This is important for them to whitelist those IP Address to ensure that the services provided by FootfallCam™ can work properly.
NETWORK OUTBOUND FIREWALL RULES (ON-SITE):
|
IP Address |
Port Number |
Purpose |
|
198.244.207.93 |
80 (HTTP), |
[Mandatory] To enable counting data upload from on-site devices to FootfallCam™ Cloud Server. |
|
45678 (FTP) |
(Optional) Allow client to establish connection to FootfallCam™ FTP Server, which is used for client to access and manage data for automated import or export jobs. |
|
|
51.195.132.20 |
80 (HTTP), |
[Mandatory] To enable counting data upload from device to FootfallCam™ Cloud Server (failover server) in case of primary server is down. |
|
51.89.155.156 |
80 (HTTP, WS), |
[Mandatory] To enable Space Occupancy / Group Counting / any other special features data upload from on-site devices to server. |
|
54.85.80.97 |
80 (HTTP), |
[Mandatory] VPN server to allow FootfallCam™ Support Team personnel remote access to on-site devices in case of technical support / error diagnosis. The connection will only be initiated from on-site devices and will only be triggered if ticket has been raised and is being processed and authorised by Support Team personnel. The connection will be closed on the next day or the support process has ended, whichever come first. |
NETWORK INBOUND FIREWALL RULES (ON-SITE / CLIENT'S FTP SERVER):
|
IP Address |
Port Number |
Purpose |
|
54.38.212.250 |
(Client to provide FTP port number) |
(Optional) To allow FTP connection established by FootfallCam™ Analytic Manager V8 to the client's FTP server to perform scheduled export and import jobs. |
| 145.239.252.218 |
(Client to provide FTP port number) |
(Optional) To allow FTP connection established by FootfallCam™ Analytic Manager V9 to the client's FTP server to perform scheduled export and import jobs. |
CONSEQUENCES OF BLOCKING TARGET IP ADDRESS, PORT NUMBER AND PROTOCOL:
|
Blocked Target IP Address, port number and protocol |
Consequence(s) |
|
198.244.207.93 port 80 (HTTP) and 443 (HTTPS) |
Counting data from on-site devices will NOT be uploaded to FootfallCam™ Cloud Servers in the event of server failover from Primary Server (145.239.4.218), and the latest counting data will NOT be presented in FootfallCam™ Analytic Manager V9 platform. The latest counting data will NOT be available for scheduled export jobs via FTP, through API, SQL function query, or any mean of data exportation from FootfallCam™ Analytic Manager V9 platform. |
|
51.89.155.156 port 80 (HTTP, WS) and |
Space Occupancy related data will NOT be uploaded to FootfallCam™ Cloud Server, and the Space Occupancy dashboard in FootfallCam™ Analytic Manager V9 platform will NOT be updated to the latest Occupancy count. The latest space occupancy data will NOT be available for scheduled export jobs via FTP, through API, SQL function query, or any mean of data exportation from FootfallCam™ Analytic Manager V9 platform. |
| 54.85.80.97 port 80 (HTTP) 443 (HTTPS) |
VPN connection cannot be established from on-site devices directly to FootfallCam™ Cloud Servers. FootfallCam™ proactive support will be affected and significantly increases the turnaround time of resolving ticket raised from FootfallCam™ Support Portal. |
2.2.3 Counting Lines Configuration
2.2.3.1 In Out Counting (Pro2)
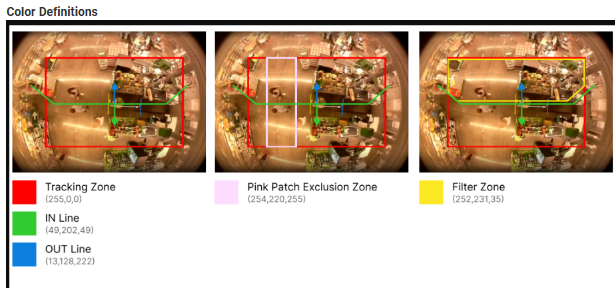 Color Definitions
(Last updated on 16-Aug-2024)
| Counting Line / Zone | Description |
| Tracking Zone | A designated area to detect and monitor the presence and movements of individuals within its boundaries. |
| IN Line | A boundary that detects IN count when people cross it as they enter a specific area. |
| OUT Line | A boundary that detects OUT counts when people cross it as they go out a specific area. |
| Pink Patch | A special covering used to block or hide stationary objects of a certain height that might be mistakenly counted by the sensor, preventing unnecessary noise or incorrect counting. |
| Filter Zone | A special area that helps to make sure only the right objects get counted. For example, in a store or with a swinging door, it can filter out any extra movements that shouldn't be counted as people coming in or going out. It works by only counting people whose path starts or ends inside the filter zone. If both the start and end of the path are either inside or outside the filter zone, the person won't be counted. |
2.2.4 Firmware and Patch Update
Please navigate to Settings > Device > "Edit" button to access the device settings page and check the current firmware and patch version. Additionally, you can view the device's firmware version directly on the Device Management page.
2.2.4.1 Firmware update
3D People counting device have different firmware versions like:
- 3.2.2
- 3.2.2a
- 3.4.1
- 4.6.0
- 4.2.0
There are different firmware versions for the device as we have different variant of hardware for the device. In order to know the firmware version of the device, user can access to the device info page and liveview page of the counter, it will be shown as '3.4.1' (just an example).
When and how to perform firmware update?
Firmware update is different from patch update where it requires manually update by FootfallCam technical personnel. Therefore, if the device is having an old firmware version, please contact FootfallCam by raising a support ticket to get the device updated.
Below are the old firmware version that requires update:
- Firmware that starts with '3.2.0', might be followed by i, j, k, etc.
- 3.3.0
- 3.5.0
- 3.8.0
2.2.4.2 Patch update
What is patch update?
A patch is a update revision for a device firmware. The higher the number of the patch version, the later the patch version of the device.
When and how to perform patch update?
When there's a new patch version released, the device has its own mechanism to update on its own by downloading the patch file from server. Hence, user wouldn't need to manually perform update for the device. However, if the device patch is too old, then there's a need to manually update the patch version for the device. In order to know the patch version of the device, user can access to the device info page and liveview page of the counter, it will be shown as '3.4.1_patch_p191' (just an example), the part p191 is the patch number/version of the device. Each firmware version has its own patch version.
If the device is have patch number/version older than below, please contact FootfallCam by raising a support ticket to get the device updated.
- 3.2.2_patch_p158
- 3.2.2a_patch_p145
- 3.4.1_patch_p191
- 4.6.0_patch_p19
2.2.4.3 Summary
Device with outdated firmware or patch version tends to have legacy issue and software bugs that will affect the user experience.
Therefore, it's important to keep the device updated to the latest version to ensure the device working properly.
2.3 Area Settings
The counting data is tied to the area available for the company, thus setting up area is extremely important in order to store the data in the server and display on the dashboards and reports afterward.
Area is a smaller region of focus within a site, and it is one of the traffic analysis methods that normally used in shopping malls, offices and stores with multi-level to understand the distribution of visitors throughout the site. Taking the shopping mall as an example, which applicable to any other industry, the site can be partitioned into different area such as different floors or different shops. Devices are required to cover all entrances and exits for each area in order to obtain the data.
2.3.1 Area Configuration
In this section, we will explain how to create, edit and update area settings.
2.3.1.1 How to Create Area
The site entrance area will be created and included the devices with entrance counting enabled automatically when the site is created. This area is mainly for the footfall of the site. If you wish to create more areas, you may follow the steps below:
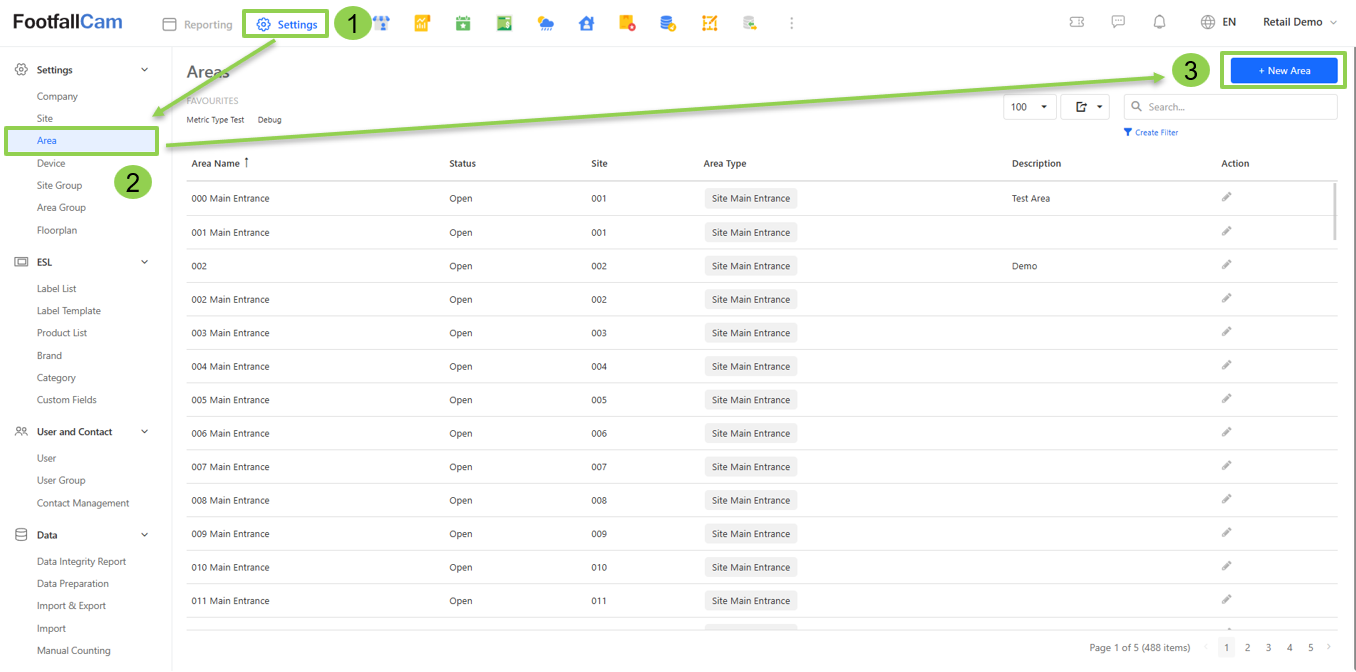
Step 1 - Go to Settings > Area to view the existing area list.
Step 2 - Click on the "+ New Area" button and fill up the necessary details in Create New Area pop up shown.

|
Item |
Description |
| 1. Area Name | Enter your preferred name for the area. |
| 2. Area Code | A unique code for the area. |
| 3. Description | Some note to describe the intended use case of the area. |
| 4. Area Type | The area nature type whether it is a site entrance or for queue area or so. Select the best fits type in the list. |
| 5. Area Group | The area can be grouped up as a larger region, which all the metrics are summed up in showing dashboards and reports. |
| 6. Site | The site of the area belongs to, to filter the devices contributing counting data to the area. |
Step 3 - Click on the "Create" button to go into the area settings page, and configure the dataset and operating hours accordingly, then click "Save" button to create the area. For more details on dataset and operating hours, refer to section 2.3.2 Dataset and Operating Hours below.
2.3.1.2 How to Update Area
Over the time there may be having changes to be made on the area configuration, if you wish to update the area settings, you may follow the steps below:
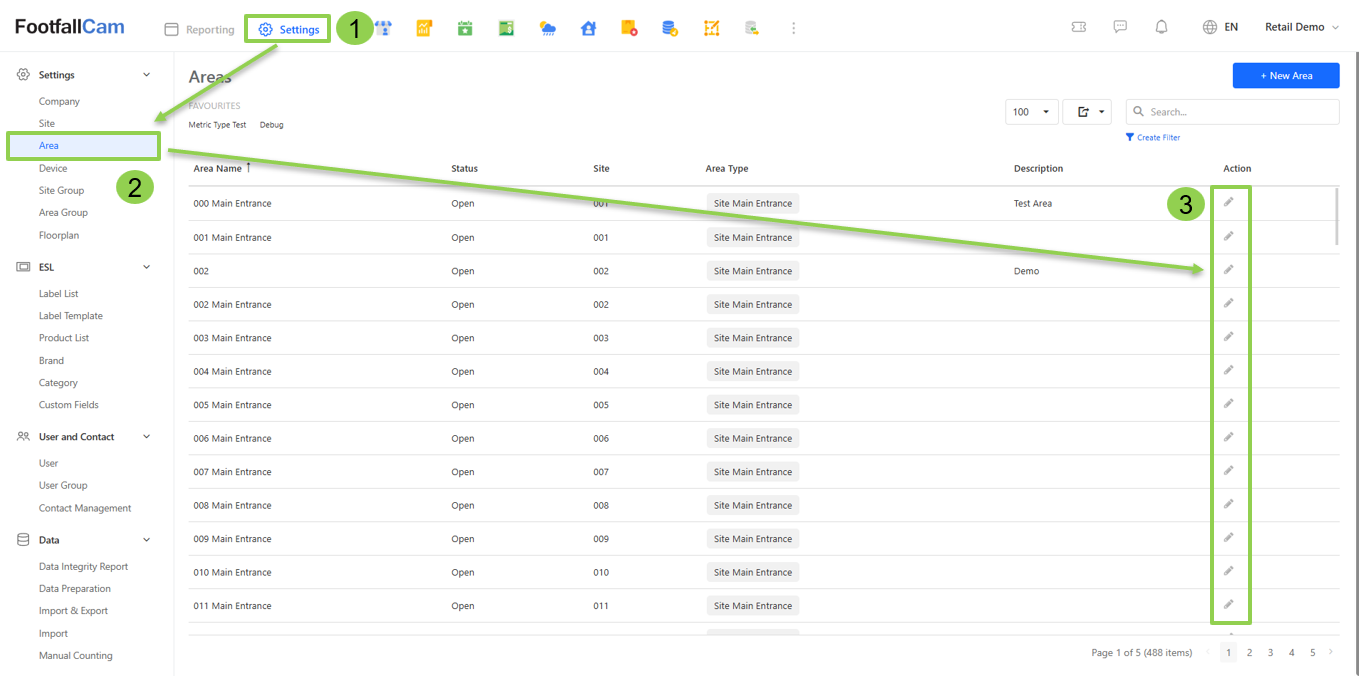
Step 1 - Go to Settings > Area to view the existing area list, click on the pen icon to edit the area details.
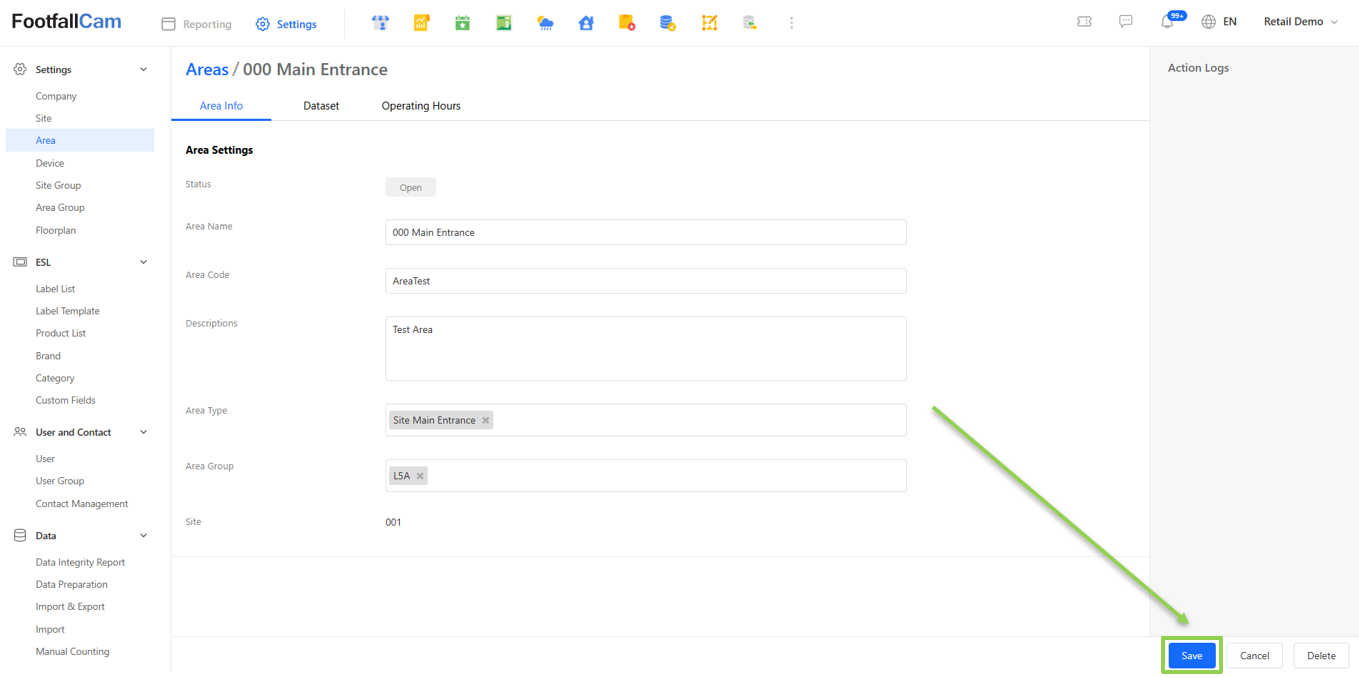
Step 2 - Update the details which changes is required, then click on the "Save" button to save the changes.
2.3.1.3 How to Delete Area
We do not suggest deleting the area, as the data will be deleted and not recoverable. If you still decided to delete the data, you may follow the steps below:
Step 1 - Go to Settings > Area to view the existing area list, click on the pen icon to edit the area details.
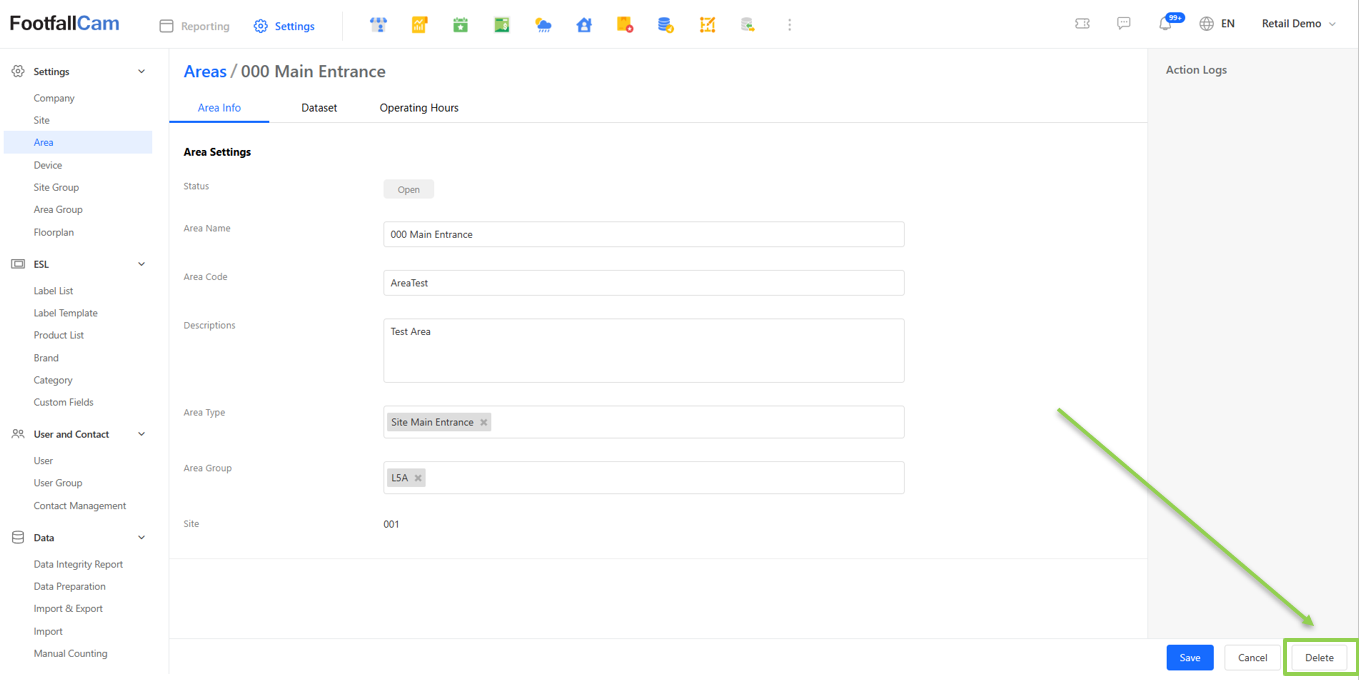
Step 2 - Click on the "Delete Area" button to remove the area and its data from the server.
2.3.2 Dataset
Dataset in area settings, specified the device contributor onto the data type for the area. There are multiple types of data stores under the area, and each type need to be configured accordingly, to create relationship between the area with the devices for respective the data type.
|
Type |
Description |
| 1. People Counting | Collect footfall metrics including Footfall In and Footfall Out. |
| 2. Dwell Time | With mode MAC Address Dwell Time, the visit duration is calculated from 2 peaks of the WiFi signal strength detected from all devices linked. |
| 3. Queue Counting | Collect queue counting metrics including Queue Serve Time and derive the Queue Waiting Time |
| 4. Others | Collect metrics other than specified above, including occupancy, heat dwell, heatmap and others. |
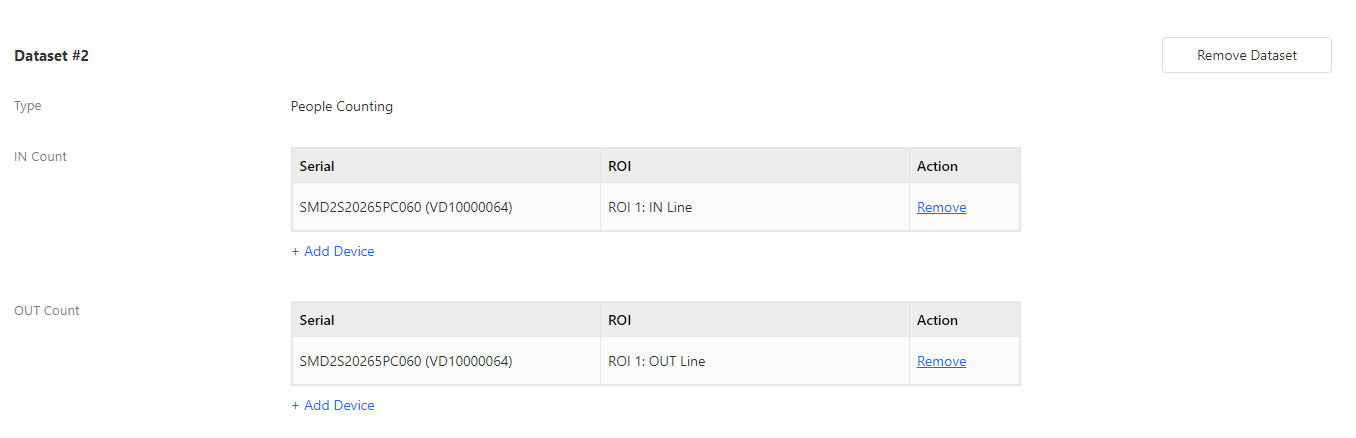
2.3.2.1 Dataset Configuration - People Counting
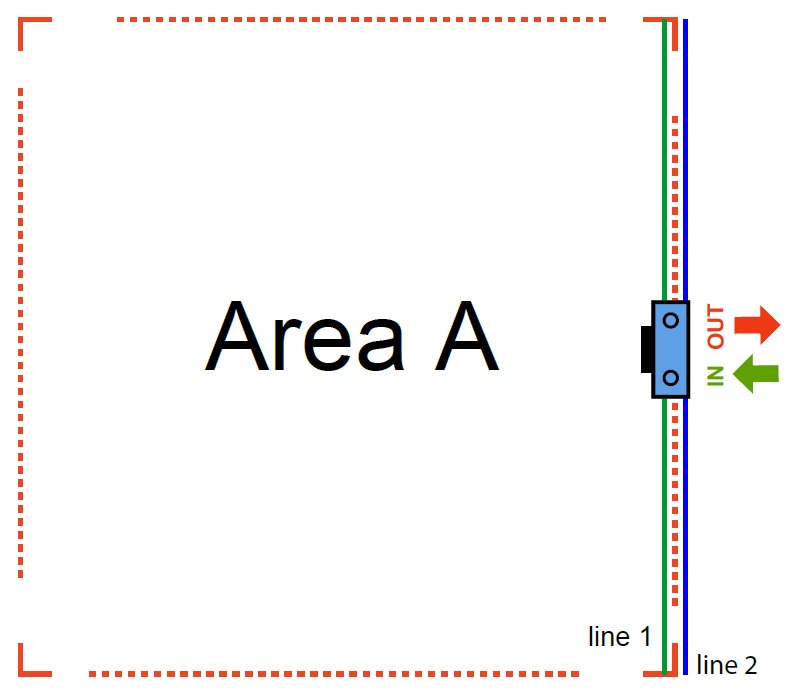 |
If the area has only 1 device, and that device only contribute to 1 area, then in normal circumstances, the IN Count is contributed by the IN Line (green) and the OUT Count is contributed by OUT Line (blue).
|
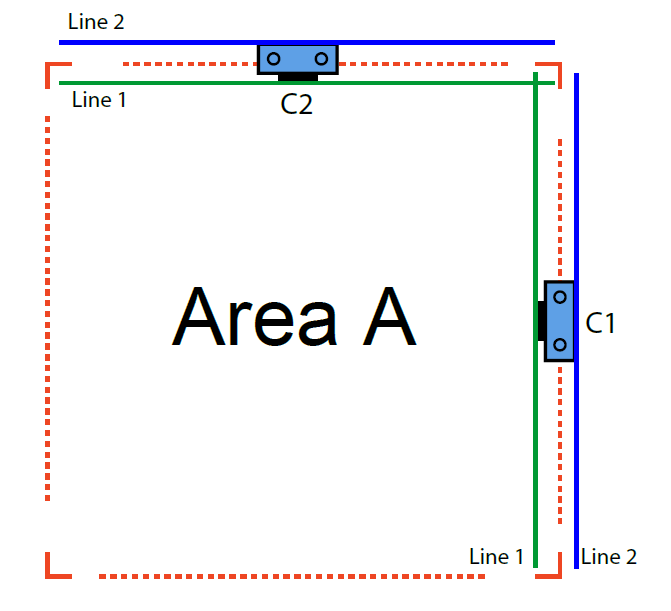 |
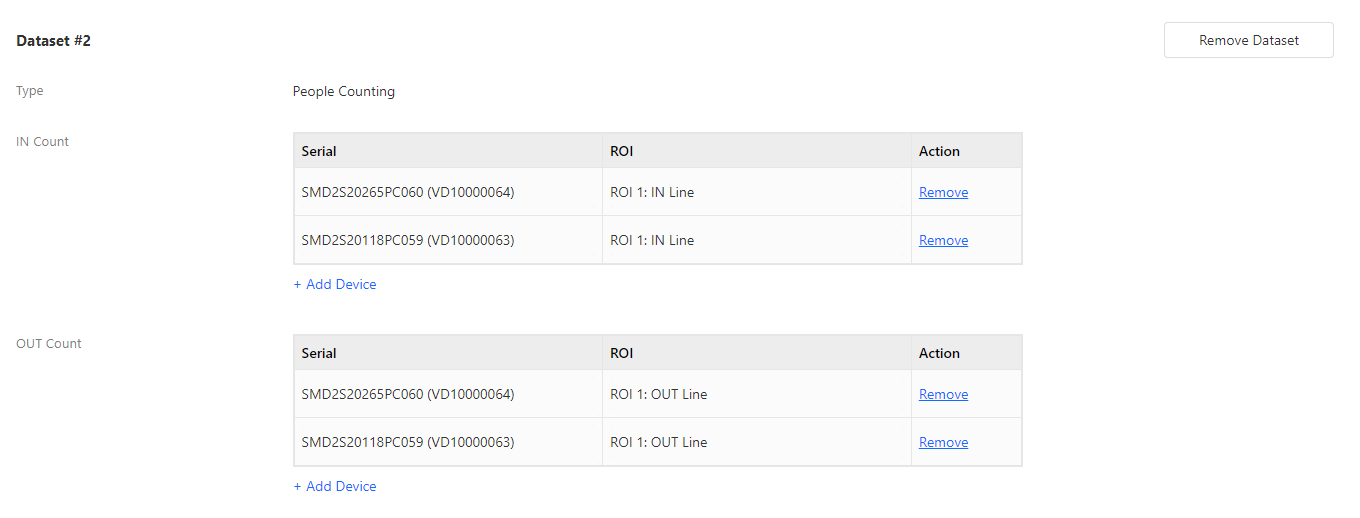
If the area contains more than 1 device, then all devices should be added during area configuration.
|
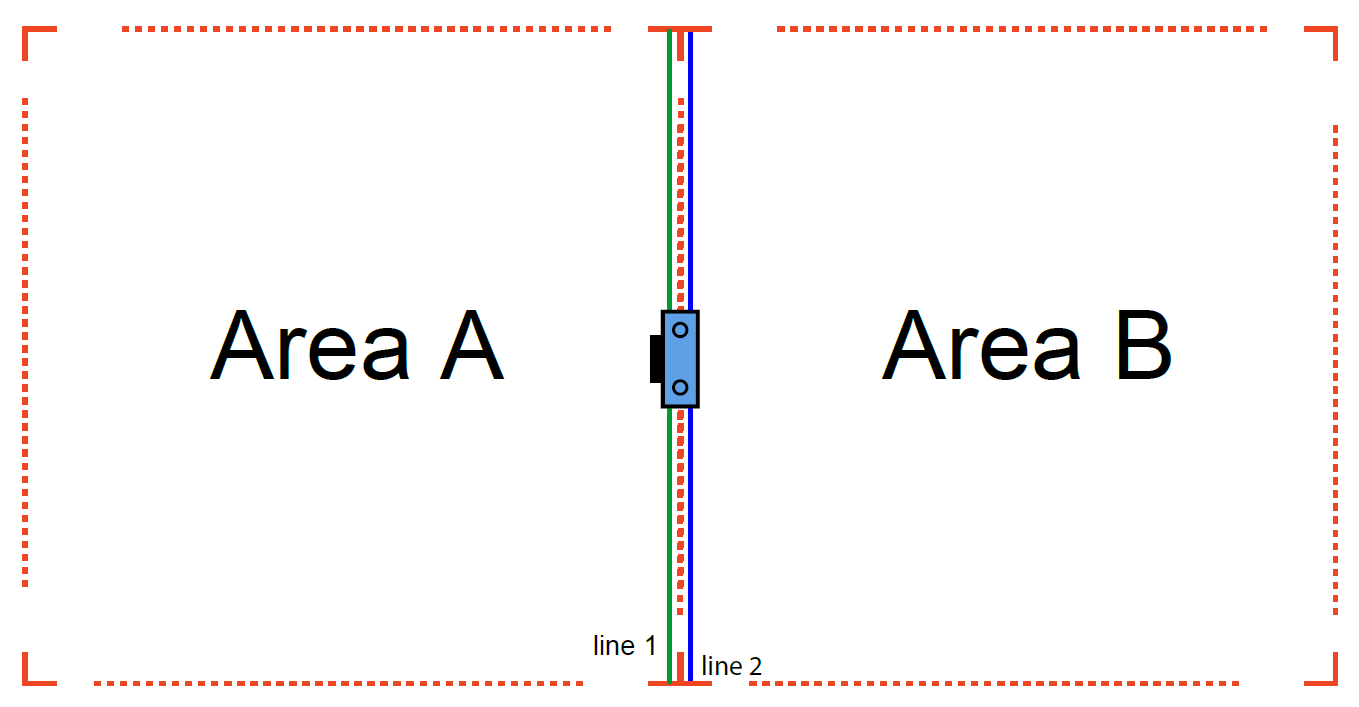 |
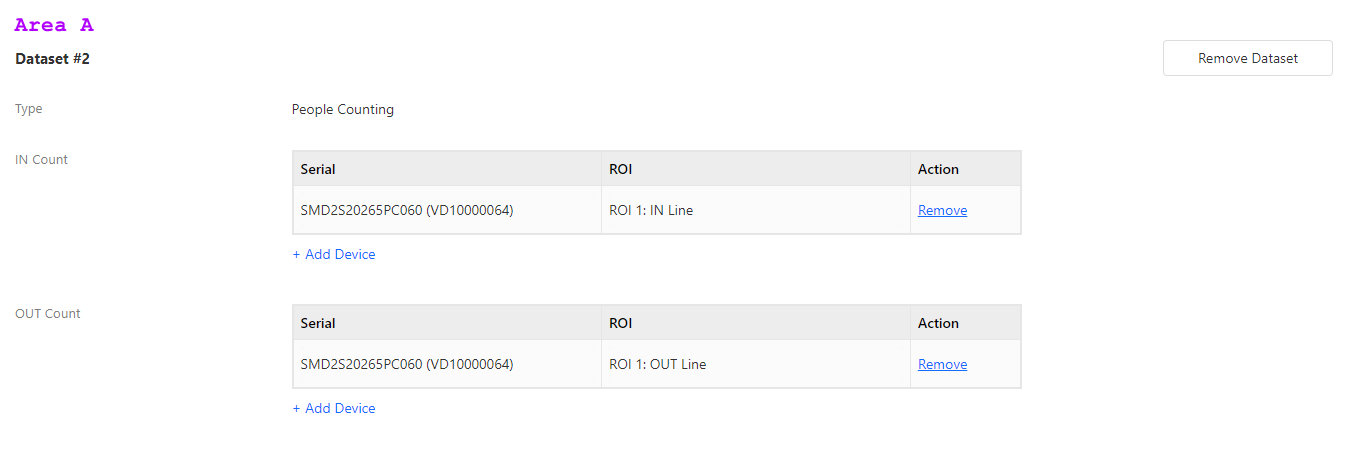
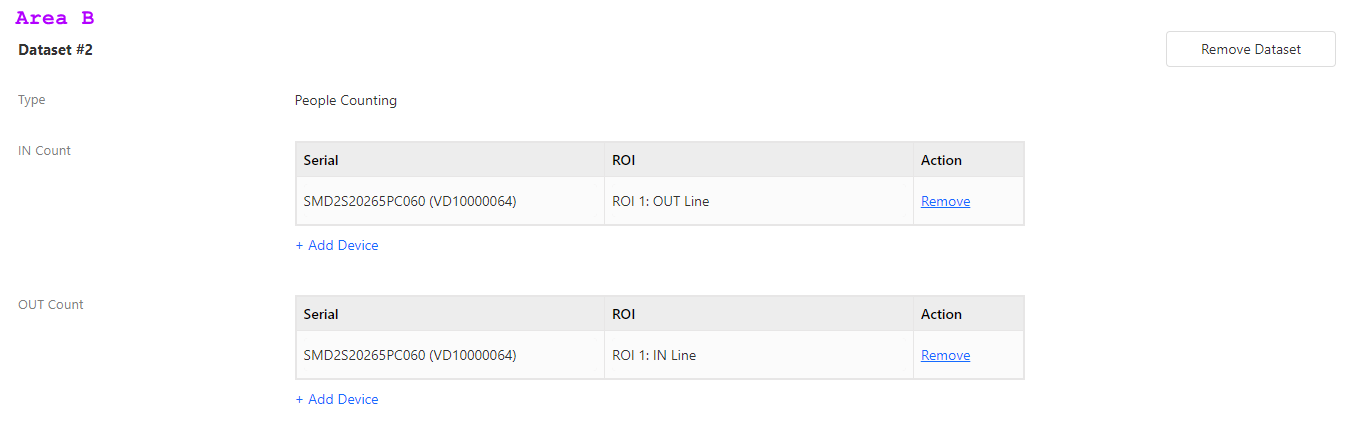
If 1 device is contributing to multiple areas, then the 2 areas need to be created with inverted line for the count. For example: For Area A, the IN Count is contributed by IN Line (green) while OUT Count is contributed by OUT Line (blue);
For Area B, the IN Count is contributed by OUT Line (blue) while OUT Count is contributed by IN Line (green).
|
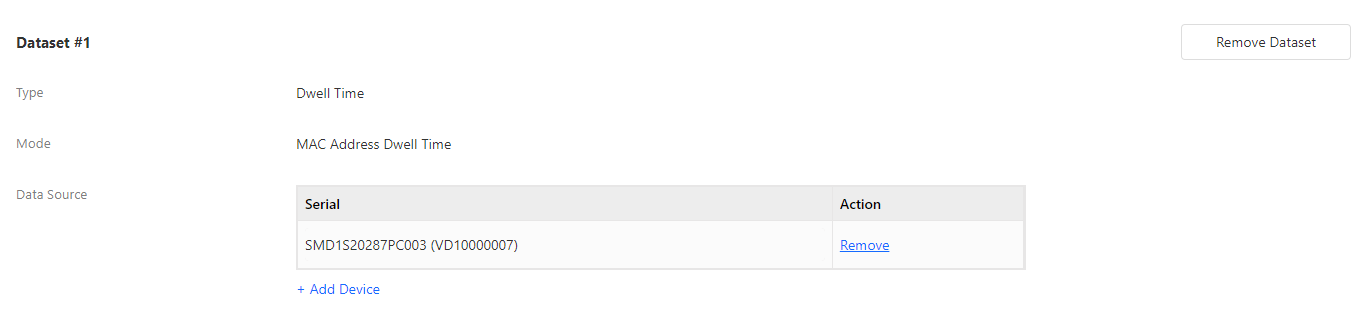
2.3.2.2 Dataset Configuration - Dwell Time
For each area, if visit duration is required, then Dwell Time dataset need to be set up by adding all devices which contribute to the area.
2.3.2.3 Dataset Configuration - Queue Counting
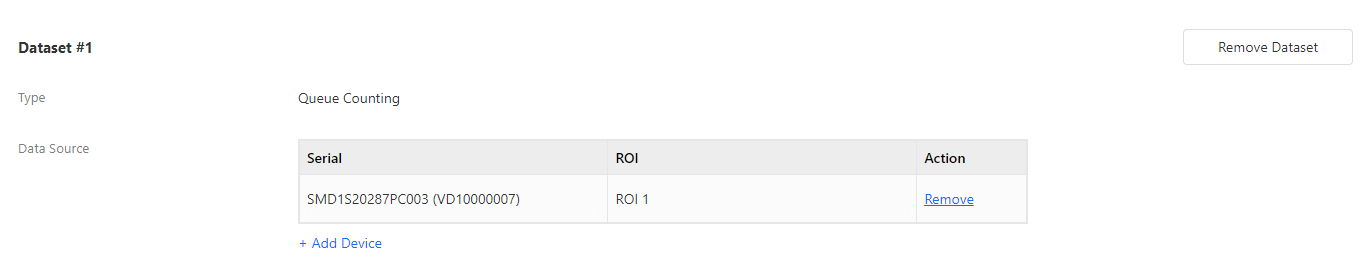
For area which required to have queue solution, the Queue Counting dataset must be set up to collect and store the data in server level, with the specific ROI of the relevant devices.
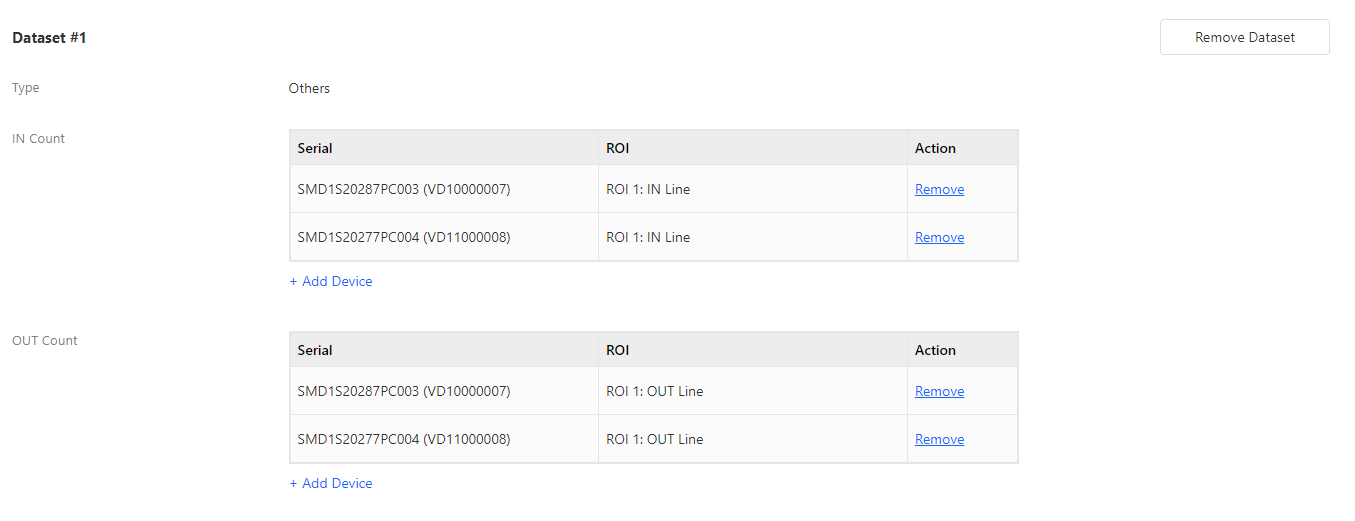
2.3.2.4 Dataset Configuration - Others
Besides people counting, dwell time for visit duration and queue counting, other metrics fall under this category, including occupancy, heat dwell and heatmap.
2.3.3 Operating Hours
Considering the use case for shopping mall, which every shop may have different operating hours, areas can have its own operating hours which different from the site. This can be set in the operating hour tab. If the store operating hour is the same as site, you may tick at the field "Same with Site Operating Hours".

2.3.4 Area Groups
Area group is referring to the group of areas, which the data is summation of the areas under the group. This area group is mainly used in shopping mall, to group the shops under same category, and review the footfall as a group.
Please be noted that area group is not applicable to occupancy, due to the nature of occupancy cannot be summed.
2.3.4.1 How to Create Area Group
Step 1 - Go to Settings > Area Group to access the area group list.
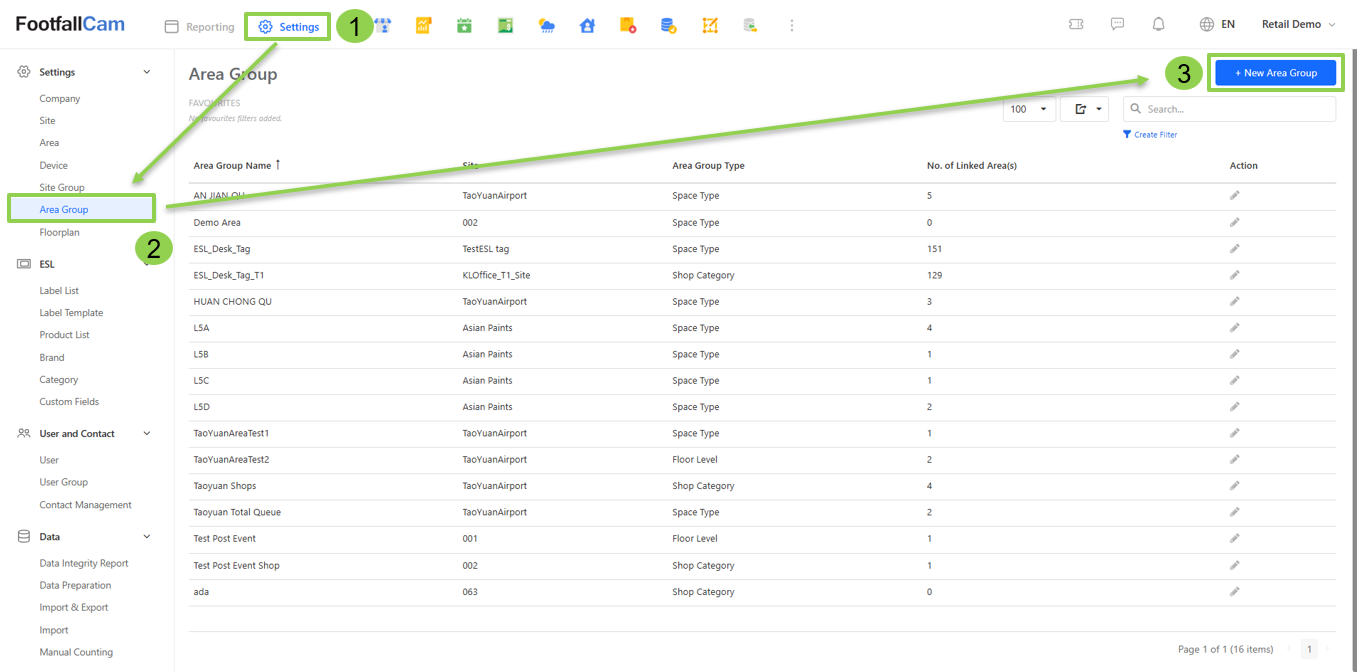
Step 2 - Click "+ New Area" and fill up the information required.
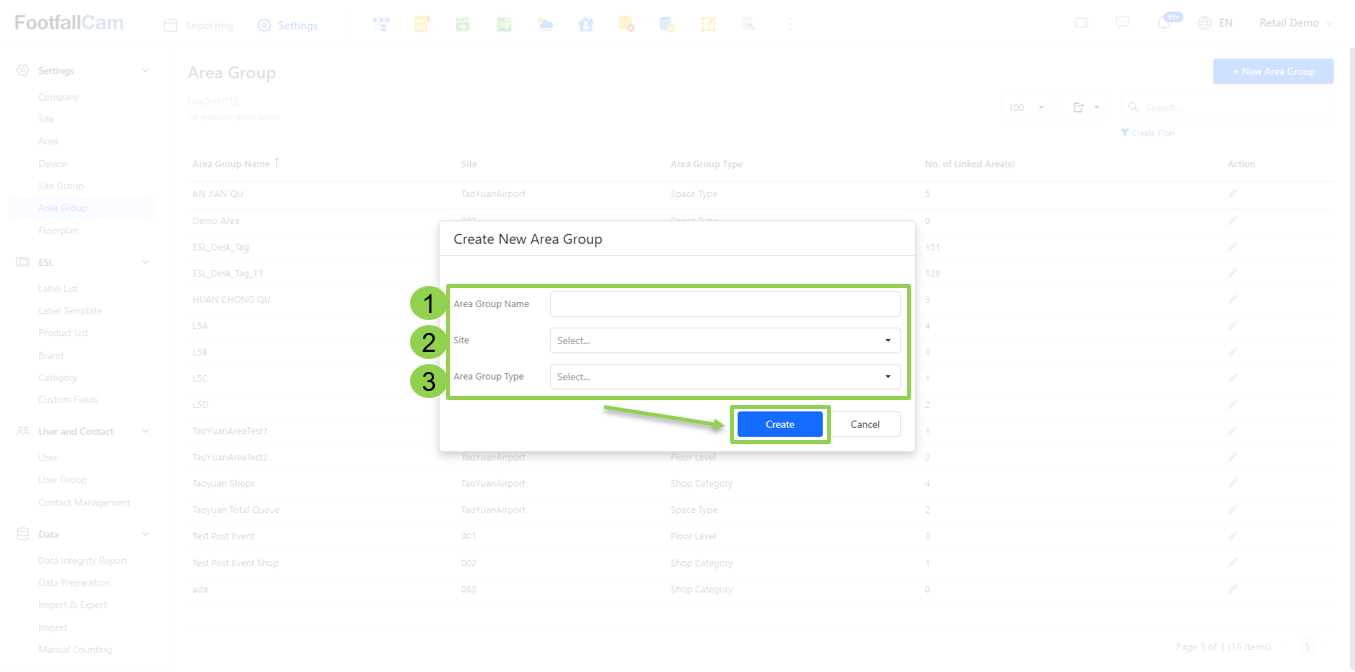
|
Item |
Description |
| 1. Area Group Name | Enter your preferred name for the area group. |
| 2. Site | The site that the area group belongs to. |
| 3. Area Group Type | The type for the area group. |
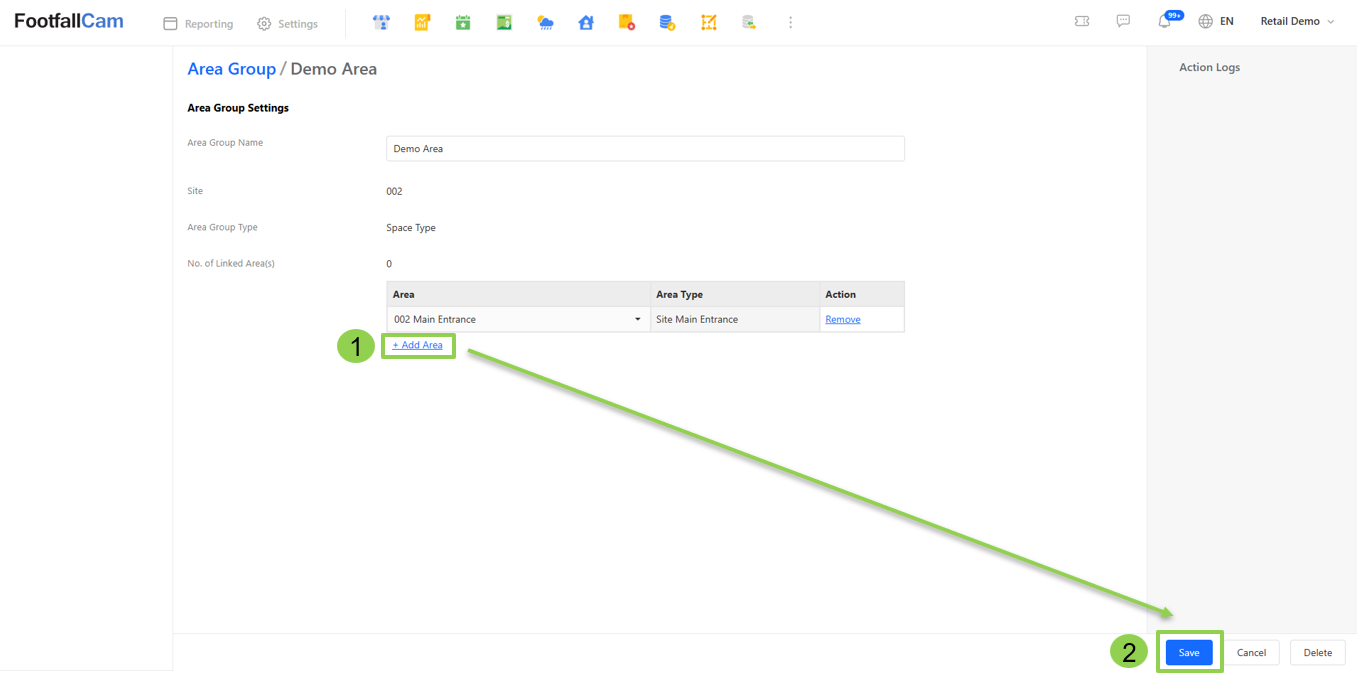
Step 3 - Click on "Create" button to go into the area group detail view.
Step 4 - Update the list of areas to be included under this area group.
2.3.4.2 How to Update Area Group
Over the time there may be having changes to be made on the area group configuration such as adding areas or removing areas. Area group configuration can be updated via area settings and area groups settings.
2.3.4.2.1 How to Update Area Group in Area Settings
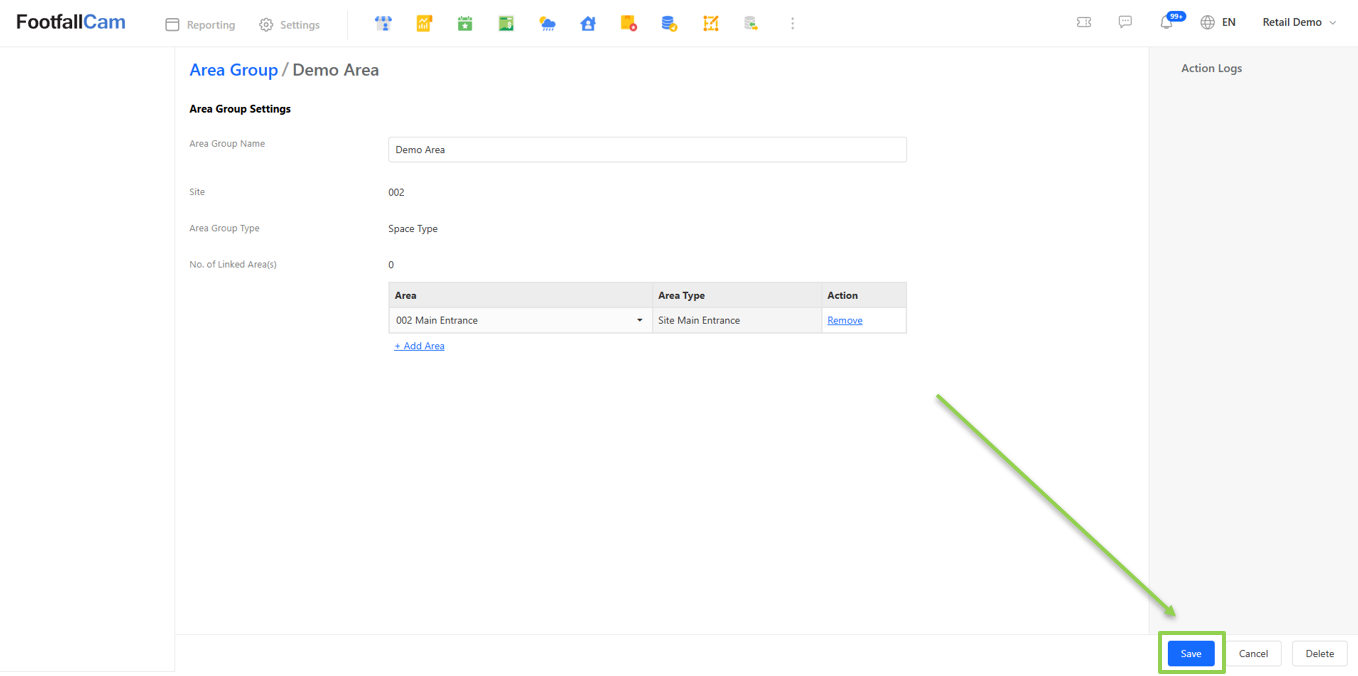
Step 1 - Go to Settings > Area Group to view the existing area group list, click on the pen icon to edit the area group details.
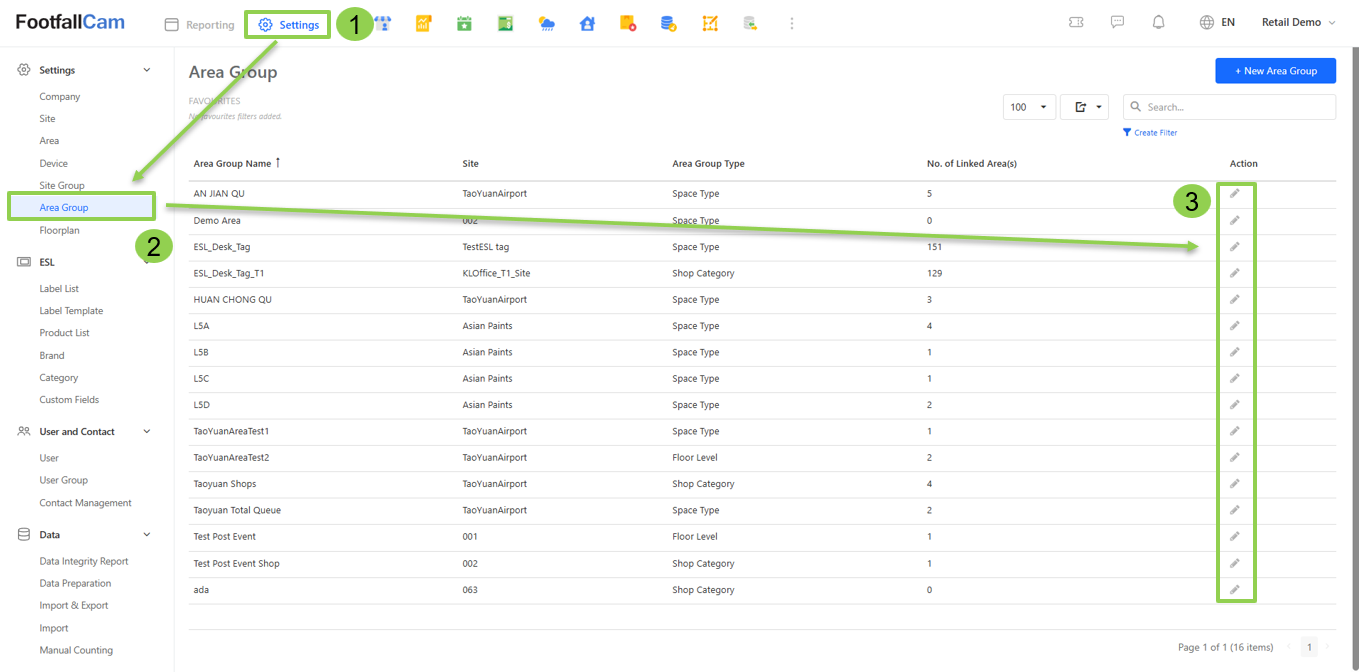
Step 2 - Update the linked area(s), then click on the "Save" button to save the changes.
2.3.4.2.2 Update in Area Settings
Step 1 - Go to Settings > Area to view the existing area list, click on the pen icon to edit the area details.
Step 2 - Update the area group tagging, then click on the "Save" button to save the changes.
2.3.4.3 How to Delete Area Group
If you wish to remove the area group, you may follow the steps below:
Step 1 - Go to Settings > Area Group to view the existing area group list, click on the pen icon to edit the area group details.
Step 2 - Click on the "Delete Area Group" button to remove the area group from the server.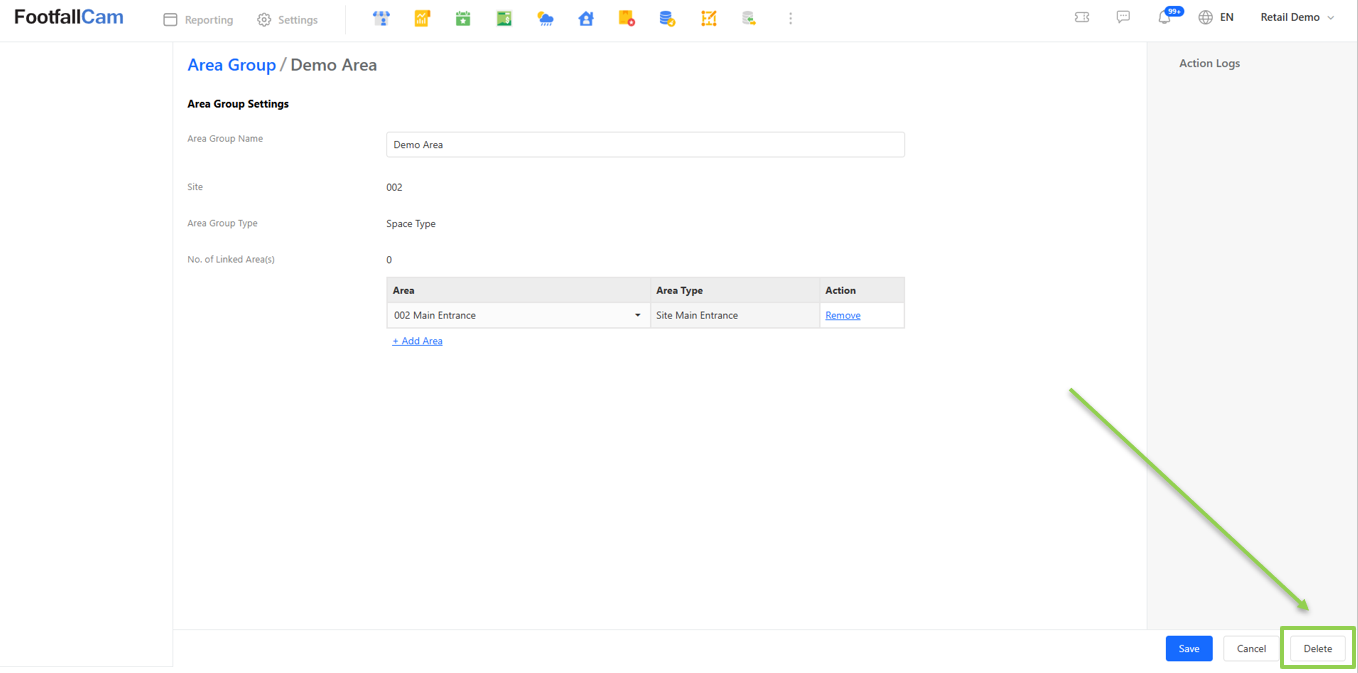
2.4 Floor Plan Settings
A Floor Plan is a diagram that visualises the location of cameras on a site's top-down floor plan. This diagram helps to confirm the number and type of devices needed to cover a site.
Users can visualise the regions within a site to be covered by each type of device. This is helpful, especially for users utilising CCTVs for people counting as the angle of CCTVs can also be visualised.
The diagrams will be stored in FootfallCam V9™ and can be easily retrieved for observation and update.
Without a floor plan, users may misjudge the number, type and mounting height of devices needed to cover a region. Without storing the floor plans in FootfallCam V9™, communication between the user and FootfallCam for the creation of a new site or an adjustment to an existing site will be less efficient due to the lack of visualisation.
2.4.1 Floor Plan Configuration
Step 1 - Find and click the "Site Manager" app. If the app is absent among your available apps, kindly contact "[email protected]".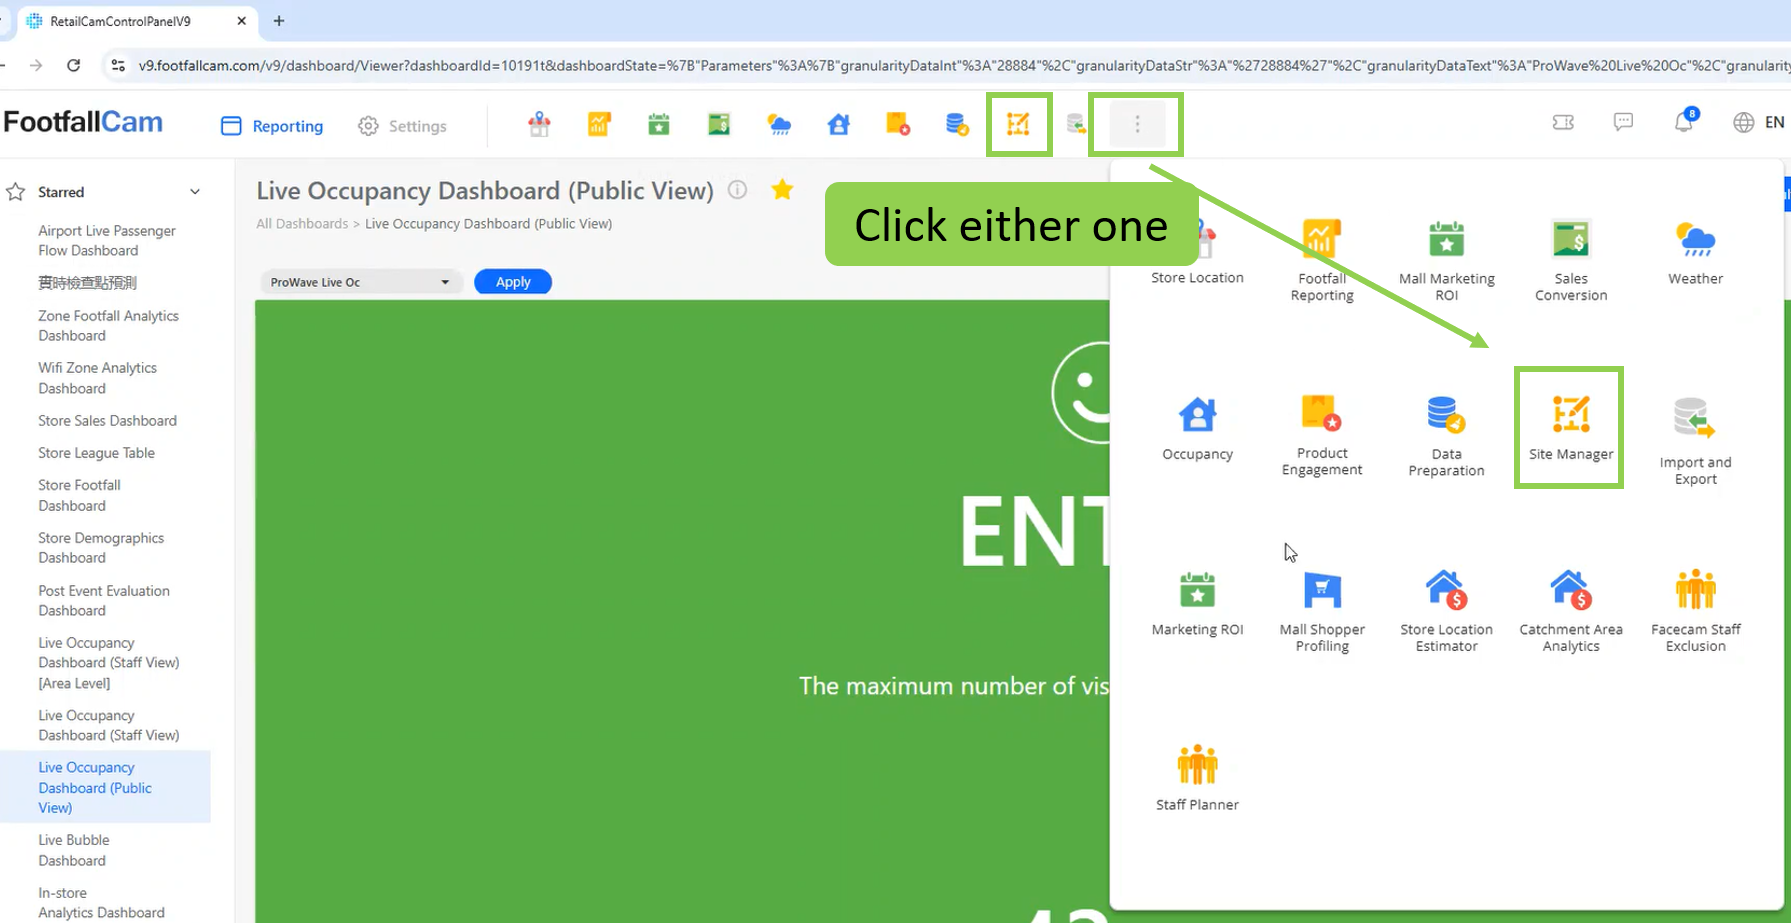
Step 2 - In the left navigation bar, click "Floor Plans".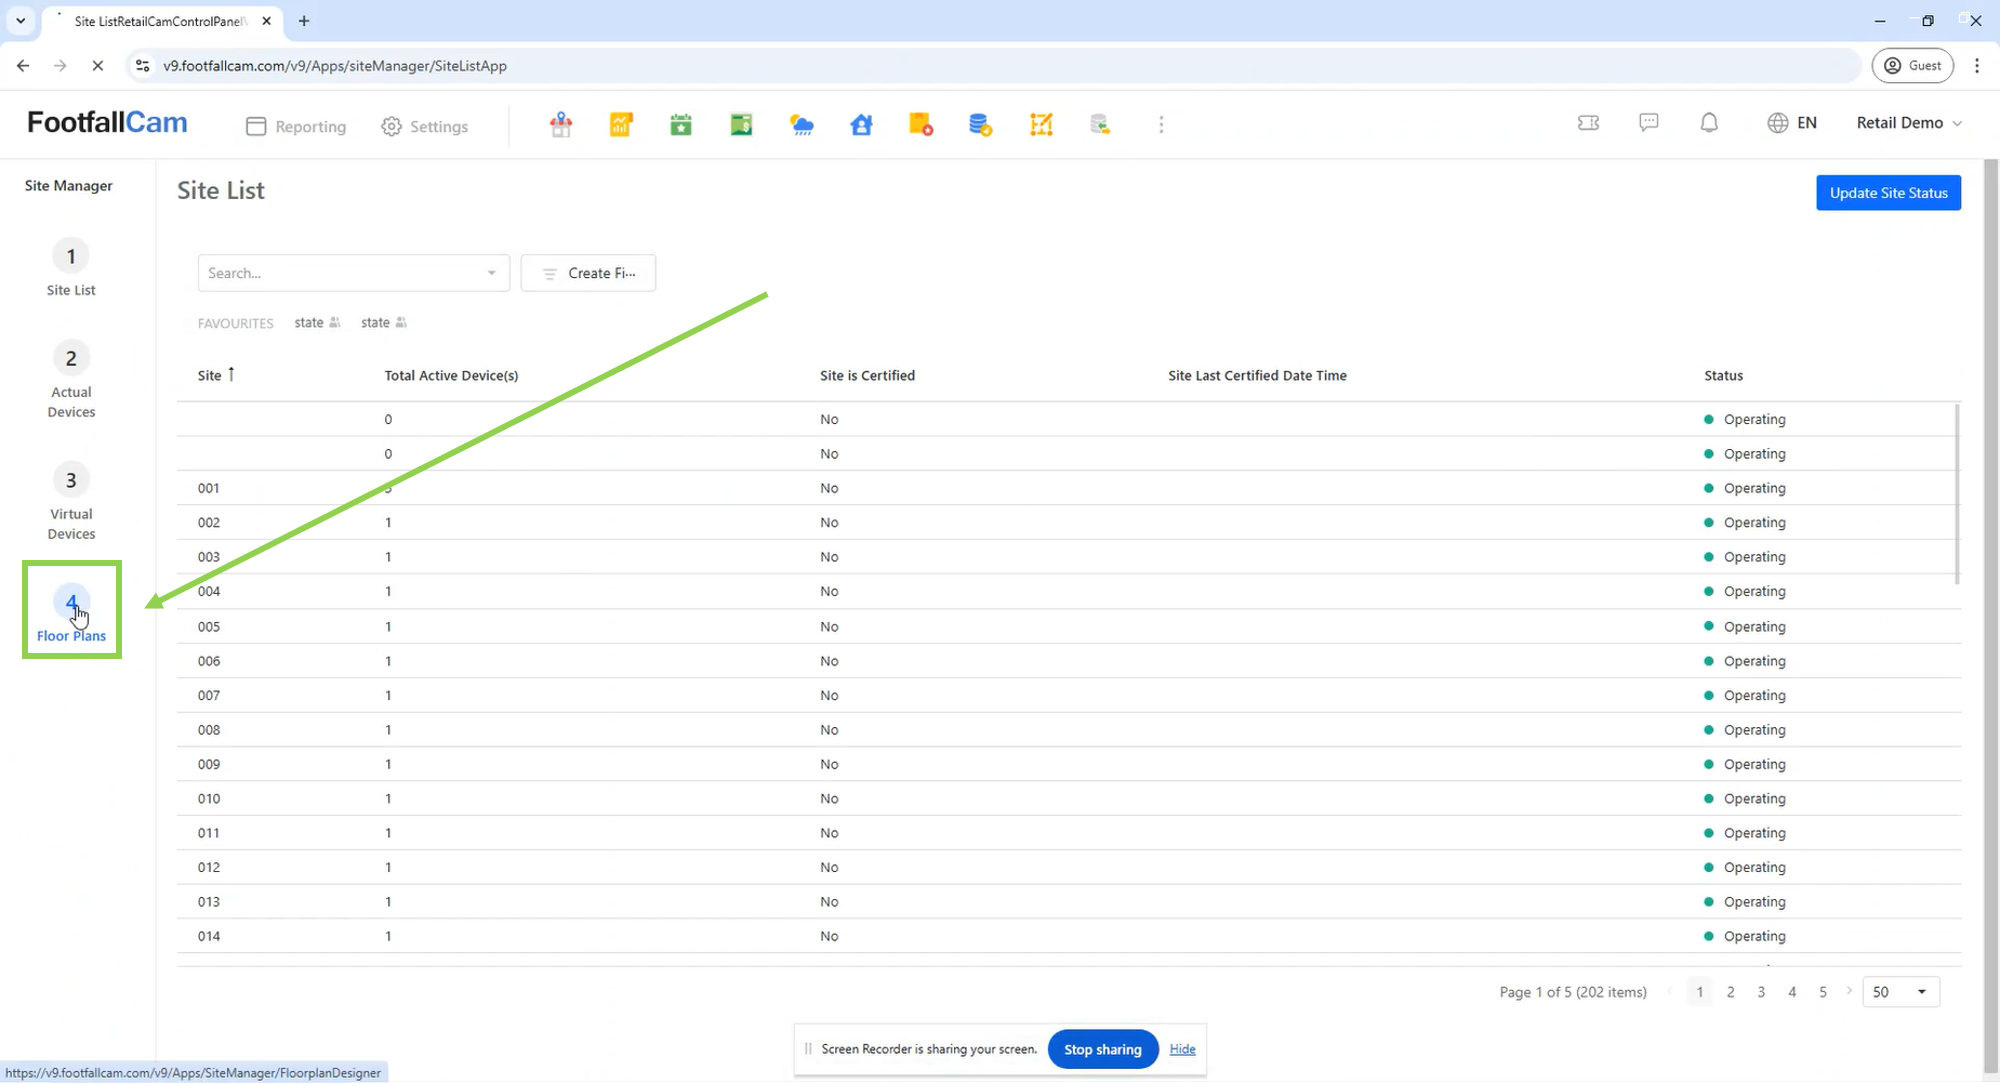
Step 3 - If you have a default site or any saved sites, you can begin to configure its floor plans. Otherwise, you can create a new site by clicking the "+" sign next to "Site Info".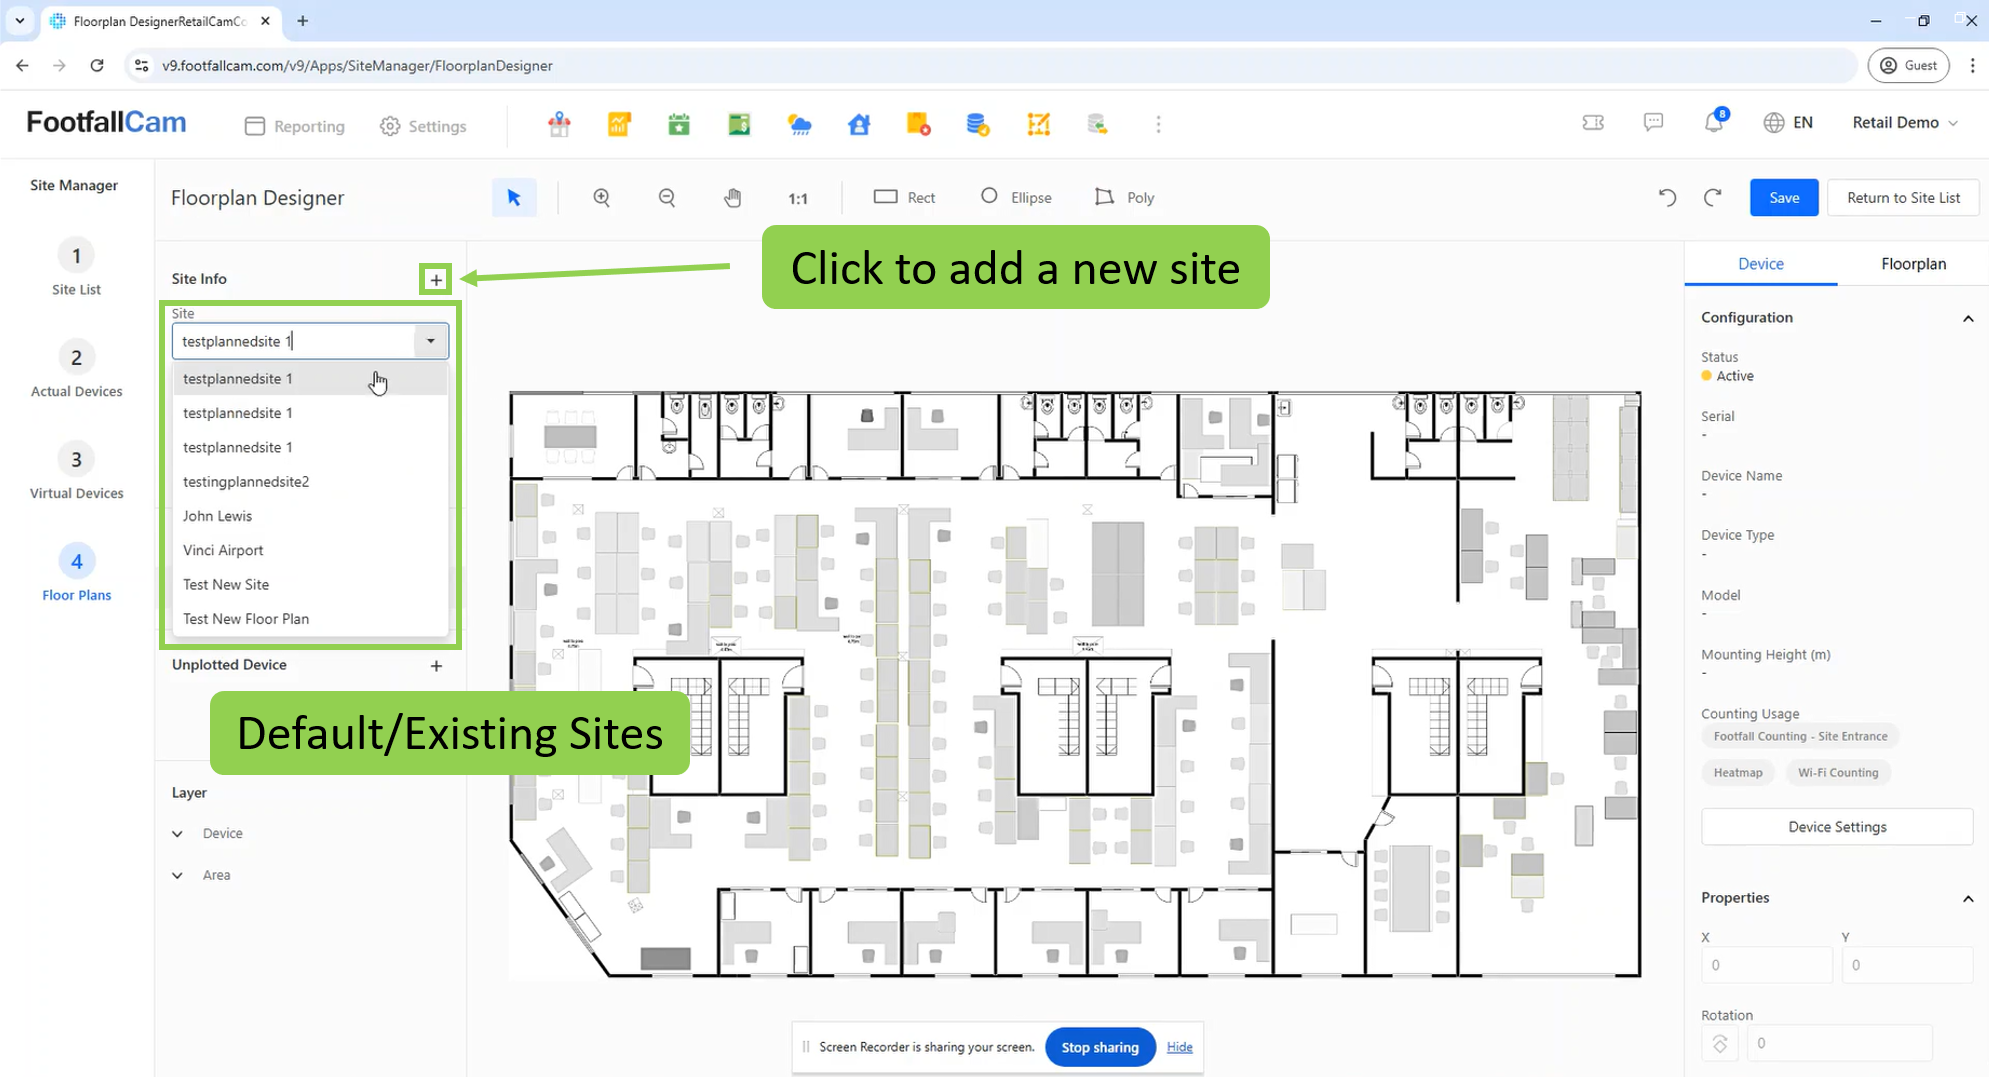
Step 4 - Fill in the "Site Name" and click "Add" to add a new site.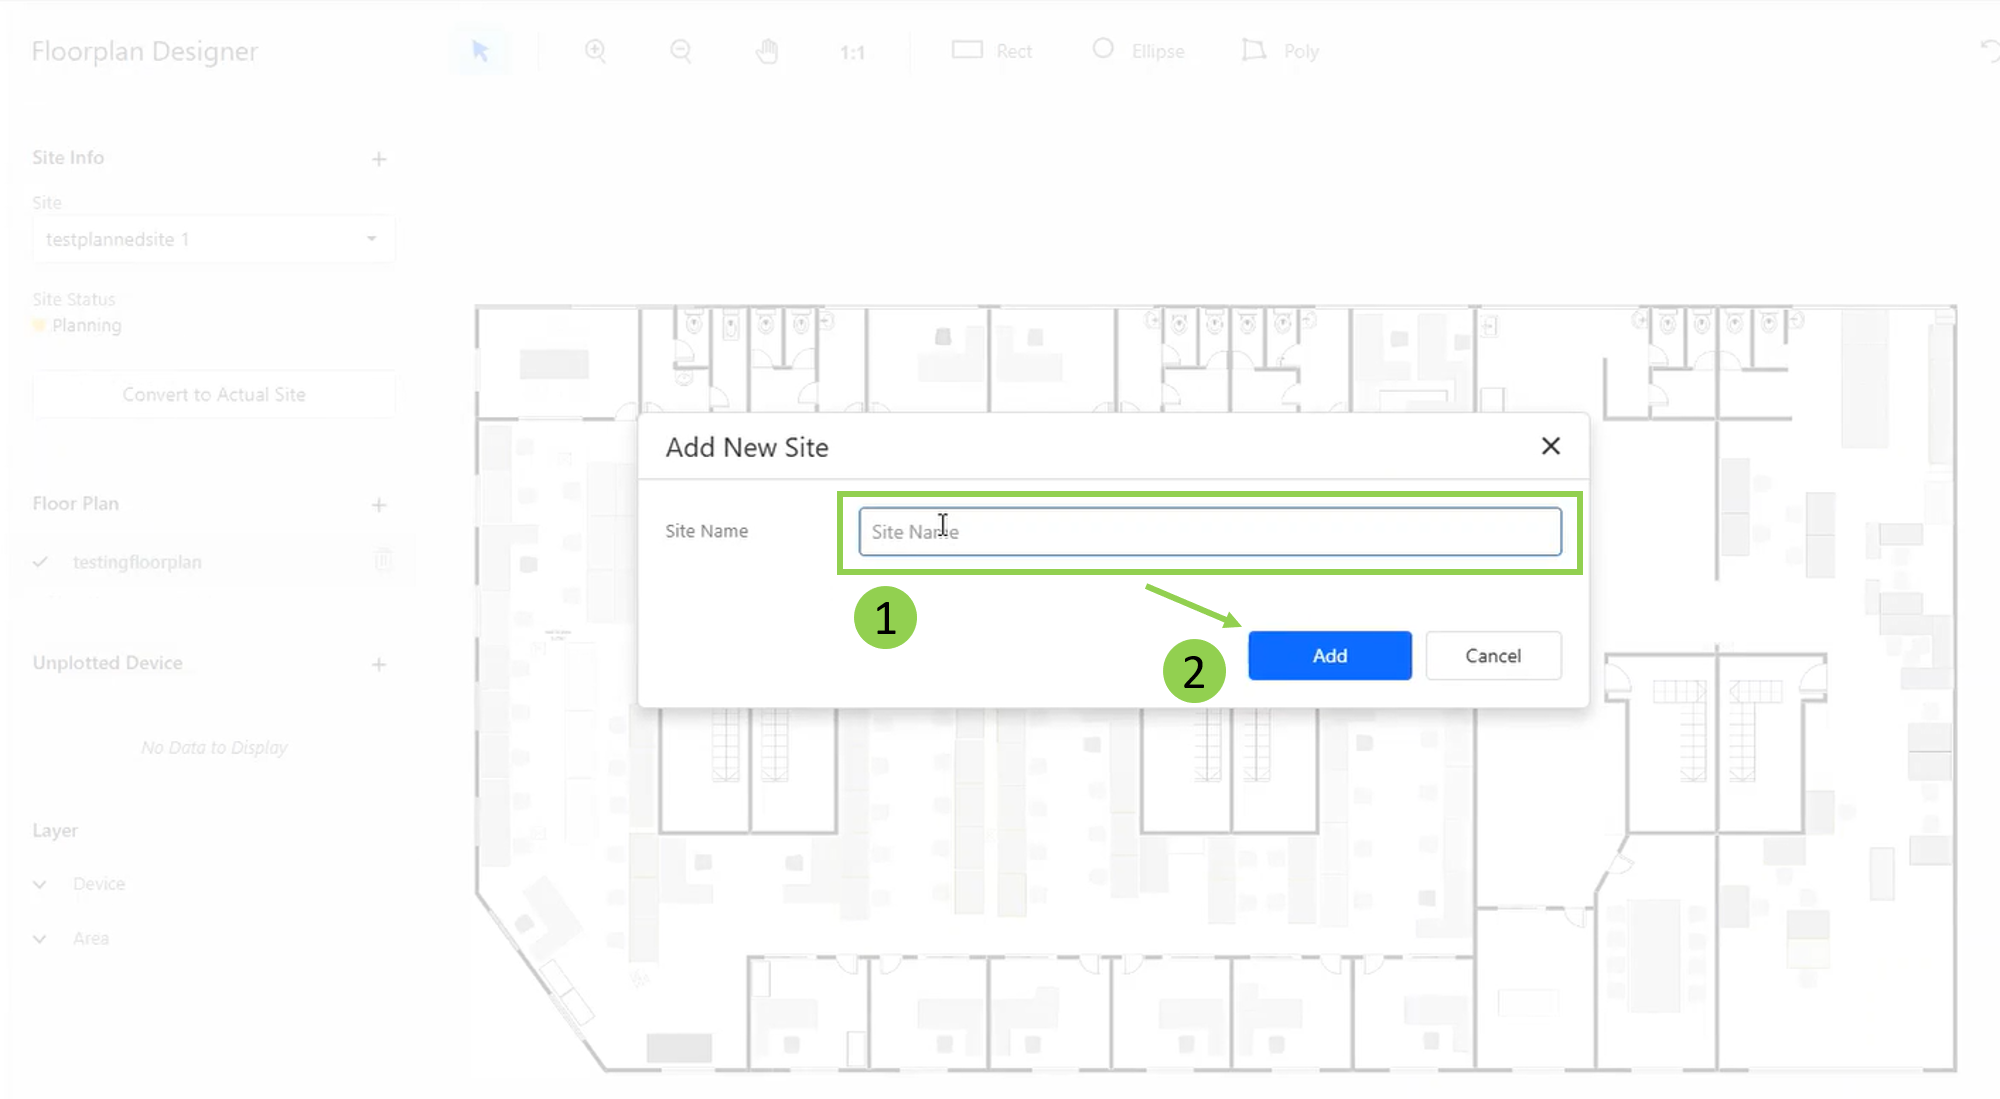
Step 5 - You are now brought to the "Floorplan Designer" of the new site. To add a new floor plan, click the "+" sign next to "Floor Plan".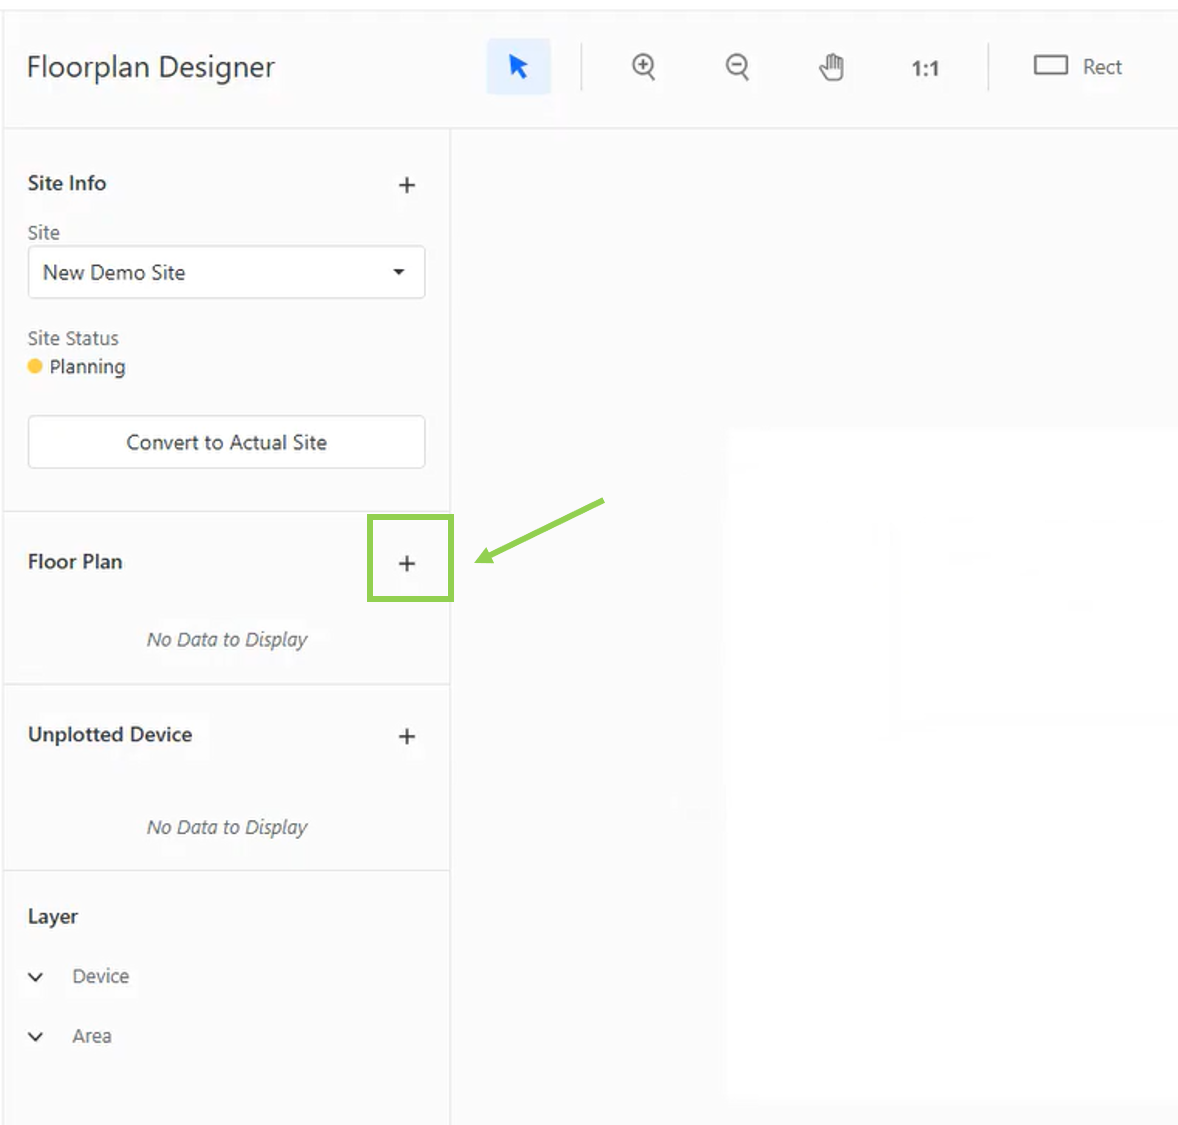
Step 6 - Fill in the "Floor Plan Name" and upload the image of this floor plan. After that, click "Add Floor Plan".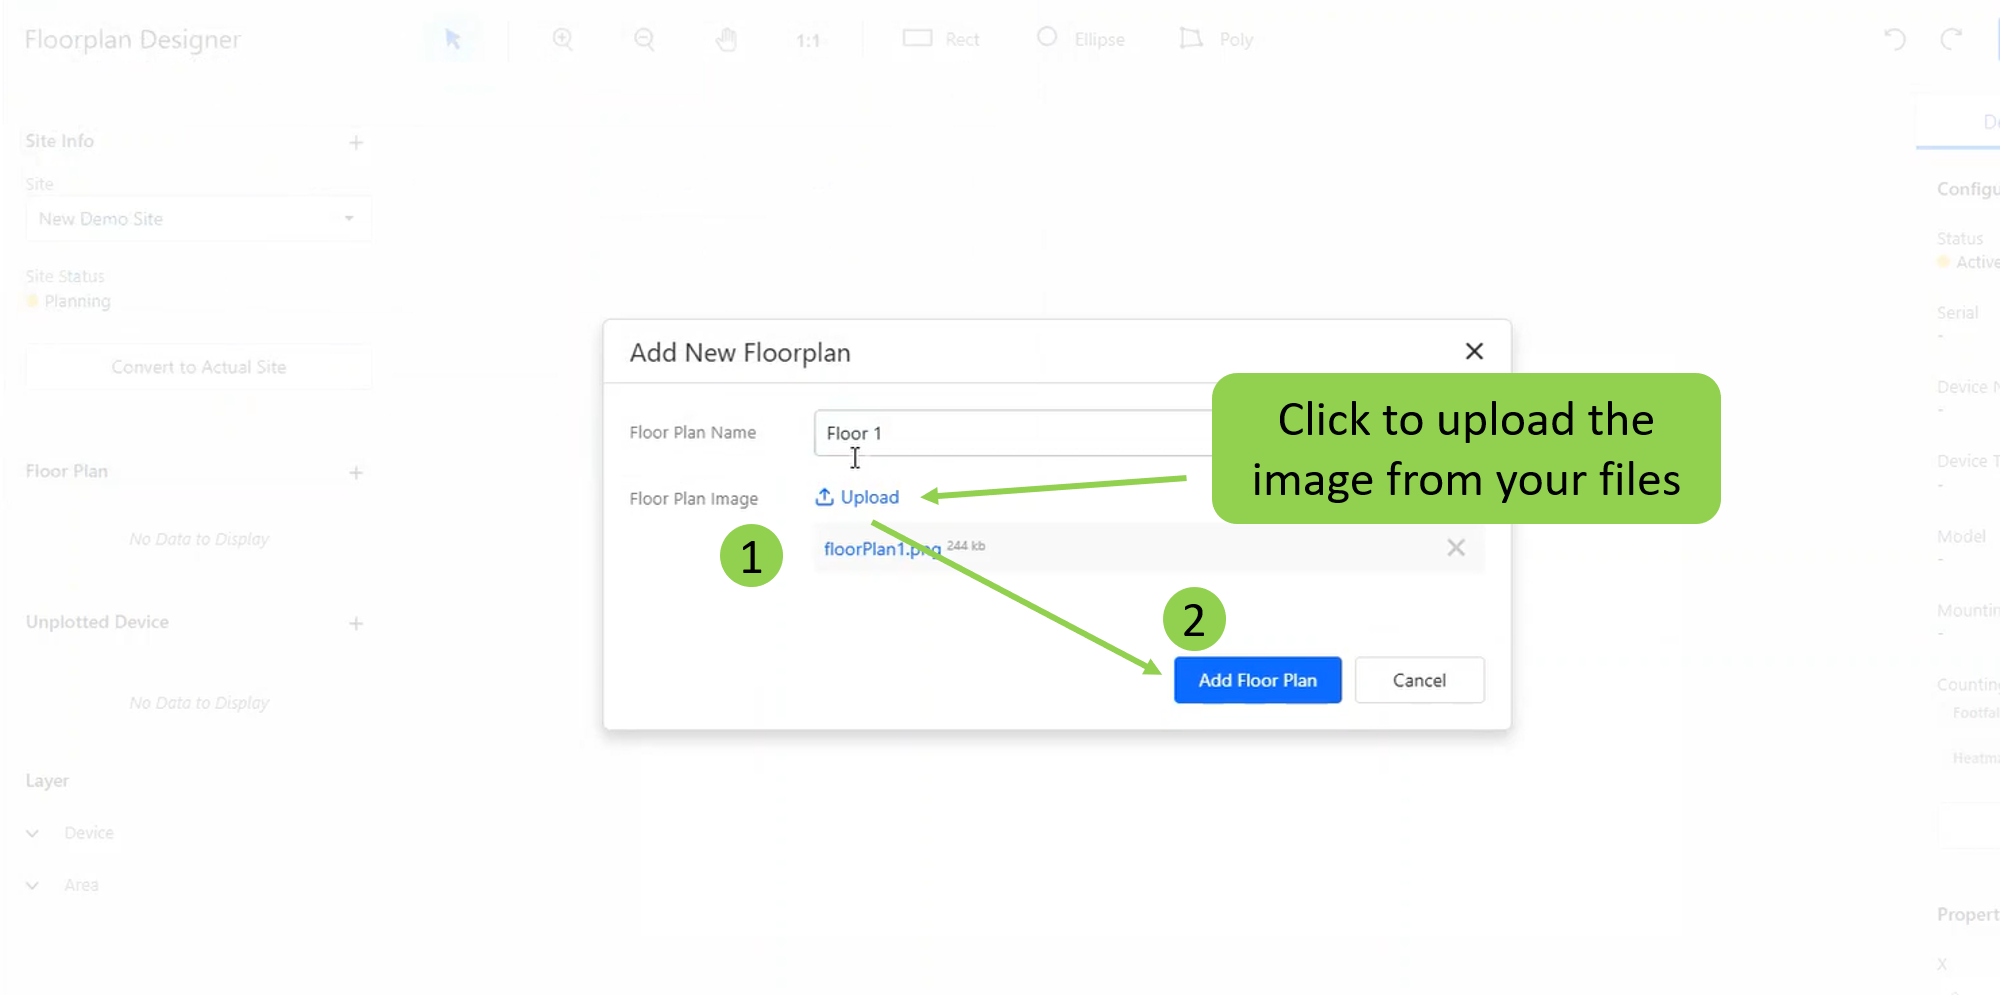
Step 7 - You have now added the image of your floor plan. Begin your configuration by setting a reference length with any two points on the floor plan. Insert the actual distance (in metres) between these two points and click "Confirm".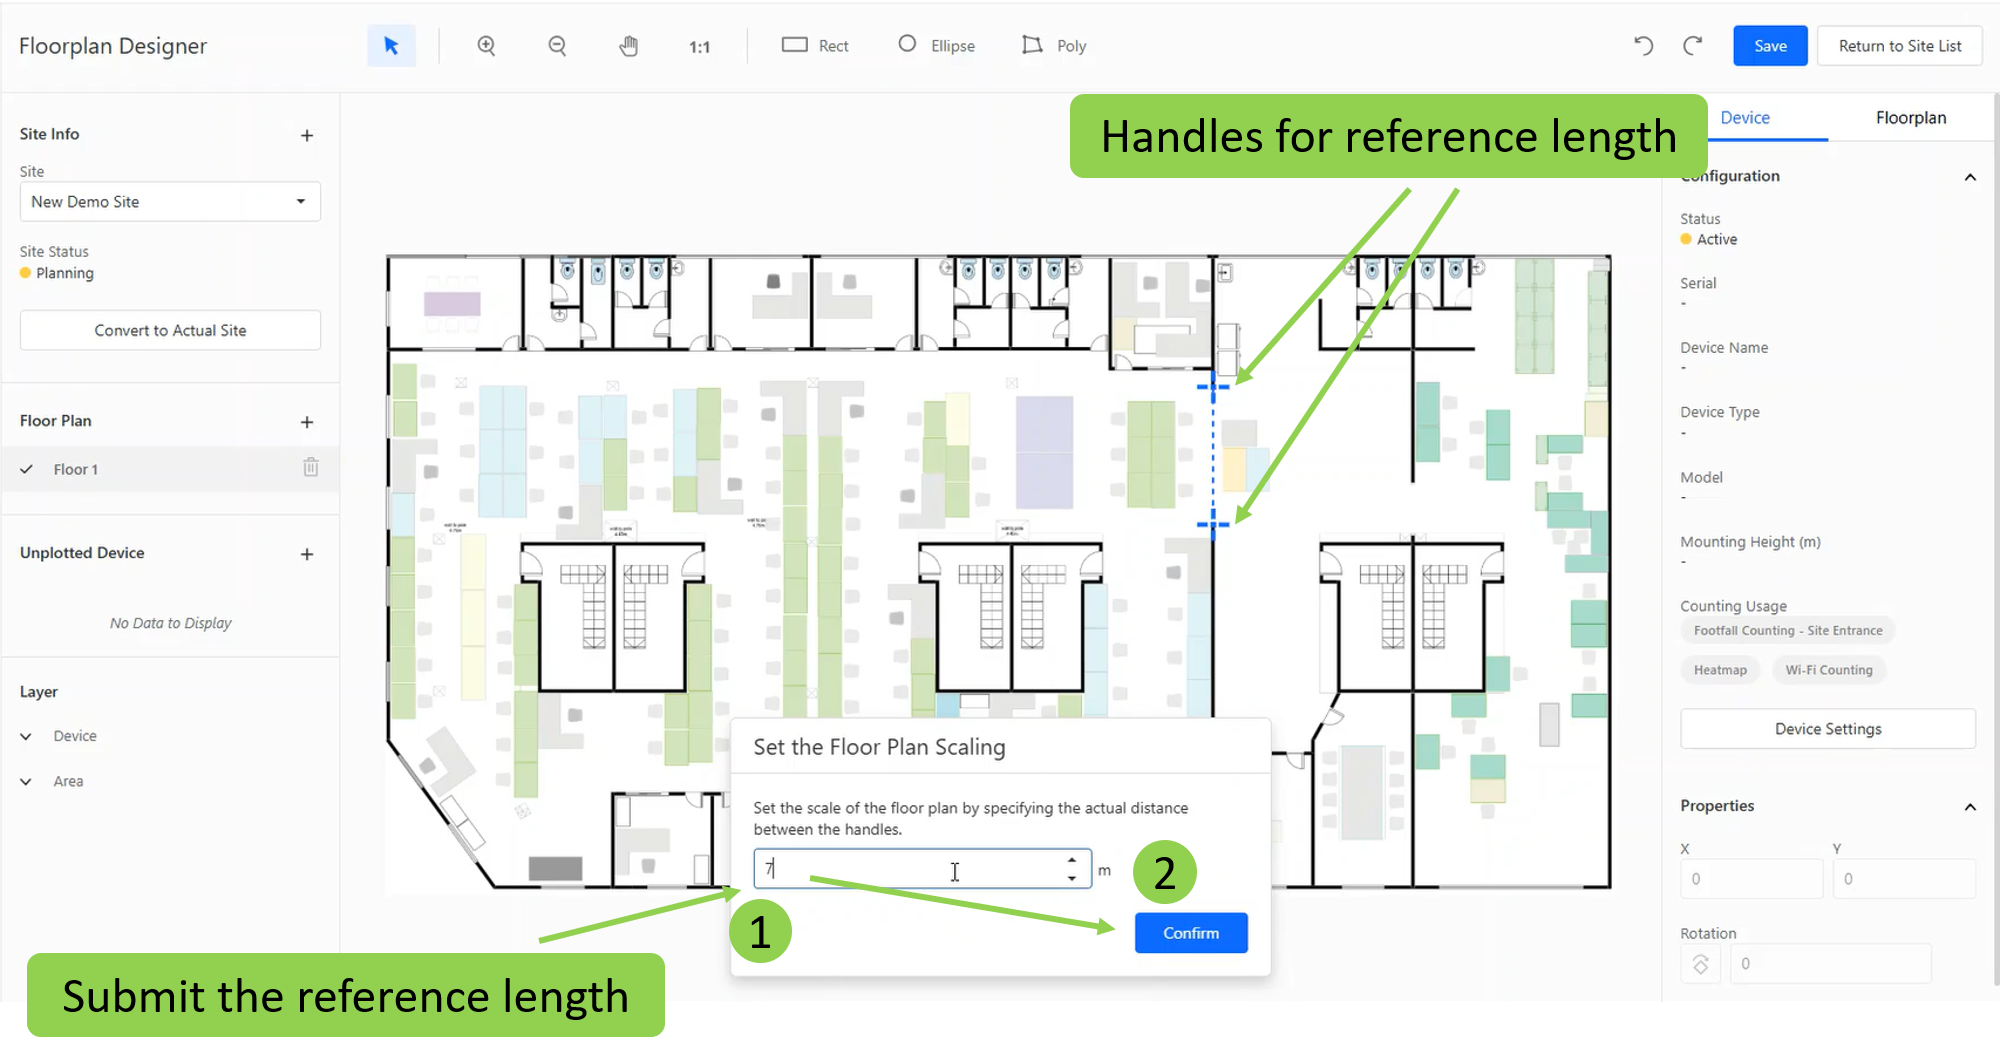
Step 8 - Click the "+" sign next to "Unplotted Device" to introduce a device to this floor plan.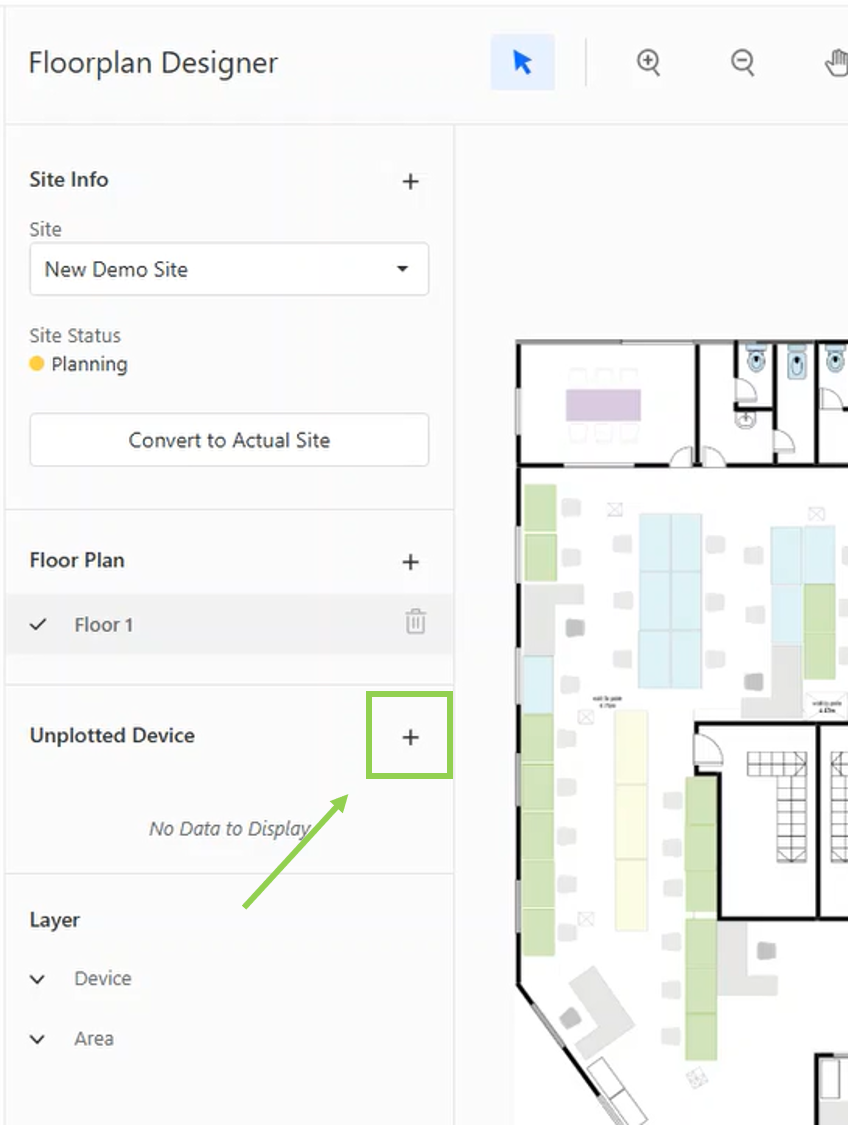
Step 9 - Fill in the form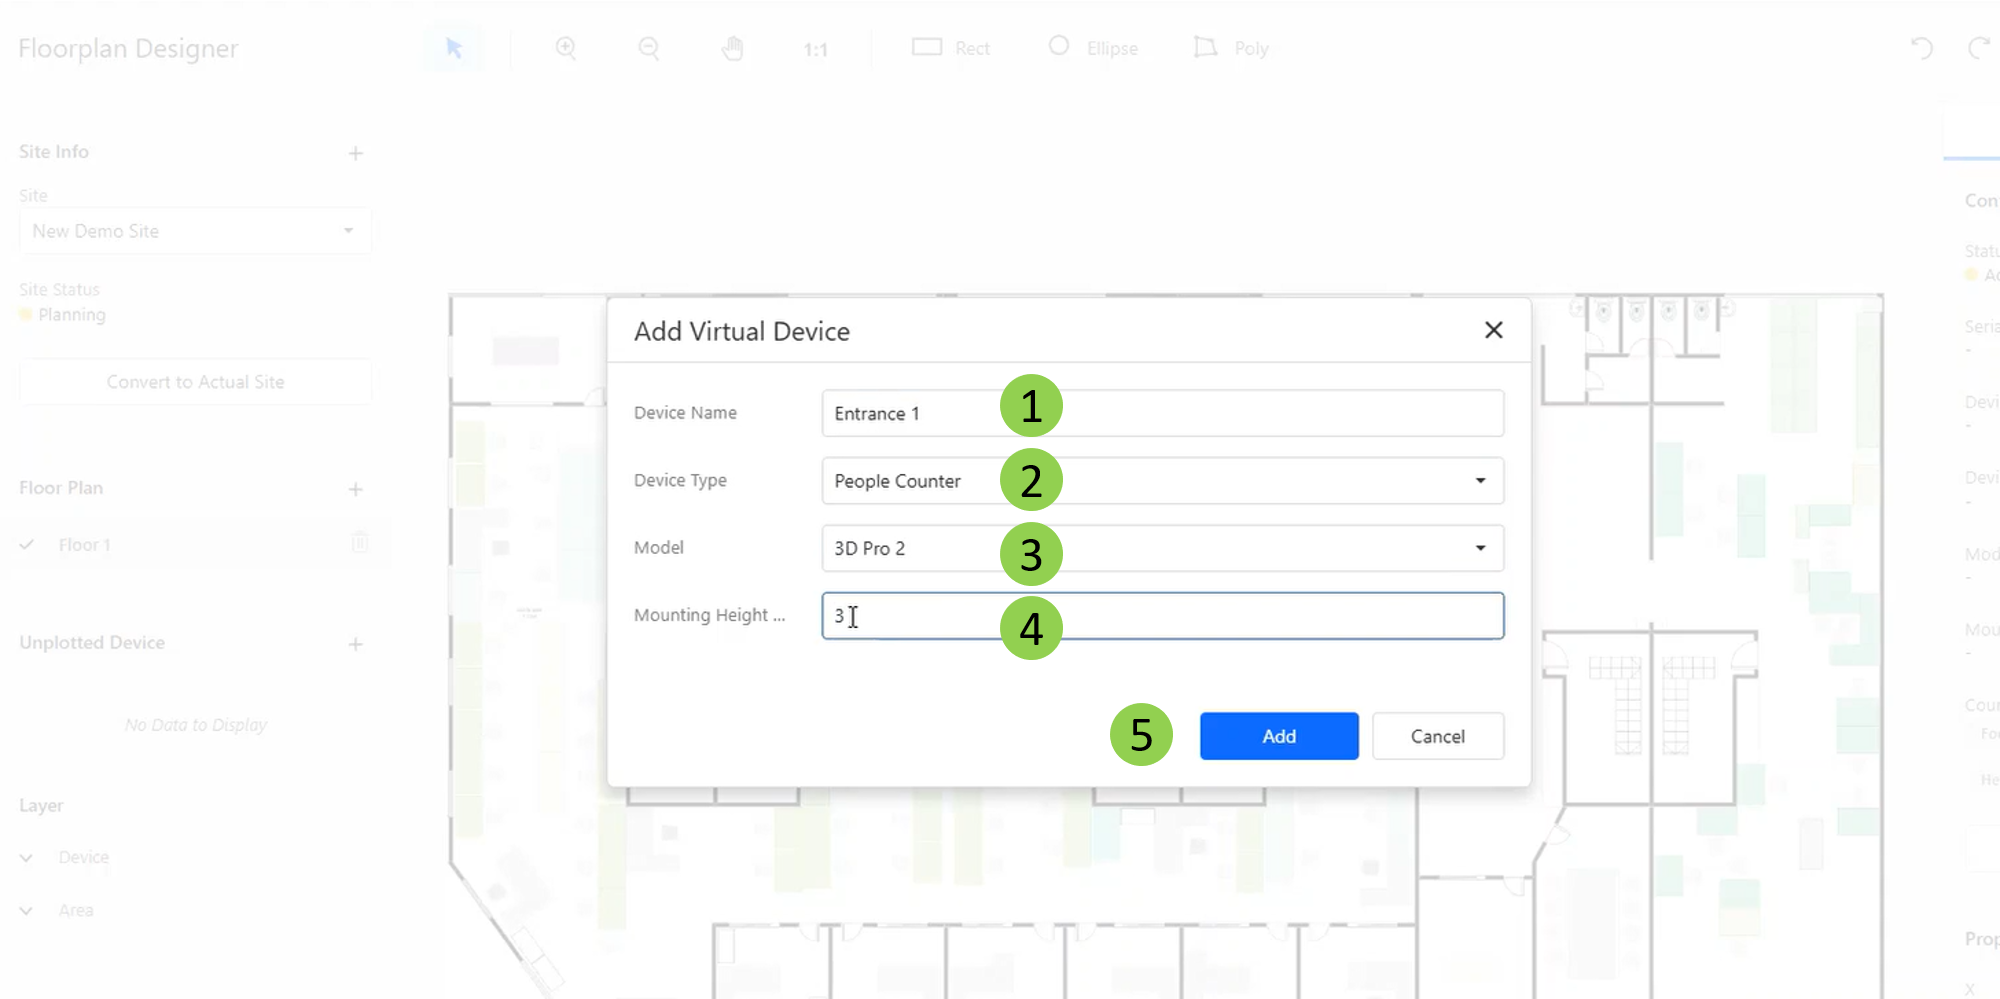
| No. | Item | Description |
| 1 | Device Name | The name given to this device for identification purposes. |
| 2 | Device Type | Select from among the available options to determine the type of your device. |
| 3 | Model | If the device has multiple models, select the desired model among the options. |
| 4 | Mounting Height | Input the height between the device and the floor in metres. |
| 5 | Add | Click this after filling out the form. |
Step 10 - In the "Layer" section, your added device will be shown under the "Device" list. Drag your device to place it onto the floor plan.
Step 11 - Use the "Rotation" field to accurately rotate a device by a given degree.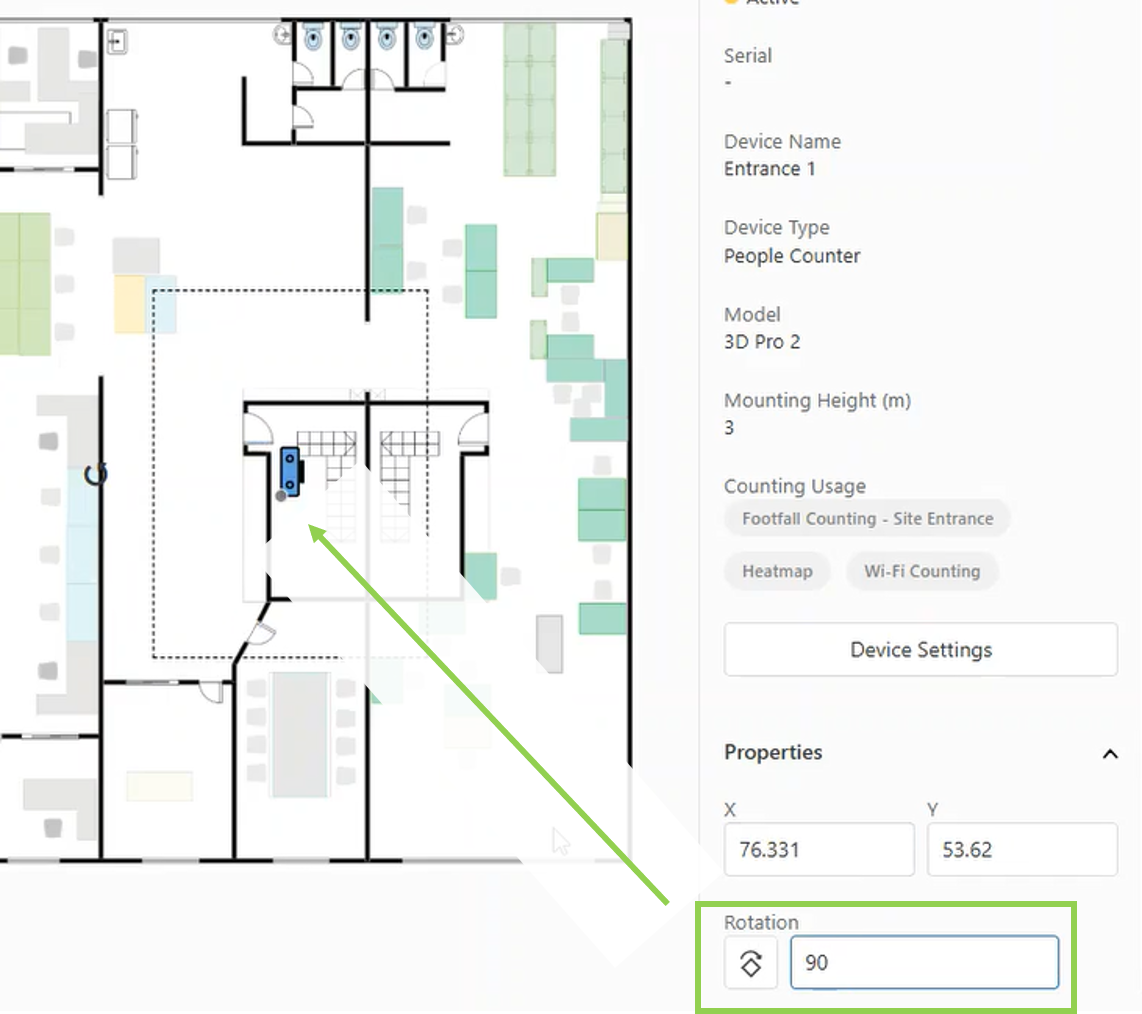
Step 12 - From the list of devices, click the "eye" button next to a device to hide it from the floor plan.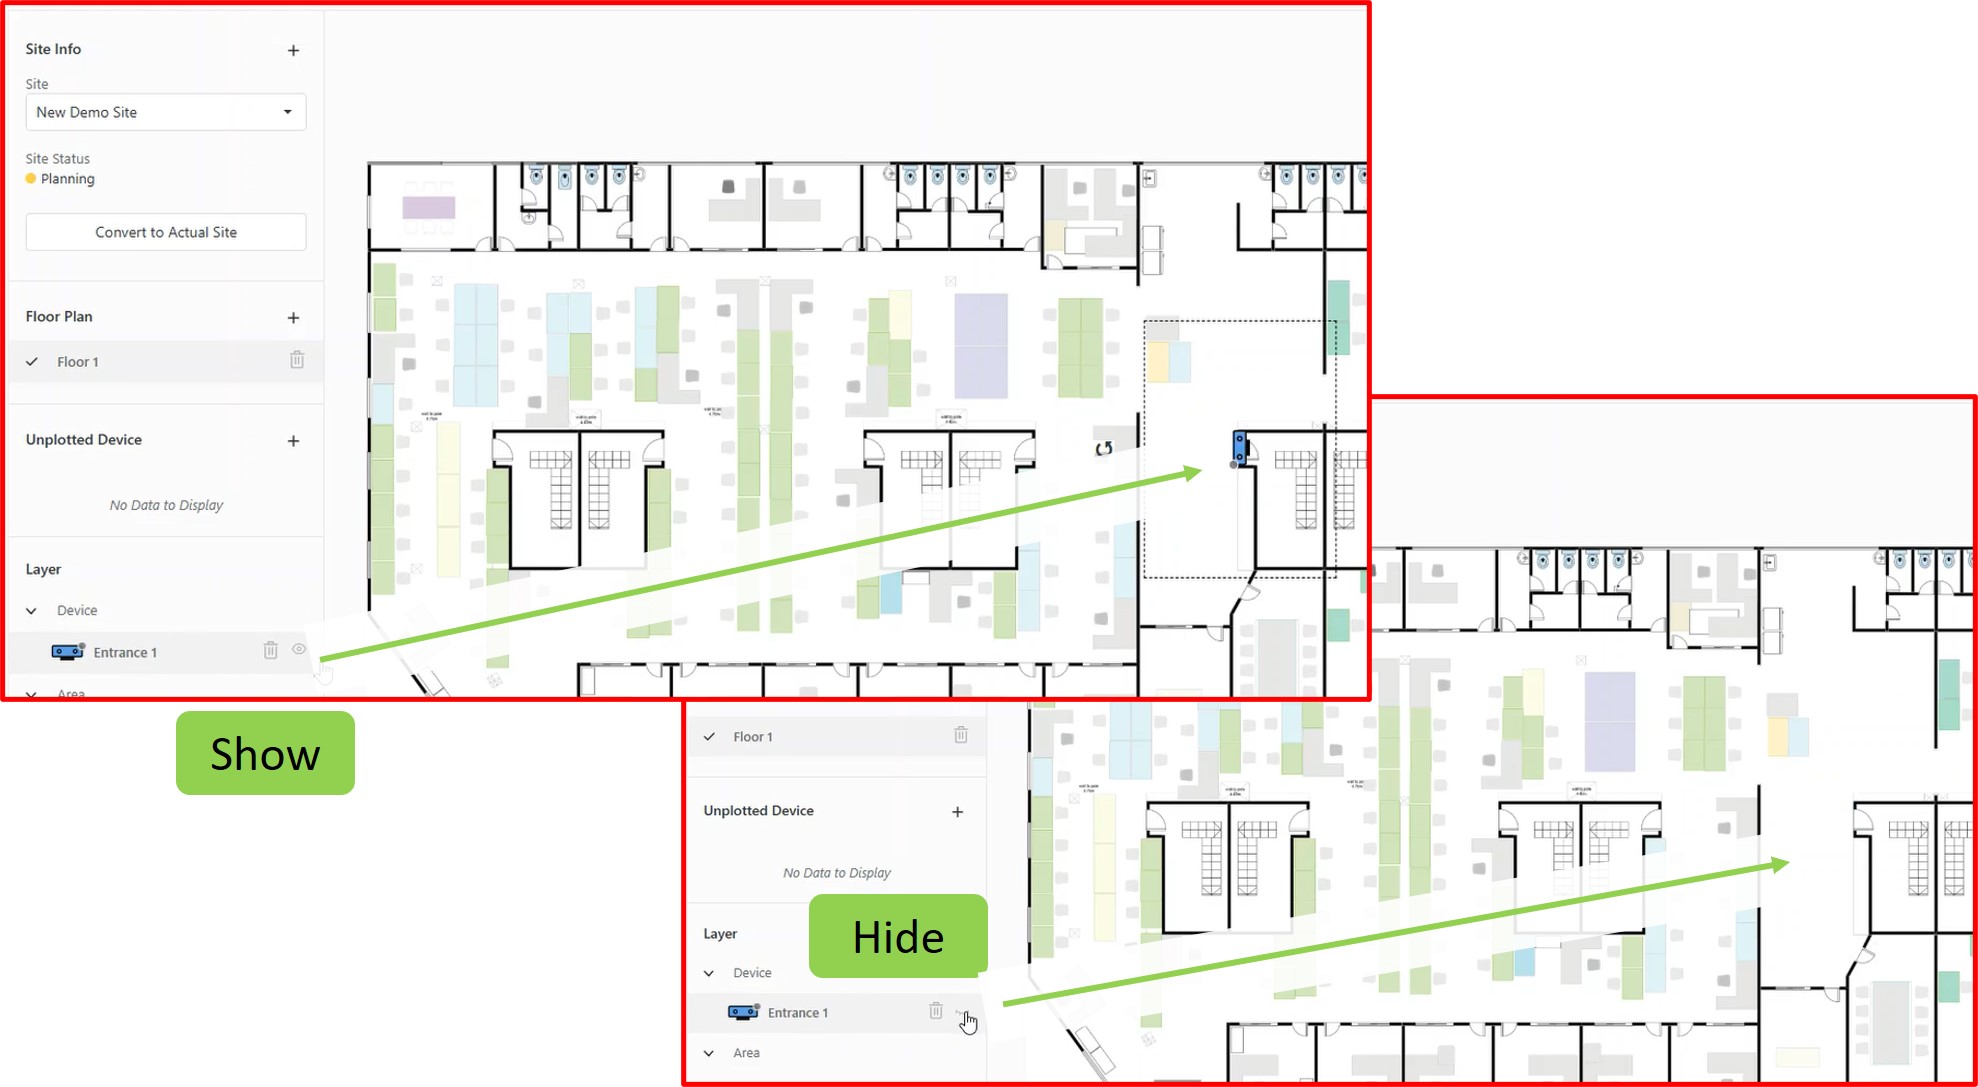
Step 13 - To remove the device from the floor plan, click the "bin" button next to it. This will return the device to the "Unplotted Device" section.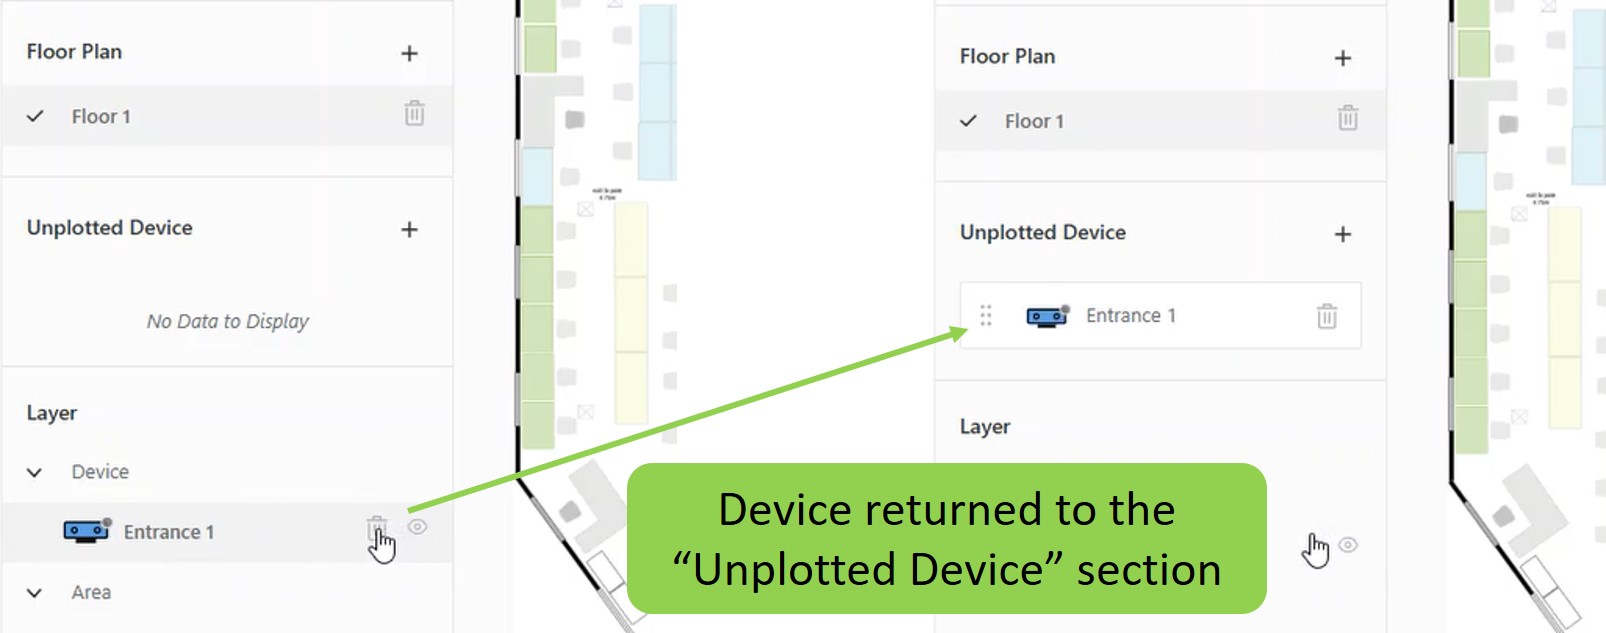
Step 14 - To permanently remove this device, click the "bin" next to the device while it is still in the "Unplotted Device" section.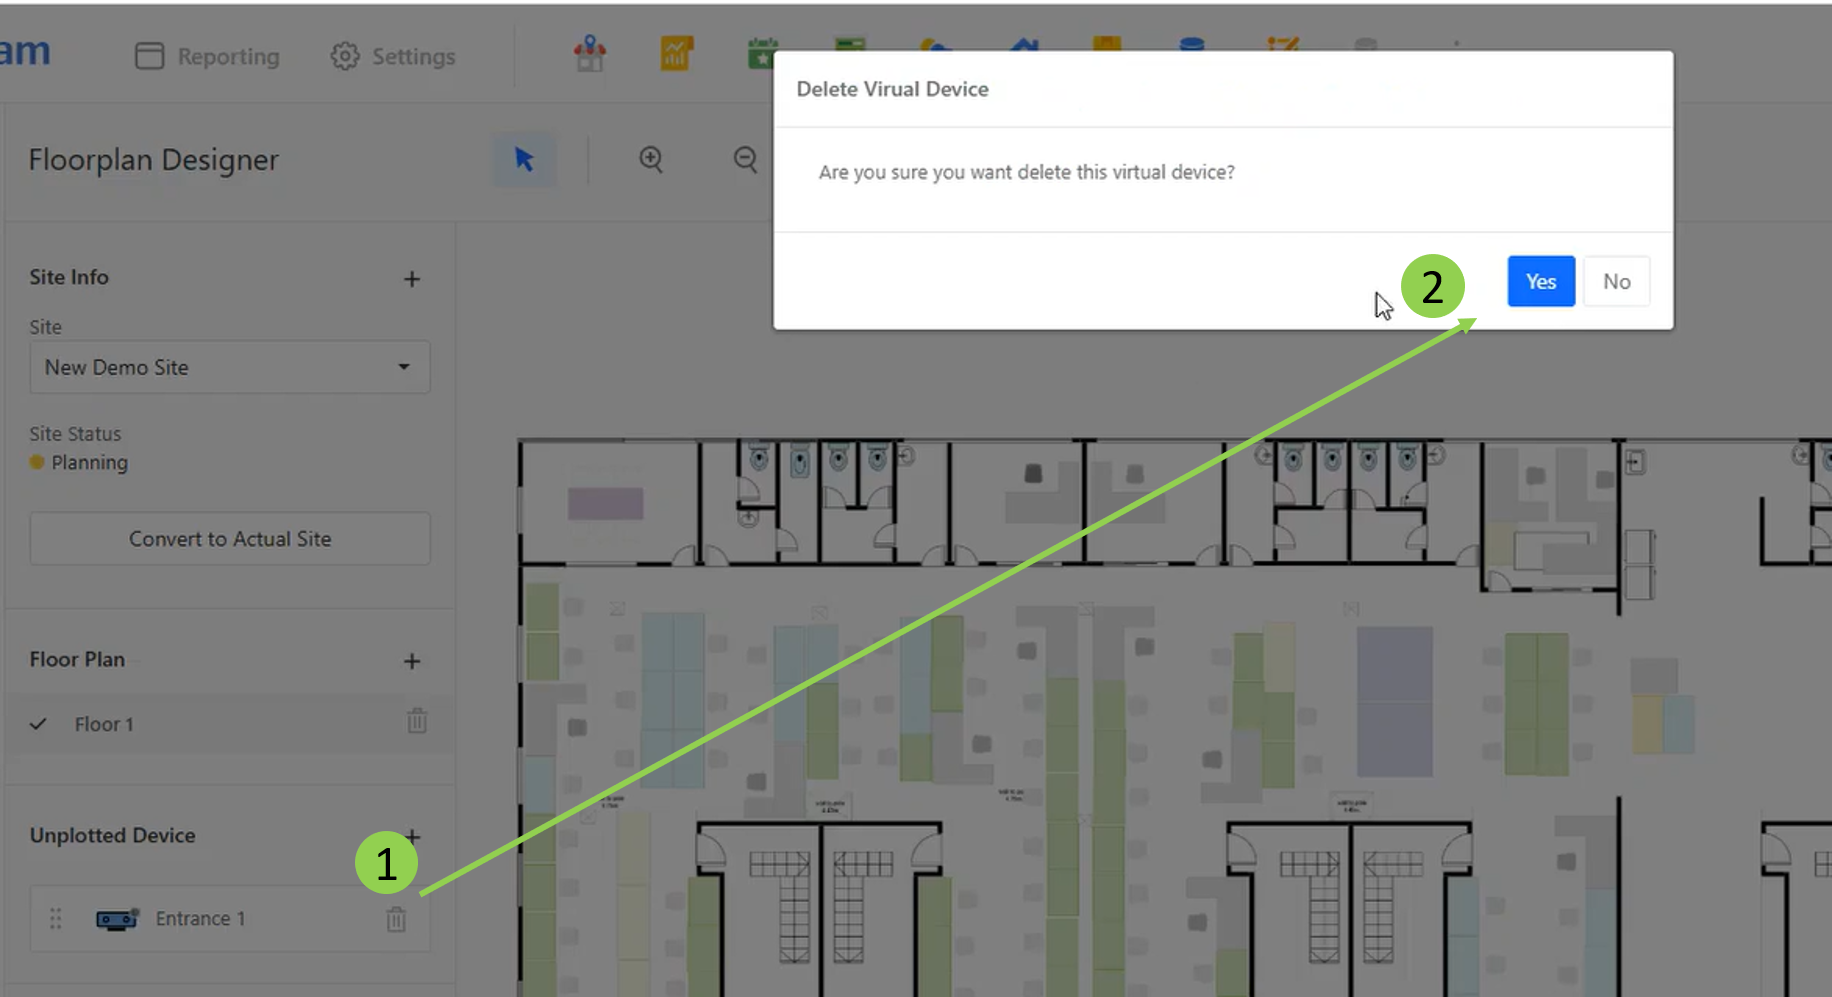
Step 15 - Click the "Save" button in the top right section after completing your changes to the current floor plan on this site.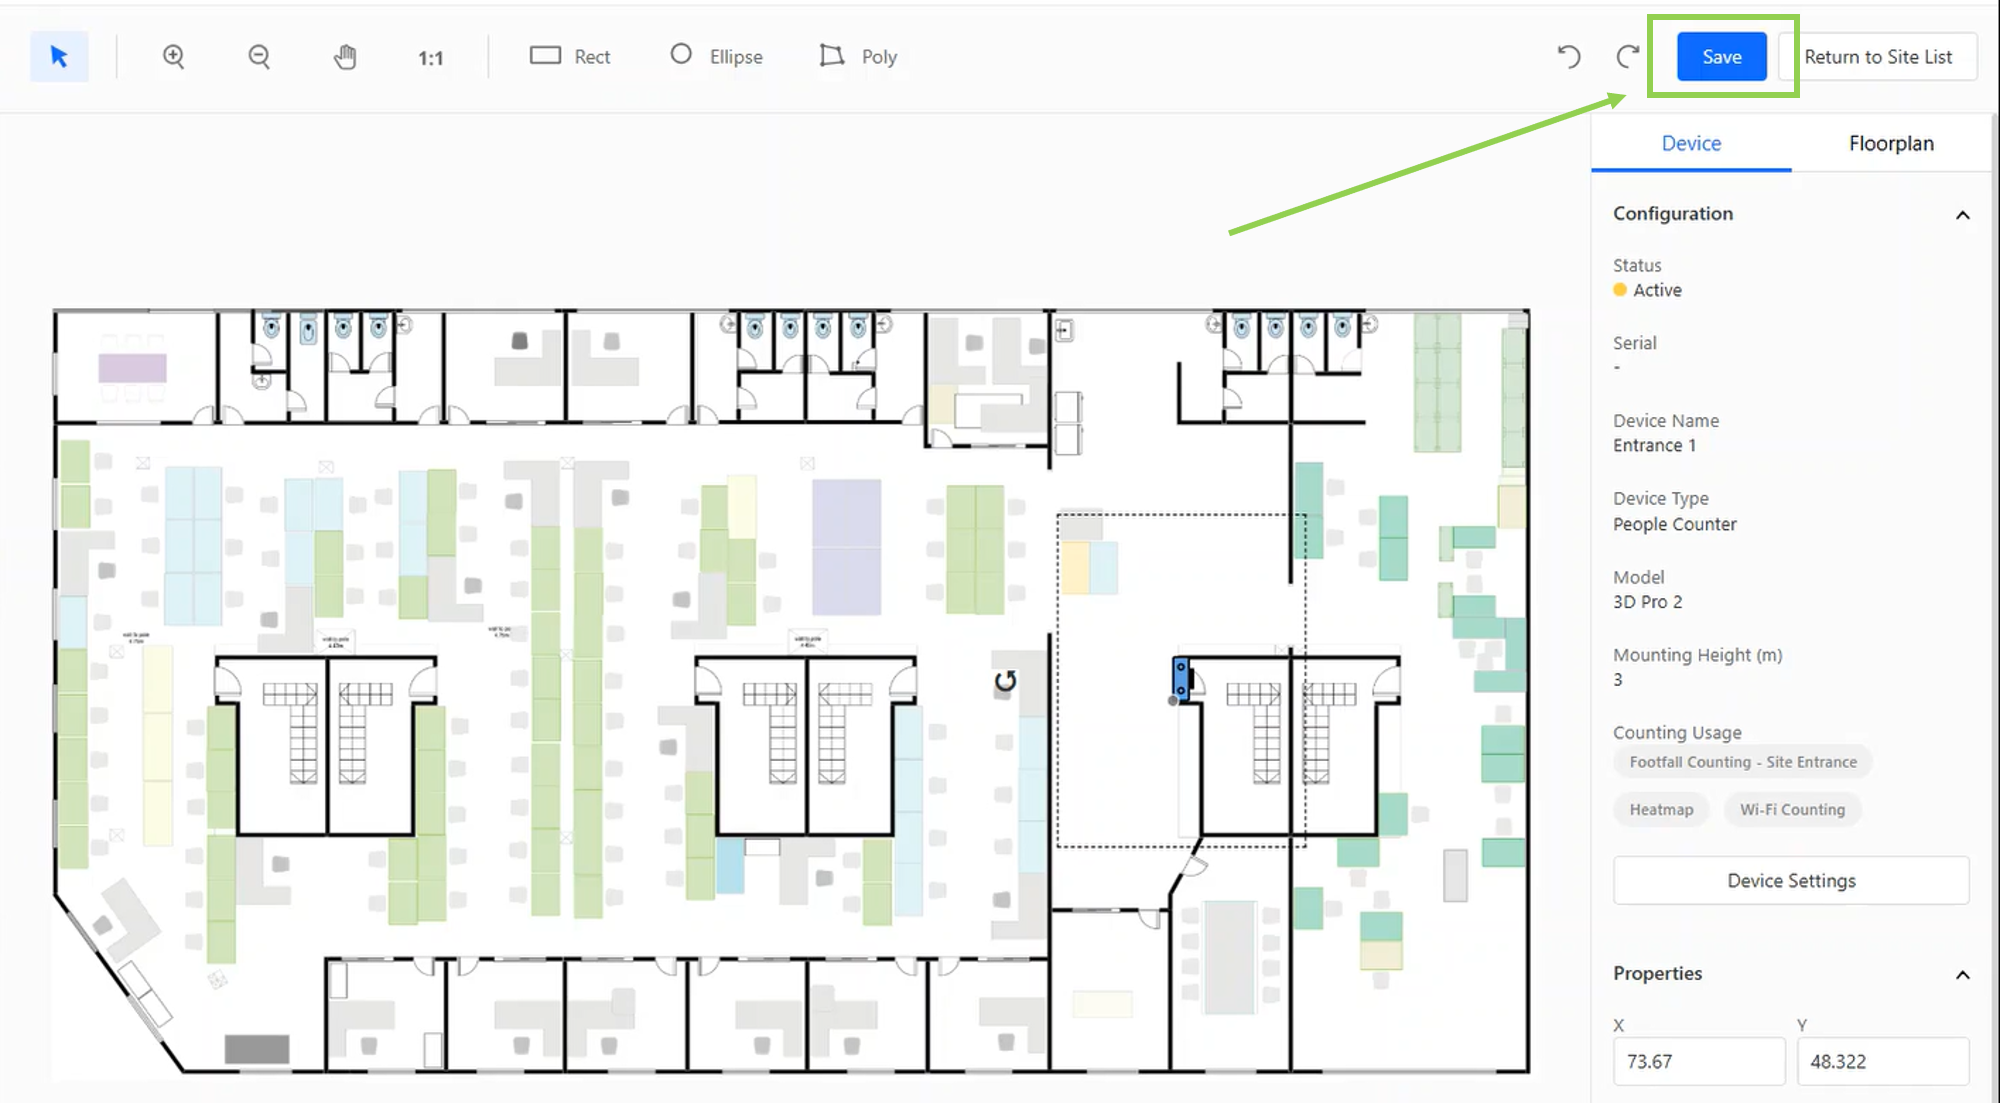
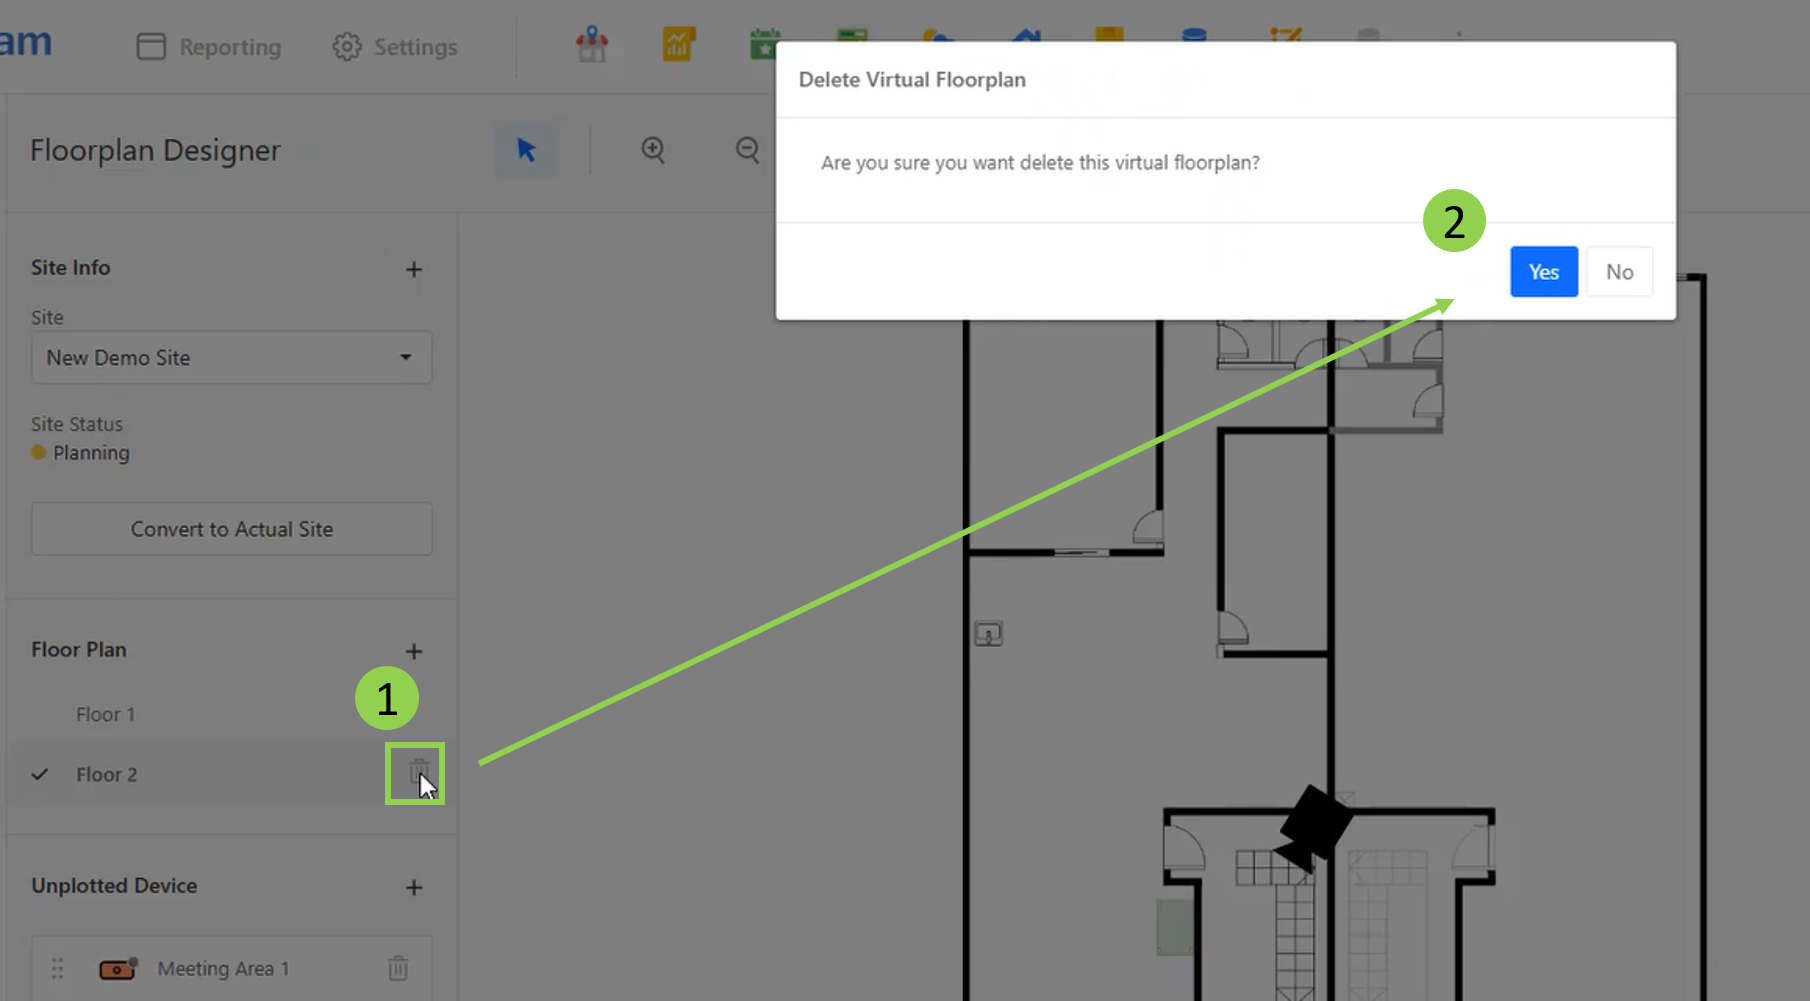
Step 16 - To add a new floor plan to this site, click the "+" sign next to "Floor Plan" and repeat steps "6." to "15.".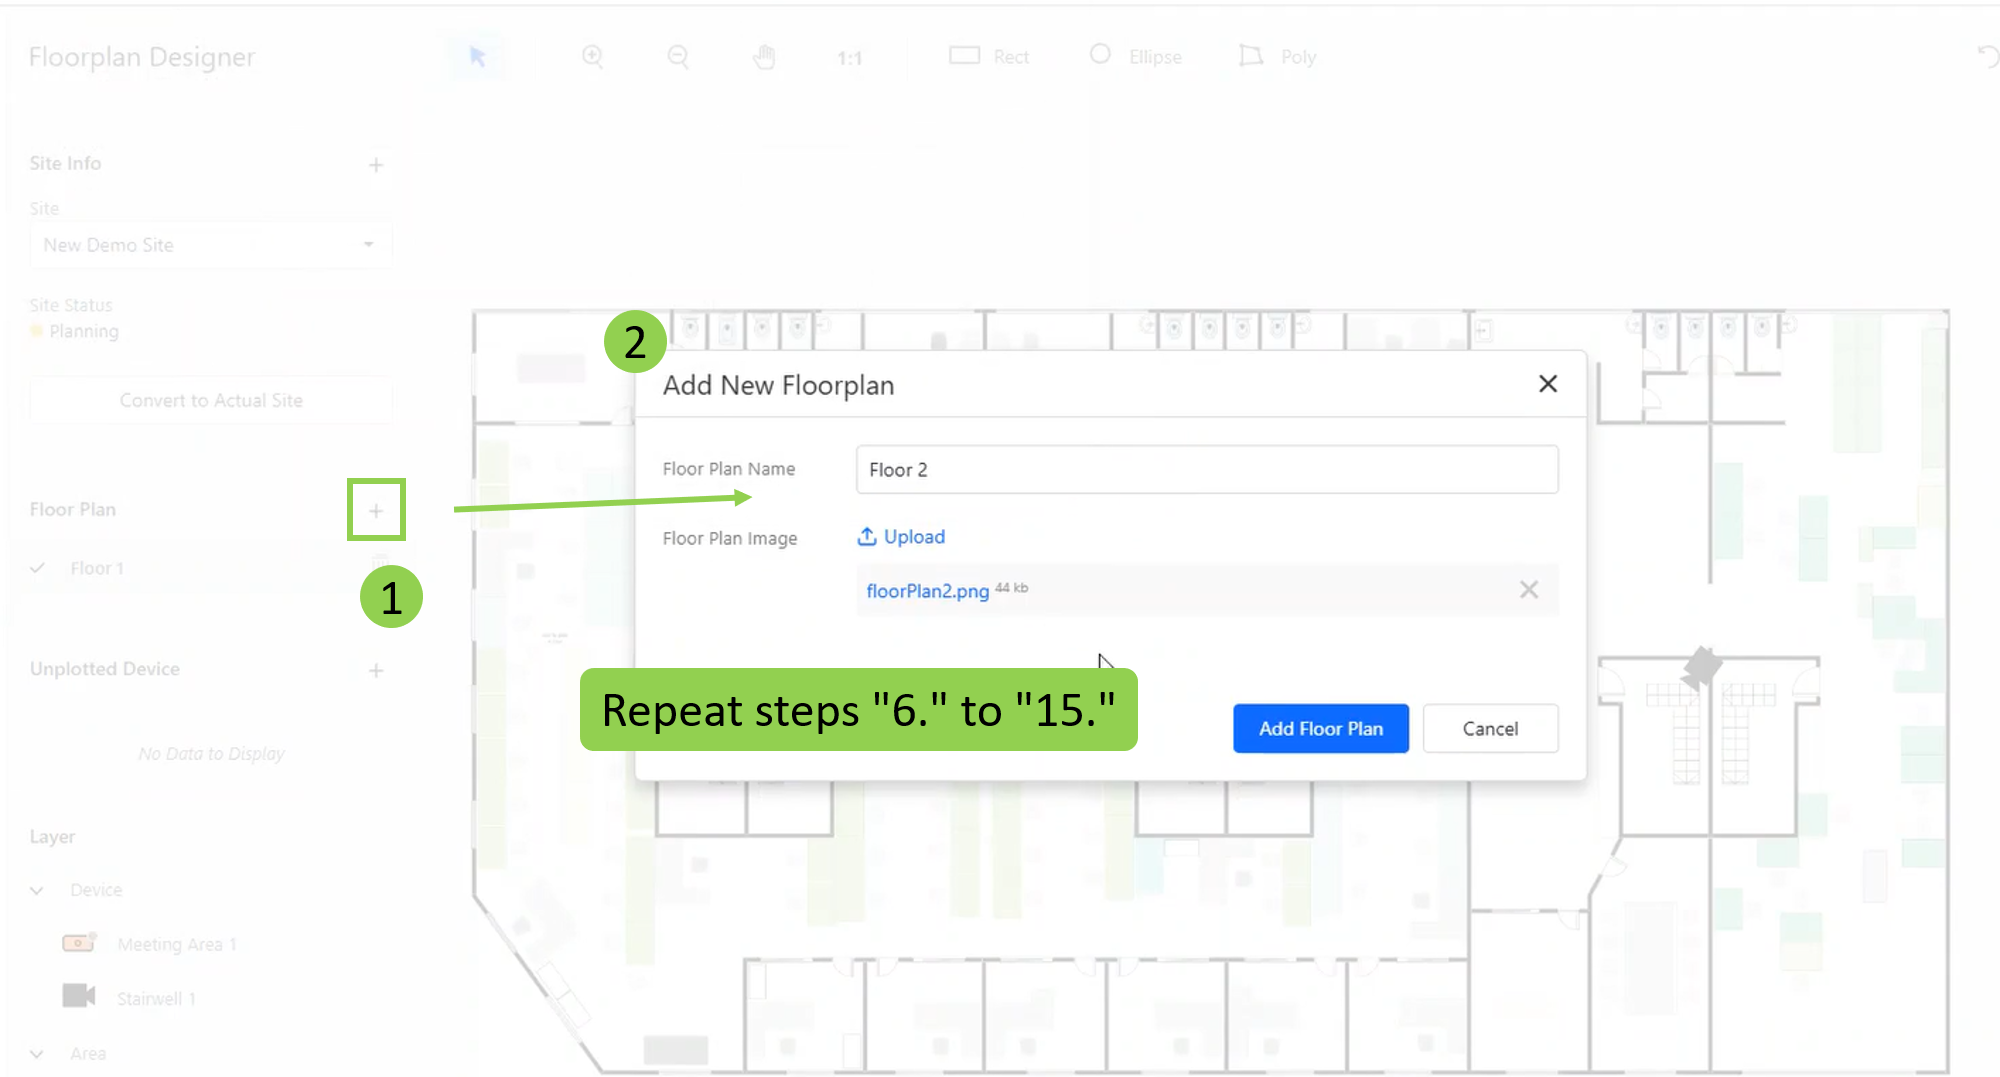
Step 17 - To delete a floor plan from a site, click the "bin" button next to that floor plan in the "Floor Plan" section.