


This chapter mainly explains how to export data efficiently from the server based on your specific needs. There are various methods available in our portal to export the necessary data, including via Email, FTP/SFTP, Link, Logic ERP, Power BI Connector, REST API, and SQL Query.
1.1 Email
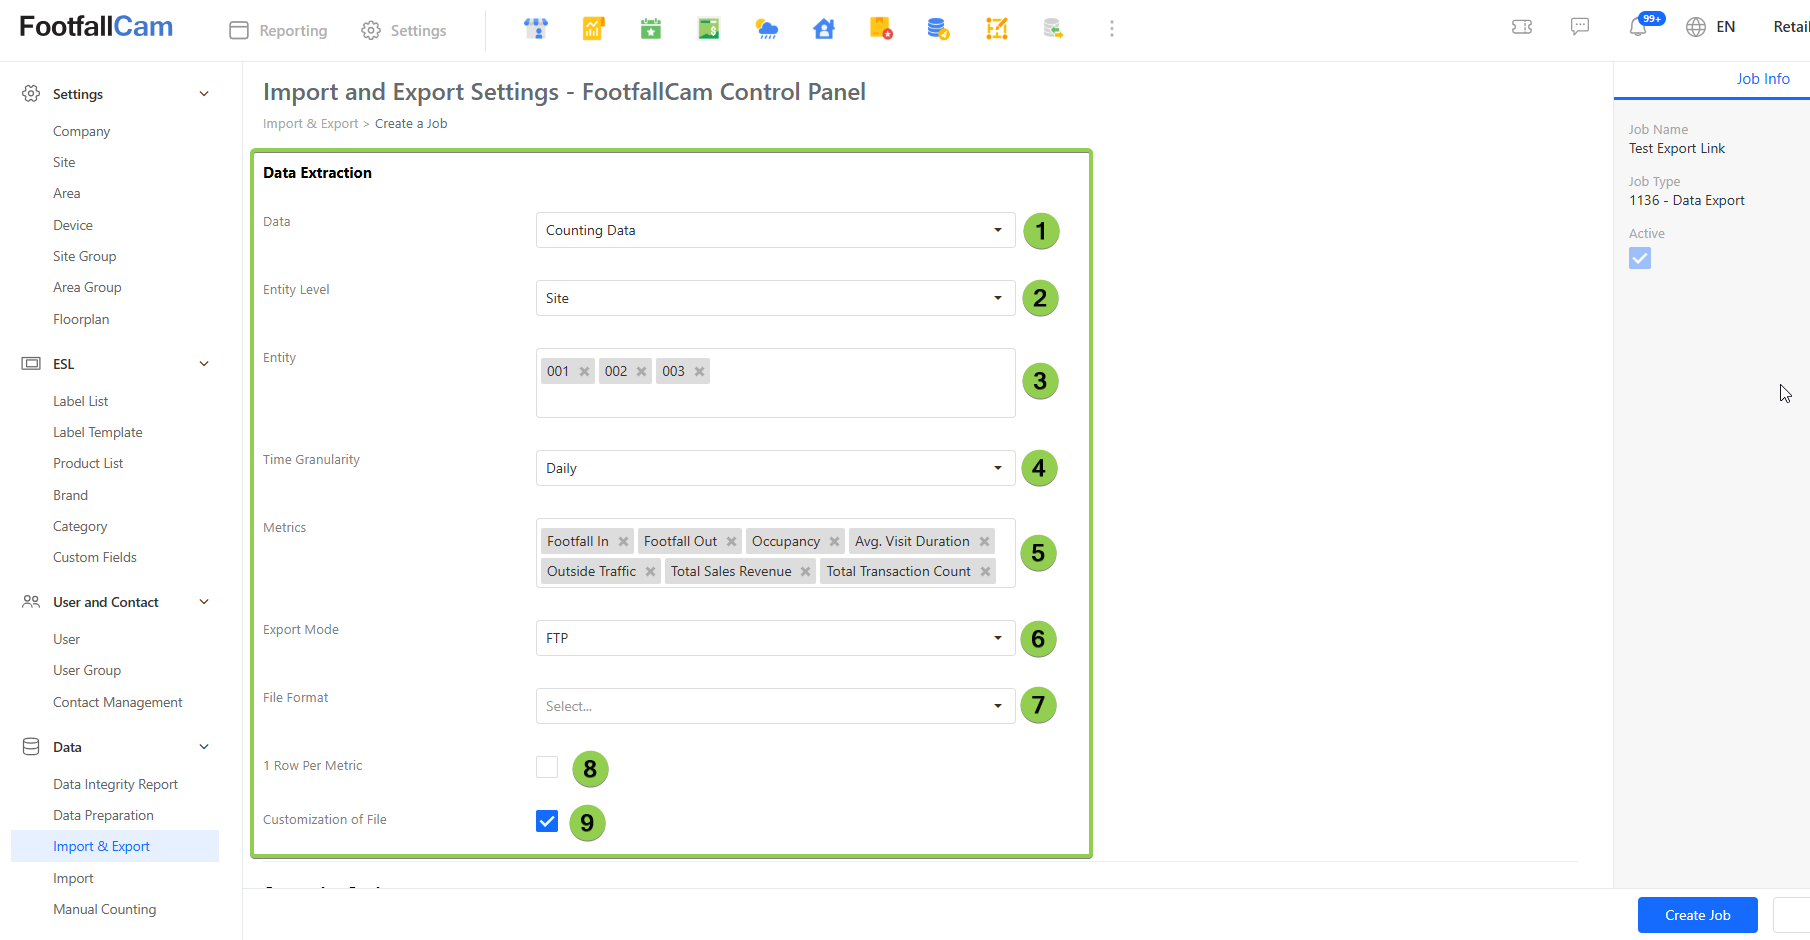
Please refer the step1 to step 3 of Chapter 3.3 Data Import and Export to create a job and select 1136 - Data Export as the Job Type.
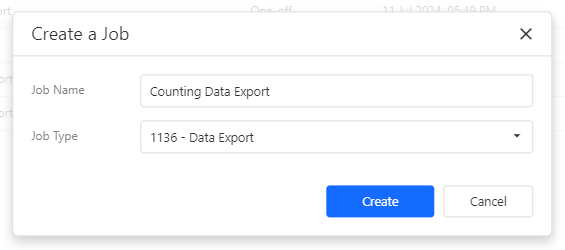
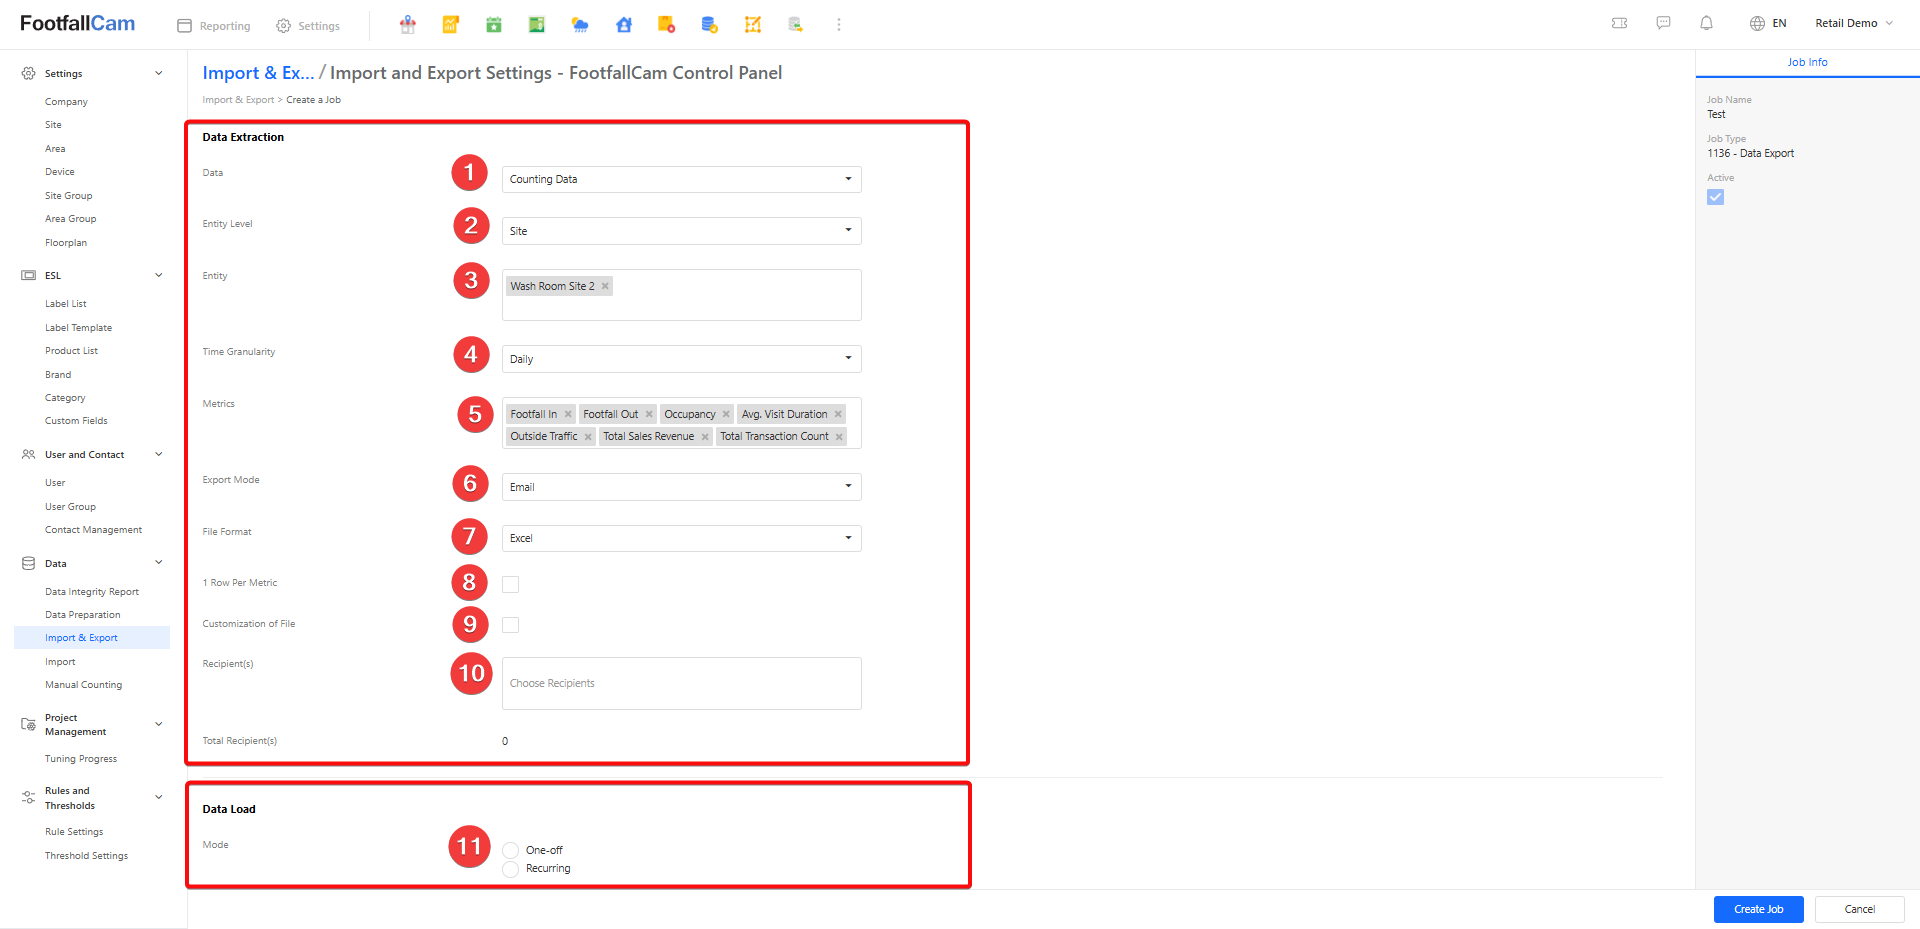
After click on the Create button, it will bring you to the Settings Page. Please fill in the necessary details required for the export, and do not leave blank for the mandatory field. To export data via email, you must select 'Email' for the Export Mode field.
| Category | Field | Description |
| Data Extraction | 1. Data | The available data that you can export. |
| 2. Entity Level | Entity level of the data to be exported. Available entity level: - Site - Site Group - Area - Area Group - Device |
|
| 3. Entity | Specifies the entity to be exported, dependent on the Entity Level selected. You must input the 'Entity Level' field before you can select the entity, and multiple selection is supported. |
|
| 4. Time Granularity | Specifies the time granularity of the data to be exported. Availability may varies based on the 'Entity Level' field, available selection: - Daily - Hourly - Minute |
|
| 5.Metrics | Specifies the metrics to be used for export, default selecting all available metrics. | |
| 6. Export Mode | Specifies how the export mode. Please select 'Email'. | |
| 7. File Format | Specifies the file extension of the output file. Available format: - Excel - CSV - Text |
|
| 8. 1 Row Per Metric | To make the metrics display in rows instead of columns. |
|
| 9. Customization of File | If want to customize your file name and the file column, please tick this checkbox, and the Customization of File section will appear. Please refer to the description below for an explanation of its features and how to configure them. | |
| 10. Recipient(s) | Specifies the recipient group(s) that will receive the exported output file. To setup recipient group, please refer here. | |
| Data Load | 11. Mode | Specifies if the recursiveness of the data export. Available data load mode: - One-off - Recurring |
| Date Range | For 'One-off' export, specifies the range of the dates for the export data. | |
| Frequency | For 'Recurring' export, specifies the frequency of the data export. Available frequency: - Daily |
|
| Next Running Date | For 'Recurring' export, specifies the next running date time, which need to be at least 1 hour after current time. |
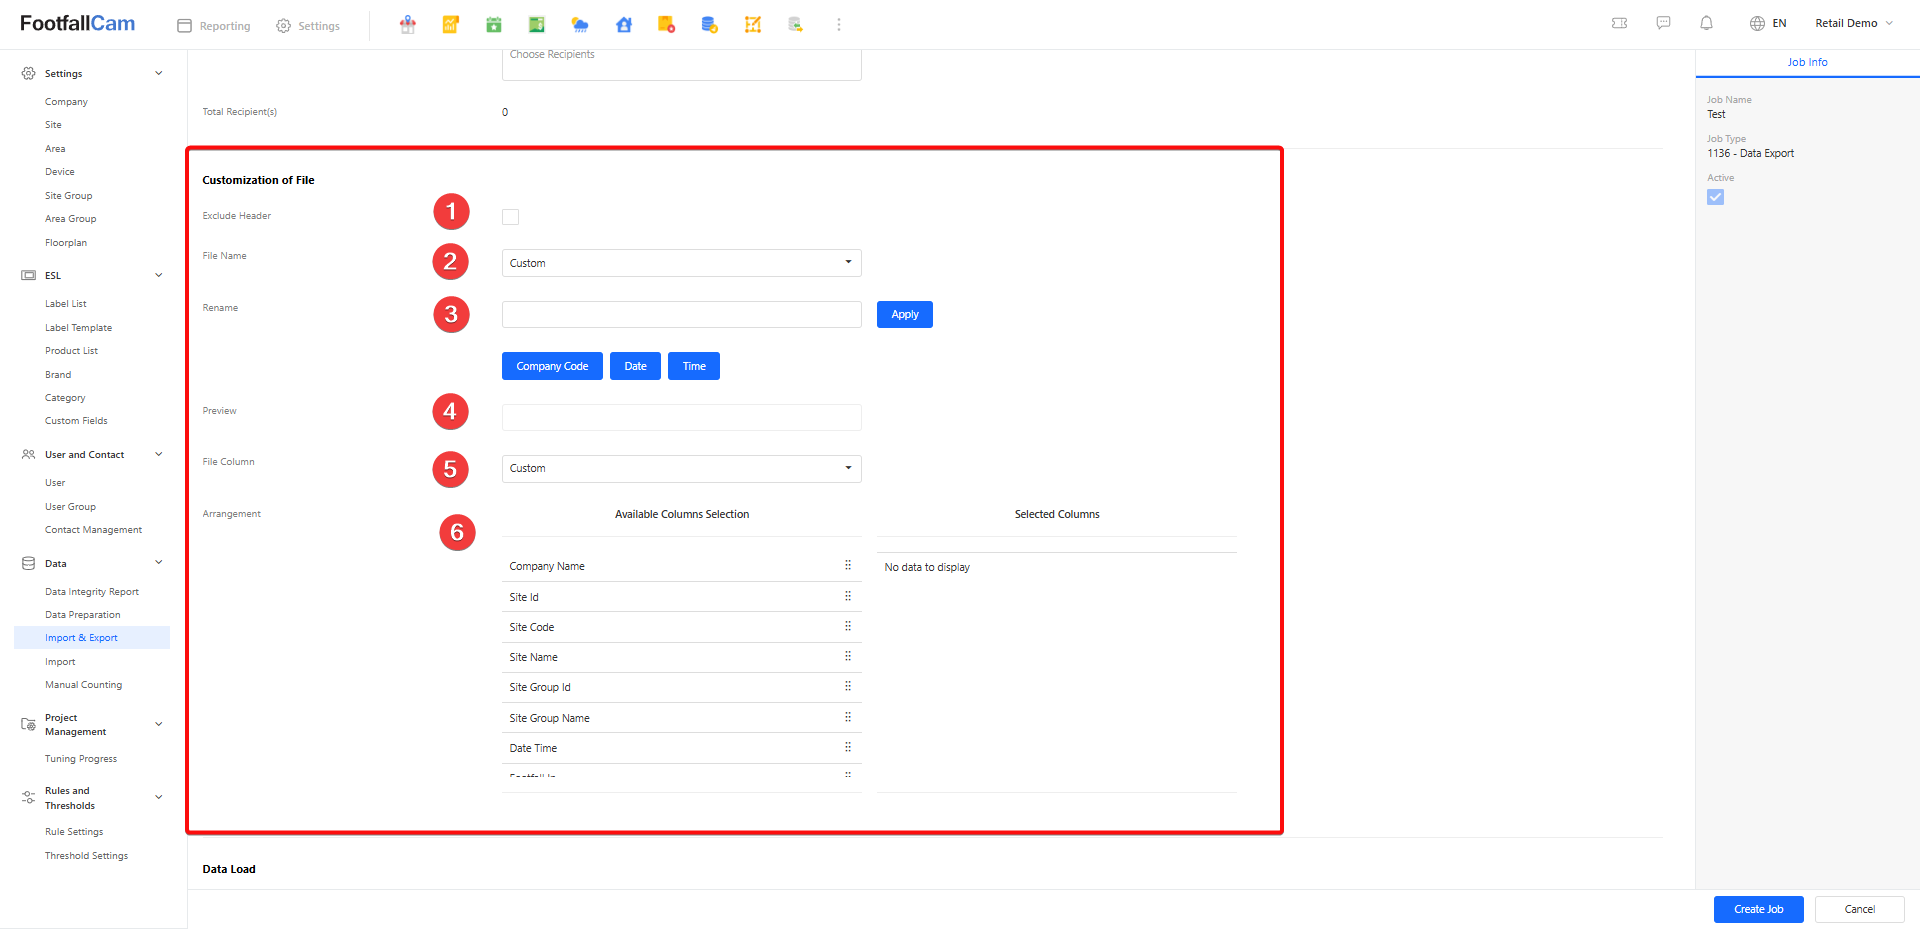
Customization of File
| Field | Description |
| 1. Exclude Header | Select if don't want to see the header in the export file. |
| 2. File Name | Please select 'Custom' to customize your file name. The default File Name will be: Data Export - countingdata 2025-02-21.csv |
| 3. Rename | Please enter your expected file name. The Company Code, the Date, and the Time will be provided. Click on the Apply button and you will be able to see the result in the preview |
| 4. Preview | To view the result of the File Name. |
| 5. File Column | Please select 'Custom' to customize your file column |
| 6. Arrangement |
All the columns that show in Available Columns Selection will be the default columns that will be shown in the export file. (Info: The columns that show in the Available Columns Selection will based on the Metric you selected at the top) |
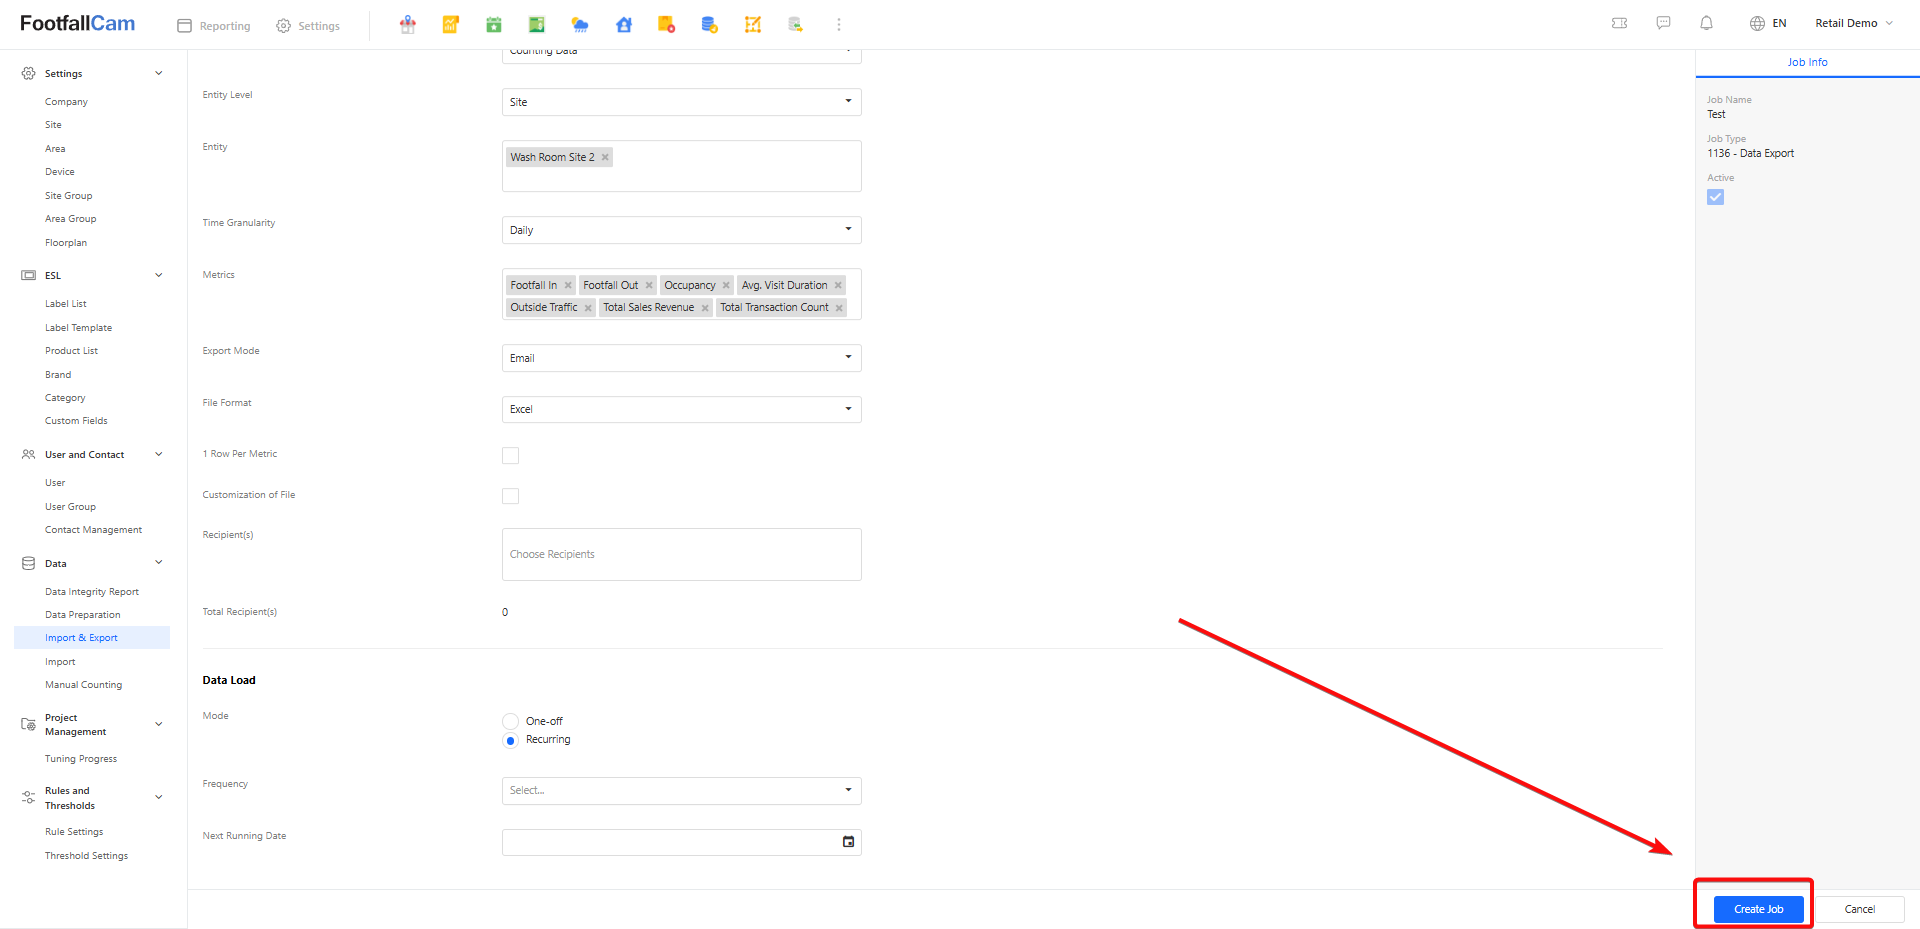
Once all required fields are filled, click on 'Create Job' button to start the job.
1.2 FTP / SFTP
Please refer the step1 to step 3 of Chapter 3.3 Data Import and Export to create a job and select 1136 - Data Export as the Job Type.
After click on the Create button, it will bring you to the Settings Page. Please fill in the necessary details required for the export, and do not leave blank for the mandatory field. To export data via email, you must select 'Email' for the Export Mode field.
For the Data Extraction Section, both FTP and SFTP are the same.
| Category | Field | Description |
| Data Extraction | 1. Data | The available data that you can export. |
| 2. Entity Level | Entity level of the data to be exported. Available entity level: - Site - Site Group - Area - Area Group - Device |
|
| 3. Entity | Specifies the entity to be exported, dependent on the Entity Level selected. You must input the 'Entity Level' field before you can select the entity, and multiple selection is supported. |
|
| 4. Time Granularity | Specifies the time granularity of the data to be exported. Availability may varies based on the 'Entity Level' field, available selection: - Daily - Hourly - Minute |
|
| 6. Export Mode | Specifies how the export mode. Please select 'SFTP' or 'FTP'. | |
| 7. File Format | Specifies the file extension of the output file. Available format: - Excel - CSV - Text |
|
| 8. 1 Row Per Metric | To make the metrics display in rows instead of columns. |
|
| 9. Customization of File | If want to customize your file name and the file column, please tick this checkbox, and the Customization of File section will appear. Please refer to the description below for an explanation of its features and how to configure them. |
FTP
| Category | Field | Description |
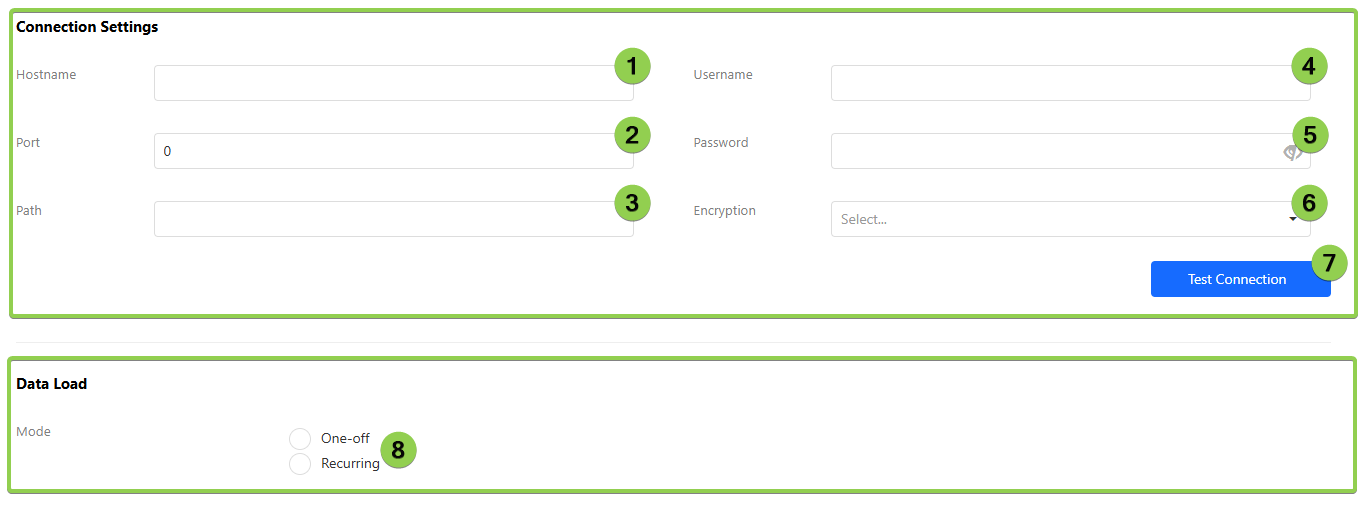
| Data Extraction | 1. Hostname | The hostname of the target. |
| 2. Port | The port to access it | |
| 3. Path | The path to the folder (Can leave blank) | |
| 4. Username | The username to access the data | |
| 5. Password | The password to access the data | |
| 6. Encryption | Specifies the file extension of the output file. Available format: - No encryption - TLS/SSL Implicit encryption - TLS/SSL Explicit Encryption |
|
| 7. Test Connection |
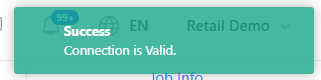
Can test the connection before create the job. A success message will show on the top right side
|
|
| Data Load | 8. Mode | Specifies if the recursiveness of the data export. Available data load mode: - One-off - Recurring |
| Date Range | For 'One-off' export, specifies the range of the dates for the export data. | |
| Frequency | For 'Recurring' export, specifies the frequency of the data export. Available frequency: - Daily |
|
| Next Running Date | For 'Recurring' export, specifies the next running date time, which need to be at least 1 hour after current time. |
SFTP
| Category | Field | Description |
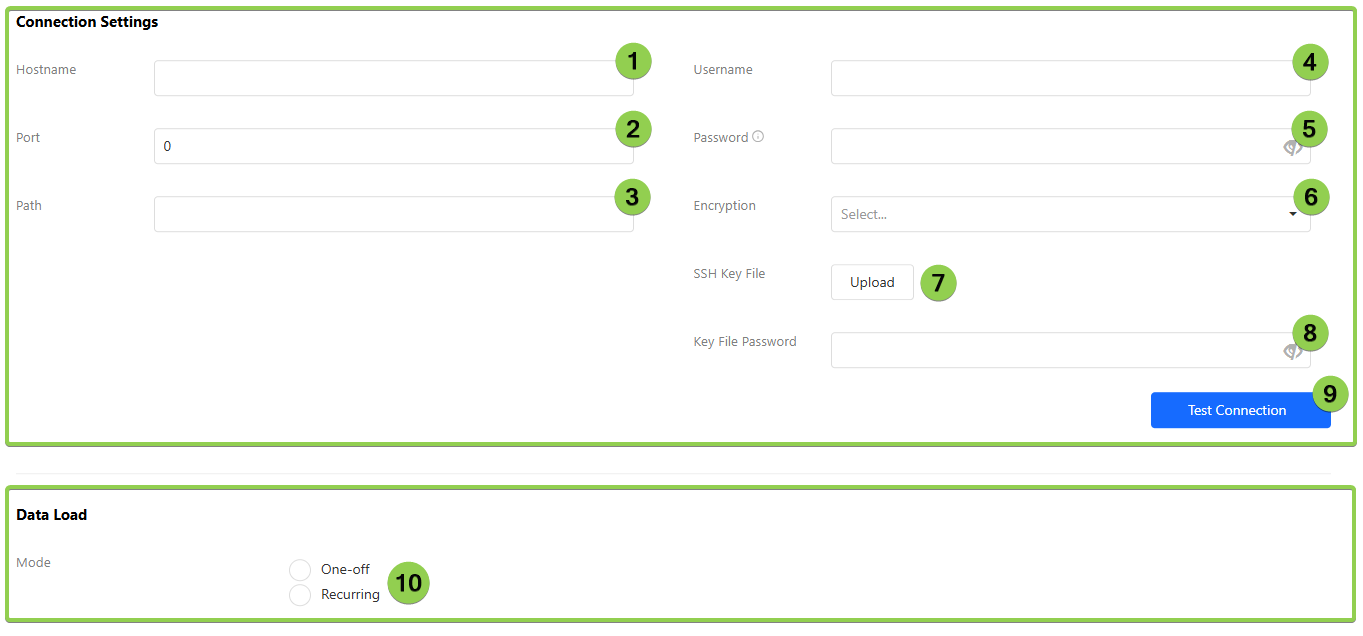
| Data Extraction | 1. Hostname | The hostname of the target. |
| 2. Port | The port to access it | |
| 3. Path | The path to the folder (Can leave blank) | |
| 4. Username | The username to access the data | |
| 5. Password | The password to access the data | |
| 6. Encryption | Specifies the file extension of the output file. Available format: - No encryption - TLS/SSL Implicit encryption - TLS/SSL Explicit Encryption |
|
| 7. SSH Key File | Can access credential in the SSH protocol | |
| 8. Key File Password | The password to unlock the SSH Key File | |
| 9. Test Connection |
Can test the connection before create the job. A success message will show on the top right side |
|
| Data Load | 10. Mode | Specifies if the recursiveness of the data export. Available data load mode: - One-off - Recurring |
| Date Range | For 'One-off' export, specifies the range of the dates for the export data. | |
| Frequency | For 'Recurring' export, specifies the frequency of the data export. Available frequency: - Daily |
|
| Next Running Date | For 'Recurring' export, specifies the next running date time, which need to be at least 1 hour after current time. |
Once all required fields are filled, click on 'Create Job' button to start the job.
1.3 Link
Please refer the step1 to step 3 of Chapter 3.3 Data Import and Export to create a job and select 1136 - Data Export as the Job Type.

After click on the Create button, it will bring you to the Settings Page. Please fill in the necessary details required for the export, and do not leave blank for the mandatory field. To export data via email, you must select 'Email' for the Export Mode field.
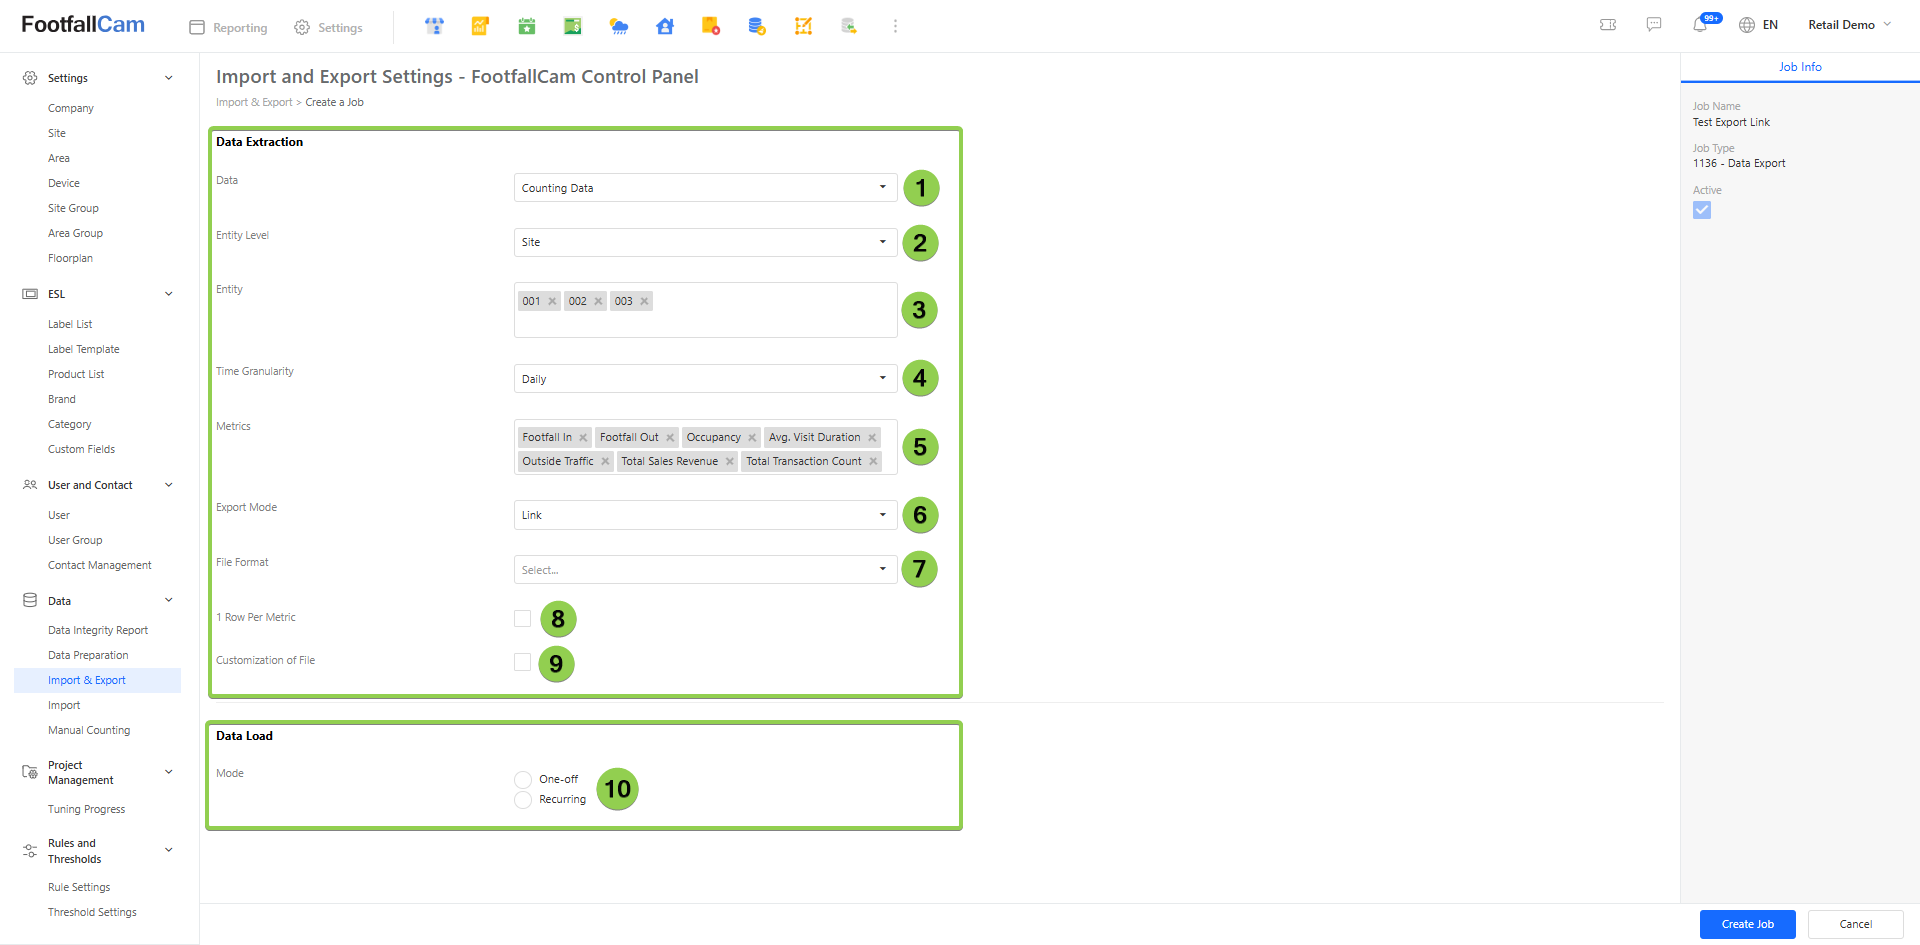
| Category | Field | Description |
| Data Extraction | 1. Data | The available data that you can export. |
| 2. Entity Level | Entity level of the data to be exported. Available entity level: - Site - Site Group - Area - Area Group - Device |
|
| 3. Entity | Specifies the entity to be exported, dependent on the Entity Level selected. You must input the 'Entity Level' field before you can select the entity, and multiple selection is supported. |
|
| 4. Time Granularity | Specifies the time granularity of the data to be exported. Availability may varies based on the 'Entity Level' field, available selection: - Daily - Hourly - Minute |
|
| 5.Metrics | Specifies the metrics to be used for export, default selecting all available metrics. | |
| 6. Export Mode | Specifies how the export mode. Please select 'Link'. | |
| 7. File Format | Specifies the file extension of the output file. Available format: (For Link we only have Excel) - Excel |
|
| 8. 1 Row Per Metric | To make the metrics display in rows instead of columns. |
|
| 9. Customization of File | If want to customize your file name and the file column, please tick this checkbox, and the Customization of File section will appear. Please refer to the description below for an explanation of its features and how to configure them. | |
| Data Load | 10. Mode | Specifies if the recursiveness of the data export. Available data load mode: - One-off - Recurring |
| Date Range | For 'One-off' export, specifies the range of the dates for the export data. | |
| Frequency | For 'Recurring' export, specifies the frequency of the data export. Available frequency: - Daily |
|
| Next Running Date | For 'Recurring' export, specifies the next running date time, which need to be at least 1 hour after current time. |
Customization of File
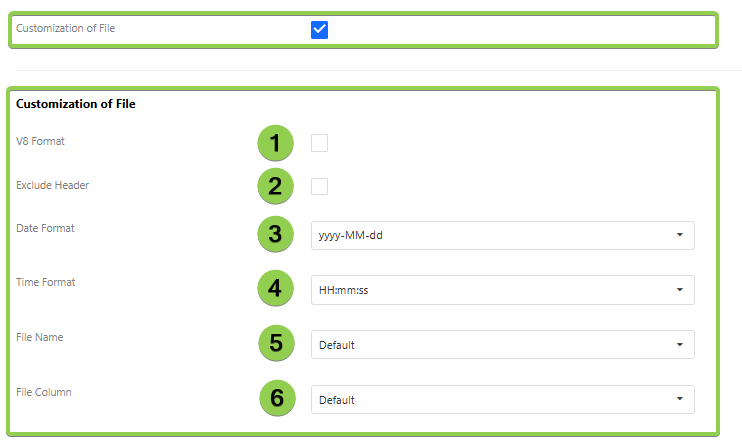
| Field | Description |
| 1. V8 Format | Select if want it to be in V8 format |
| 2. Exclude Header | Select if don't want to see the header in the export file. |
| 3. Date Format |
Please select the date format that you desire. |
| 4. Time Format | Please select the time format that you desire. The default will be HH:mm:ss |
| 5. File Name | Please select 'Custom' to customize your file name. The default File Name will be: Data Export - countingdata 2025-02-21.csv |
| 6. File Column | Please select 'Custom' to customize your file column |
Once all required fields are filled, click on 'Create Job' button at the bottom right to start the job.
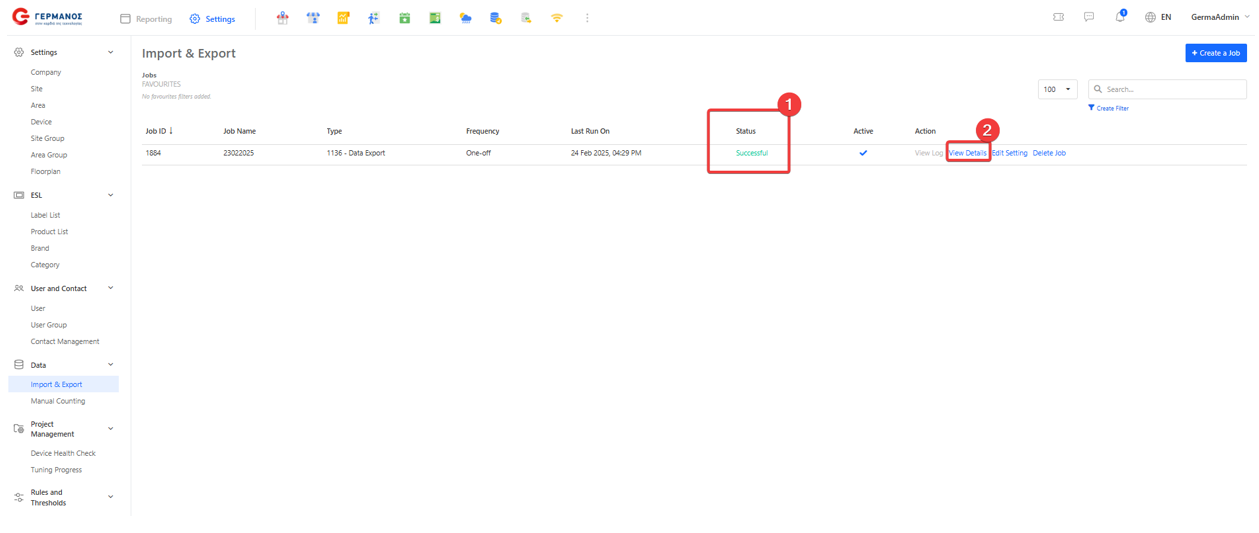
Download the link
Please wait until the status column shows Successful. Then click on View Details to go to the Export Job settings page.
Note: If select Link as the export mode, only the Excel file format will be available for download.
Scroll down the page, and you will see the File Location in the Data Load section. Click on Download File link to download the file.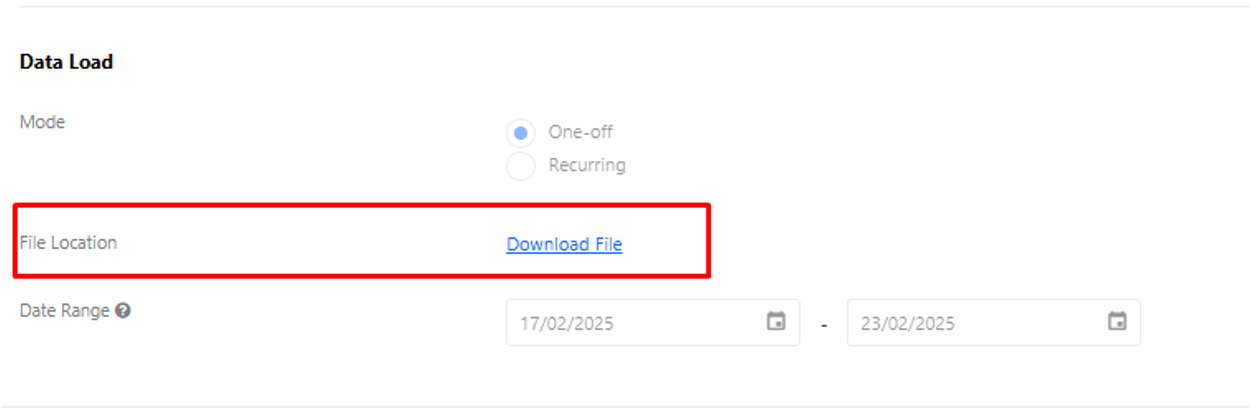
1.4 Logic ERP
Please refer the step1 to step 3 of Chapter 3.3 Data Import and Export to create a job and select 1136 - Data Export as the Job Type.
After click on the Create button, it will bring you to the Settings Page. Please fill in the necessary details required for the export, and do not leave blank for the mandatory field. To export data via email, you must select 'Email' for the Export Mode field.
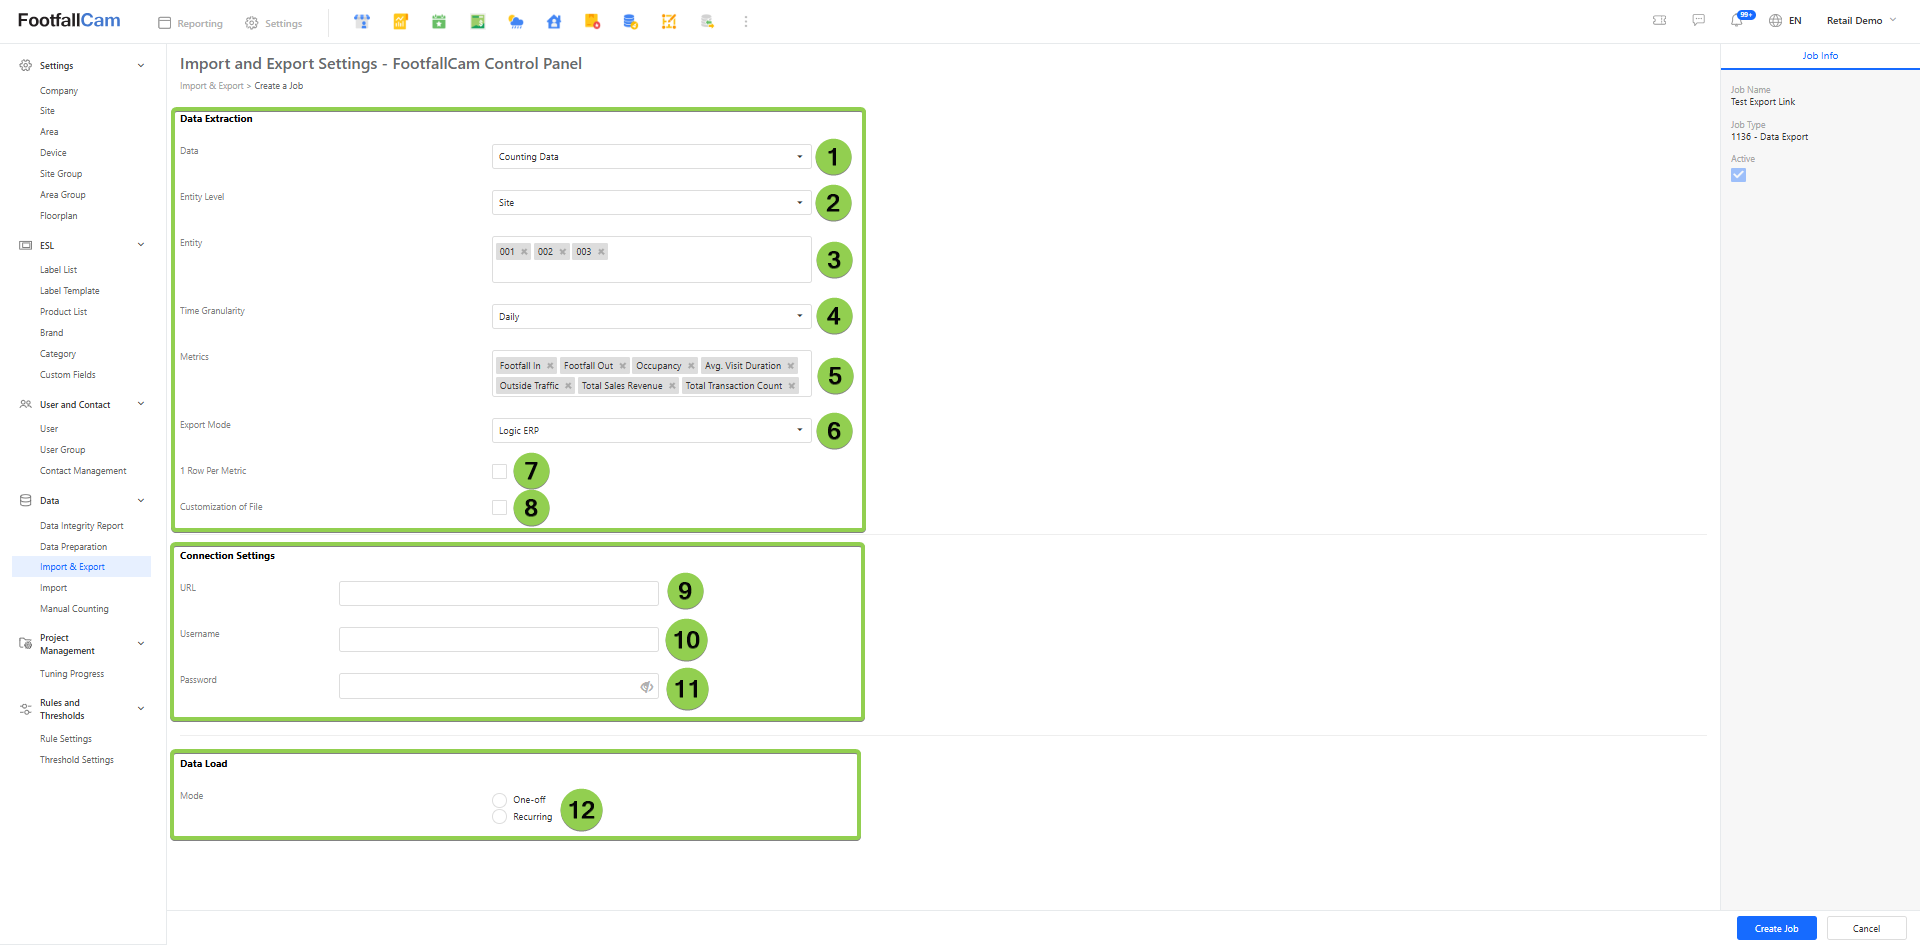
| Category | Field | Description |
| Data Extraction | 1. Data | The available data that you can export. |
| 2. Entity Level | Entity level of the data to be exported. Available entity level: - Site - Site Group - Area - Area Group - Device |
|
| 3. Entity | Specifies the entity to be exported, dependent on the Entity Level selected. You must input the 'Entity Level' field before you can select the entity, and multiple selection is supported. |
|
| 4. Time Granularity | Specifies the time granularity of the data to be exported. Availability may varies based on the 'Entity Level' field, available selection: - Daily - Hourly - Minute |
|
| 5.Metrics | Specifies the metrics to be used for export, default selecting all available metrics. | |
| 6. Export Mode | Specifies how the export mode. Please select 'Logic ERP'. | |
| 7. 1 Row Per Metric | To make the metrics display in rows instead of columns. |
|
| 8. Customization of File | If want to customize your file name and the file column, please tick this checkbox, and the Customization of File section will appear. Please refer to the description below for an explanation of its features and how to configure them. | |
| Connection Settings | 9. URL | Please enter the URL |
| 10. Username | Please enter the Username | |
| 11. Password | Please enter the Password | |
| Data Load | 11. Mode | Specifies if the recursiveness of the data export. Available data load mode: - One-off - Recurring |
| Date Range | For 'One-off' export, specifies the range of the dates for the export data. | |
| Frequency | For 'Recurring' export, specifies the frequency of the data export. Available frequency: - Daily |
|
| Next Running Date | For 'Recurring' export, specifies the next running date time, which need to be at least 1 hour after current time. |
Customization of File
| Field | Description |
| 1. V8 Format | Select if want it to be in V8 format |
| 2. Exclude Header | Select if don't want to see the header in the export file. |
| 3. Date Format |
Please select the date format that you desire. |
| 4. Time Format | Please select the time format that you desire. The default will be HH:mm:ss |
| 5. File Name | Please select 'Custom' to customize your file name. The default File Name will be: Data Export - countingdata 2025-02-21.csv |
| 6. File Column | Please select 'Custom' to customize your file column |
Once all required fields are filled, click on 'Create Job' button to start the job.
1.5 Power BI Application
Please refer to this guideline link and follow the steps to get the data by using Power BI.
1.6 REST API
This section requires an API client such as Postman. You may get Postman here. The steps that are described in this section will be done via Postman, but you may utilize other API clients to perform the requests as well.
1.6.1 Generate an Access Token (AToken)
Access Token is required to verify the identification of the user and the data accessible.

Step 1 - Set Request Method to POST.
Step 2 - Insert "https://v9.footfallcam.com/account/GenerateAccessToken" to the URL field.
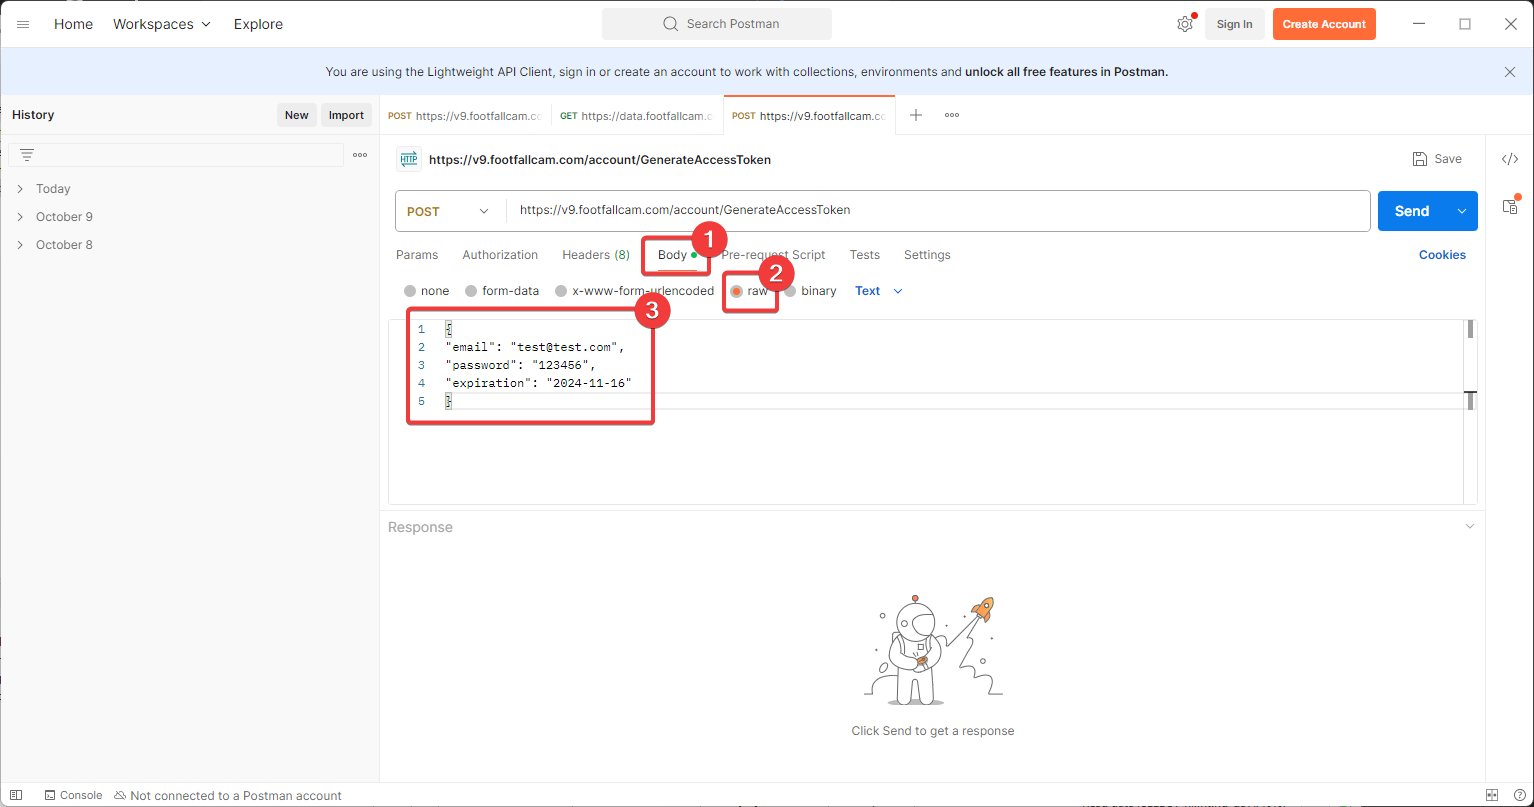
Step 3 - Click on the 'Body' tab below the URL field. Select "raw" at the option below the tabs. You will need the parameters "email", "password", and "expiration". Consult your administrator for a valid credential to access.
Below is a sample of the three parameters. You might need to edit the expiration parameter to prevent immediate expiration of the Token.
{
"email": "[email protected]",
"password": "123456",
"expiration": "2024-03-15"
}
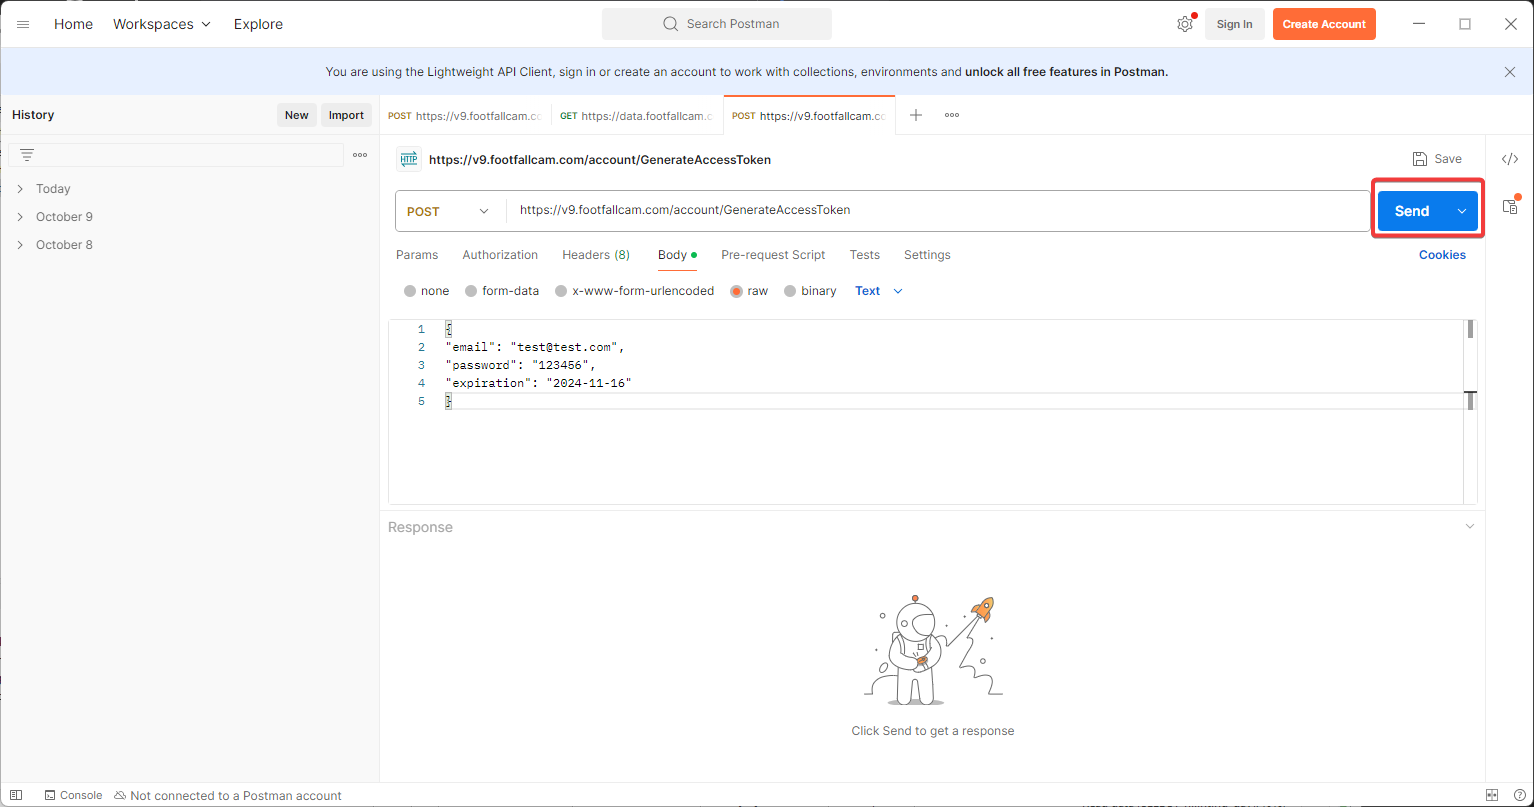
Step 4 - Click on Send.
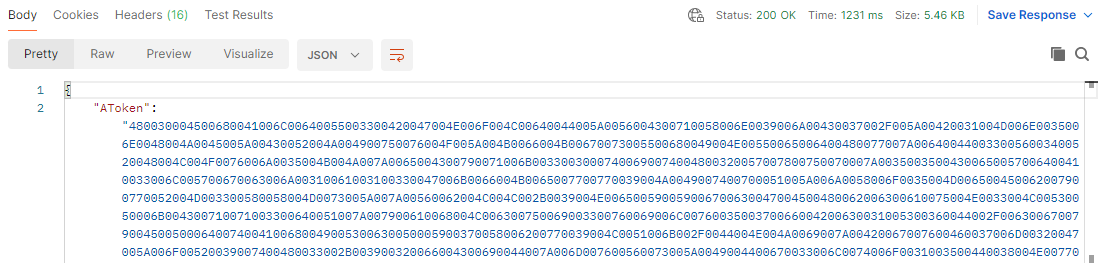
Step 5 - The Access Token (AToken) will be generated and displayed at the output tab at the bottom of the application. Copy this token key as you will be using it for the next requests.
1.6.2 Get Site Details

Optional Step - You may open a new tab to create a new request. If not, you may reuse your current tab but you will be replacing fields in your request.
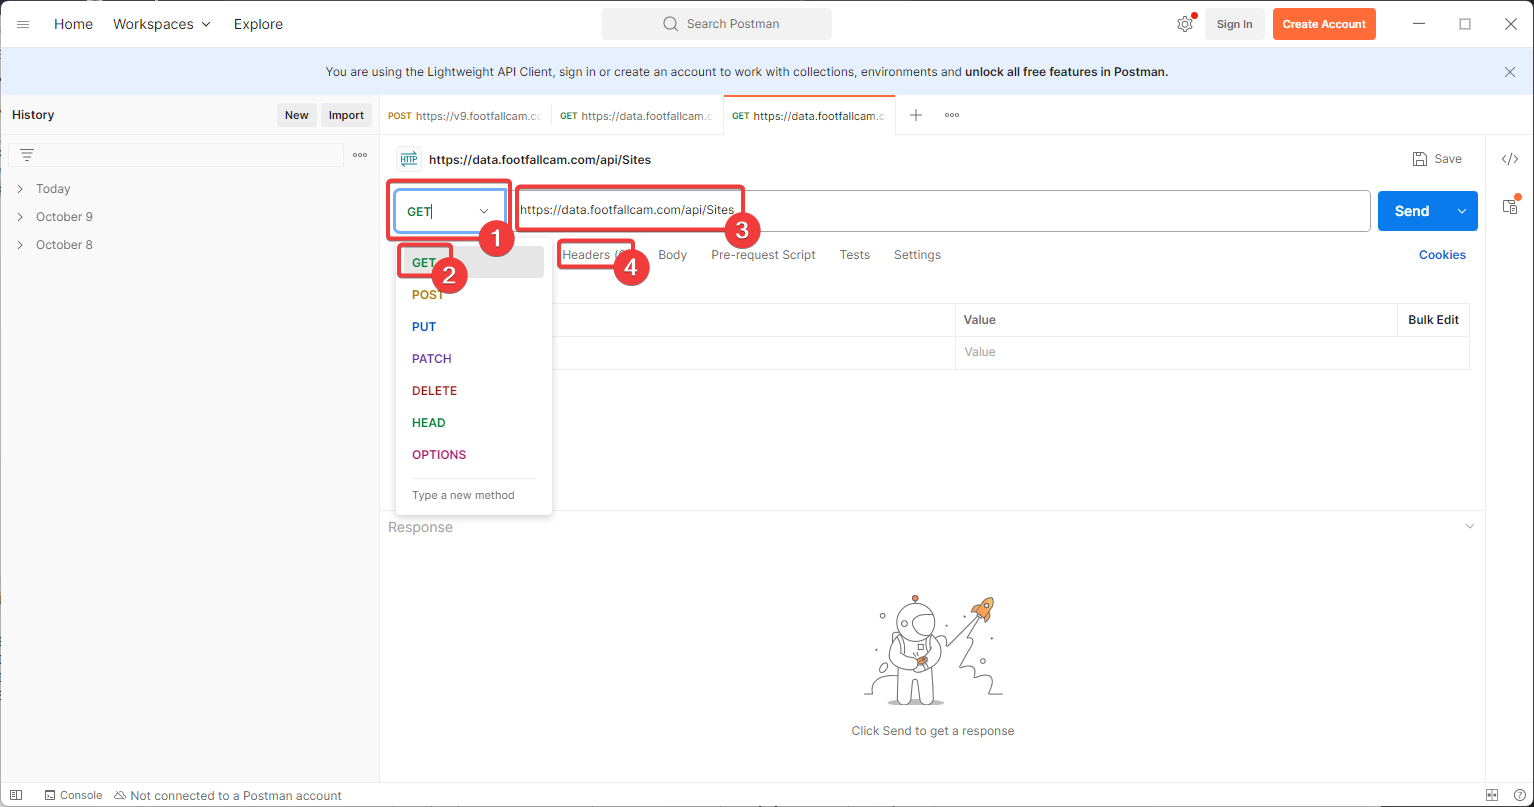
Step 1 - Set Request Method to GET.
Step 2 - Insert "https://data.footfallcam.com/api/Sites" to the URL field.
Step 3 - Move to the Headers tab.
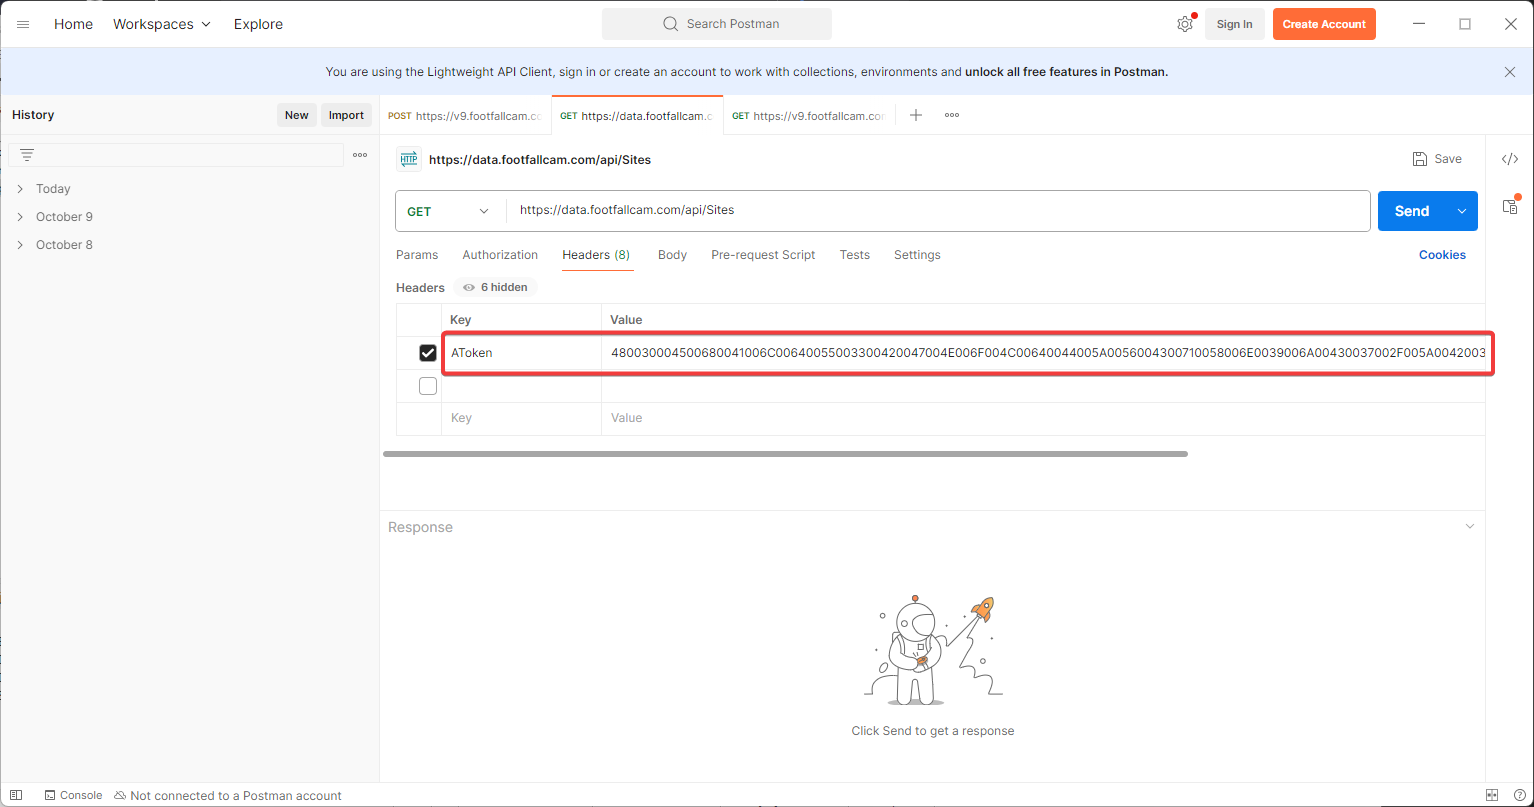
Step 4 - There will be a table under the tab. Put in 'AToken' under the 'Key' column, and paste in the copied token key that was generated previously into the 'Value' column.
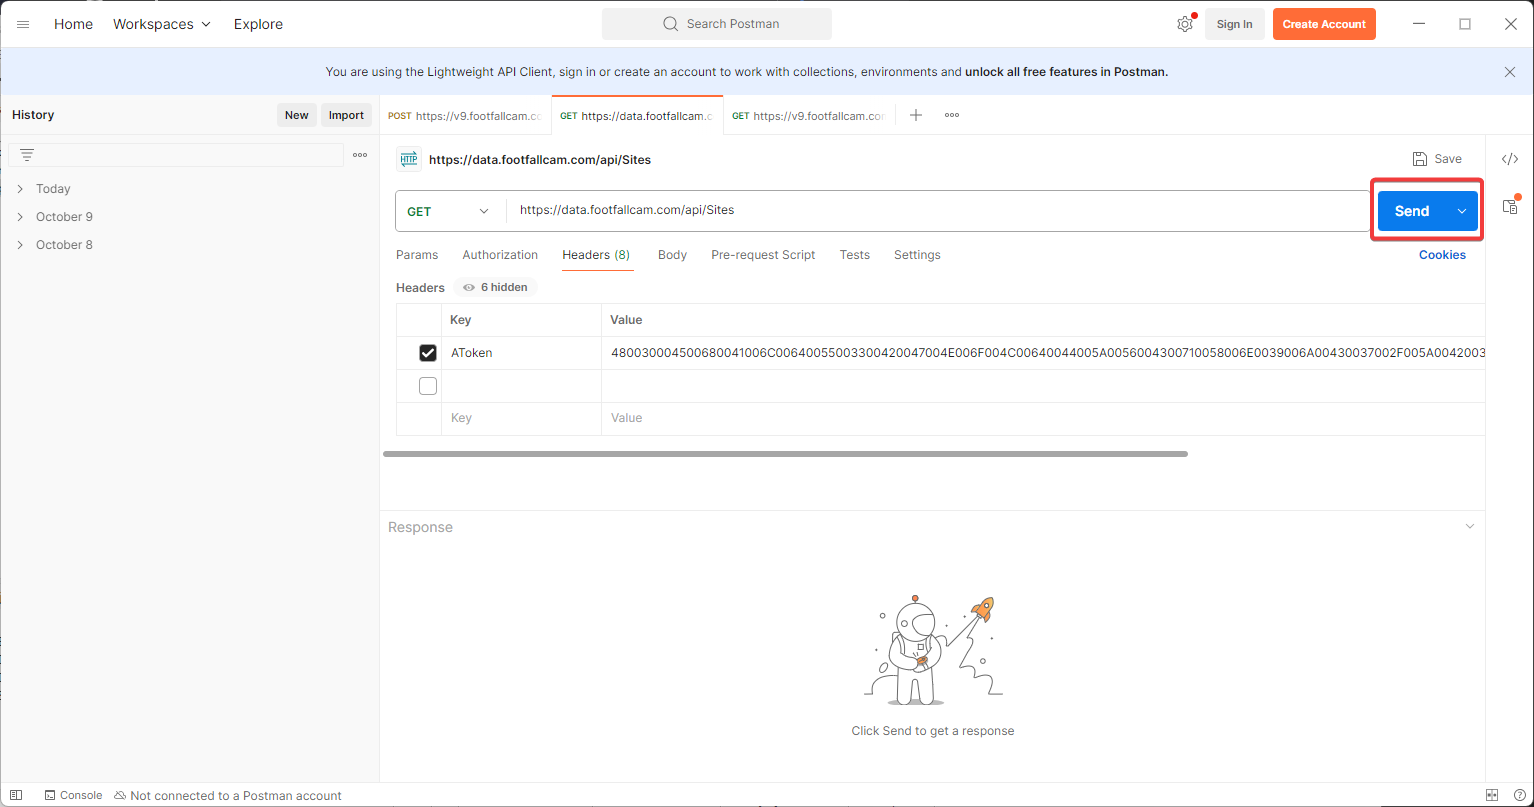
Step 5 - Click on Send.
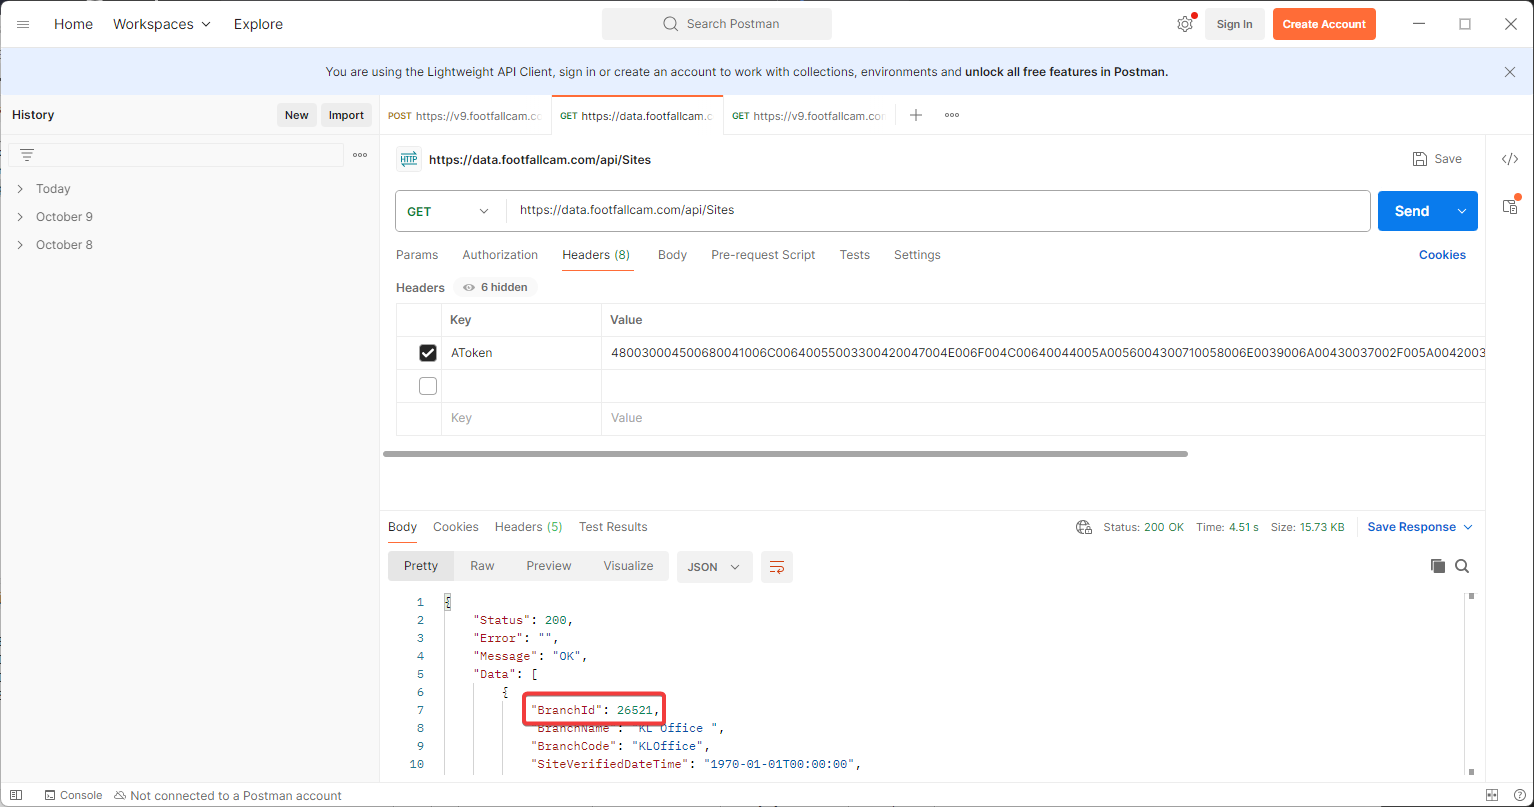
Step 6 - The list of Sites and their details will be displayed in the output tab. For each Site there will be a "BranchId", "BranchName" and "BranchCode". Find the branch that matches your company's Branch Name or Branch Code. Once located, copy the respective "branchId".
1.6.3 Export Data via API
Step 1 - Set Request Method to POST.
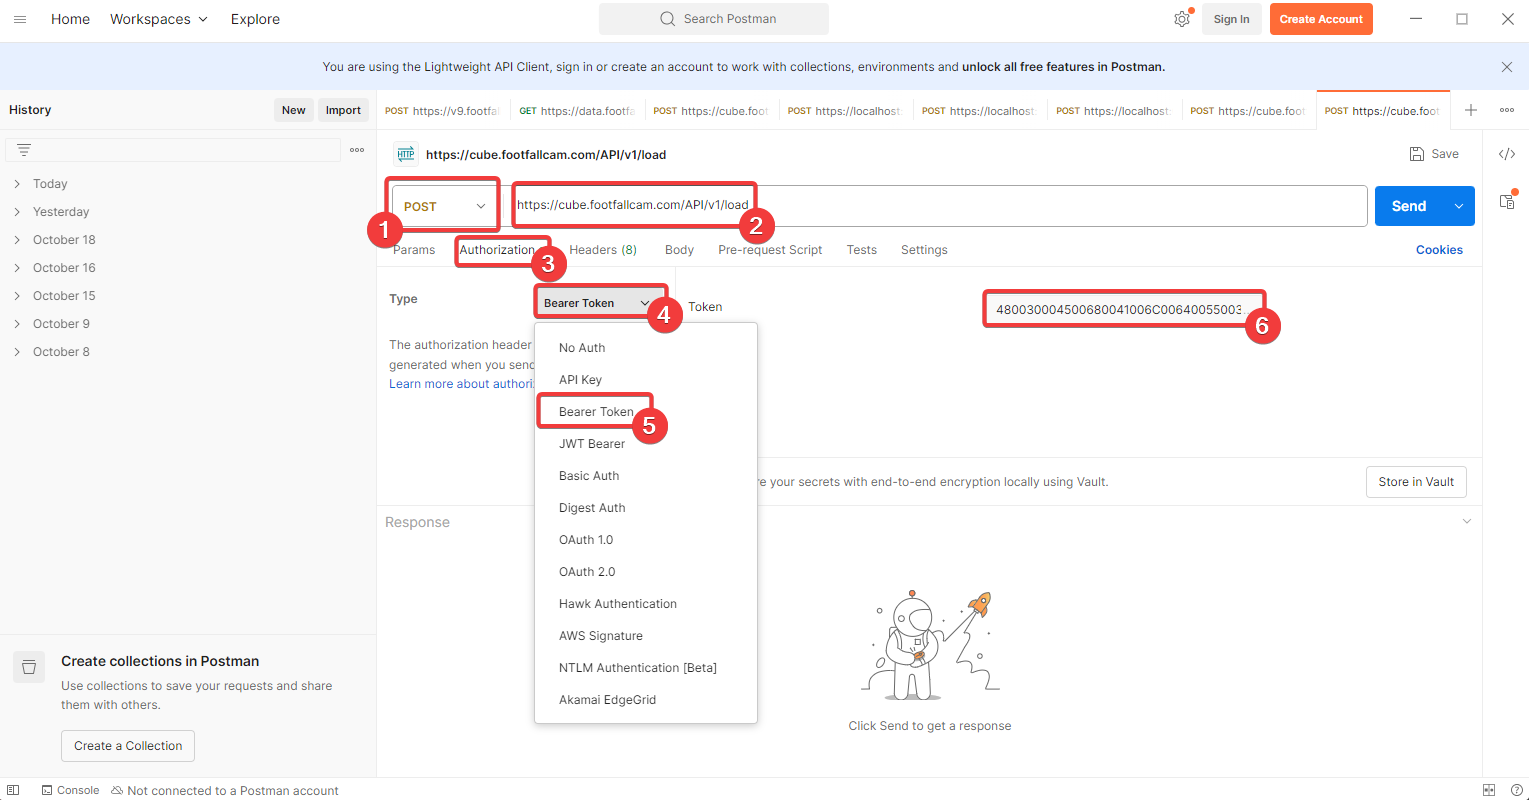
Step 2 - Insert "https://cube.footfallcam.com/API/v1/load" to the URL field.
Step 3 - Move to the Authorization tab.
Step 4 - Select Bearer Token for Type field. There will be a Token field that appears right next to it.
Step 5 - Paste your Access Token into the Token field.
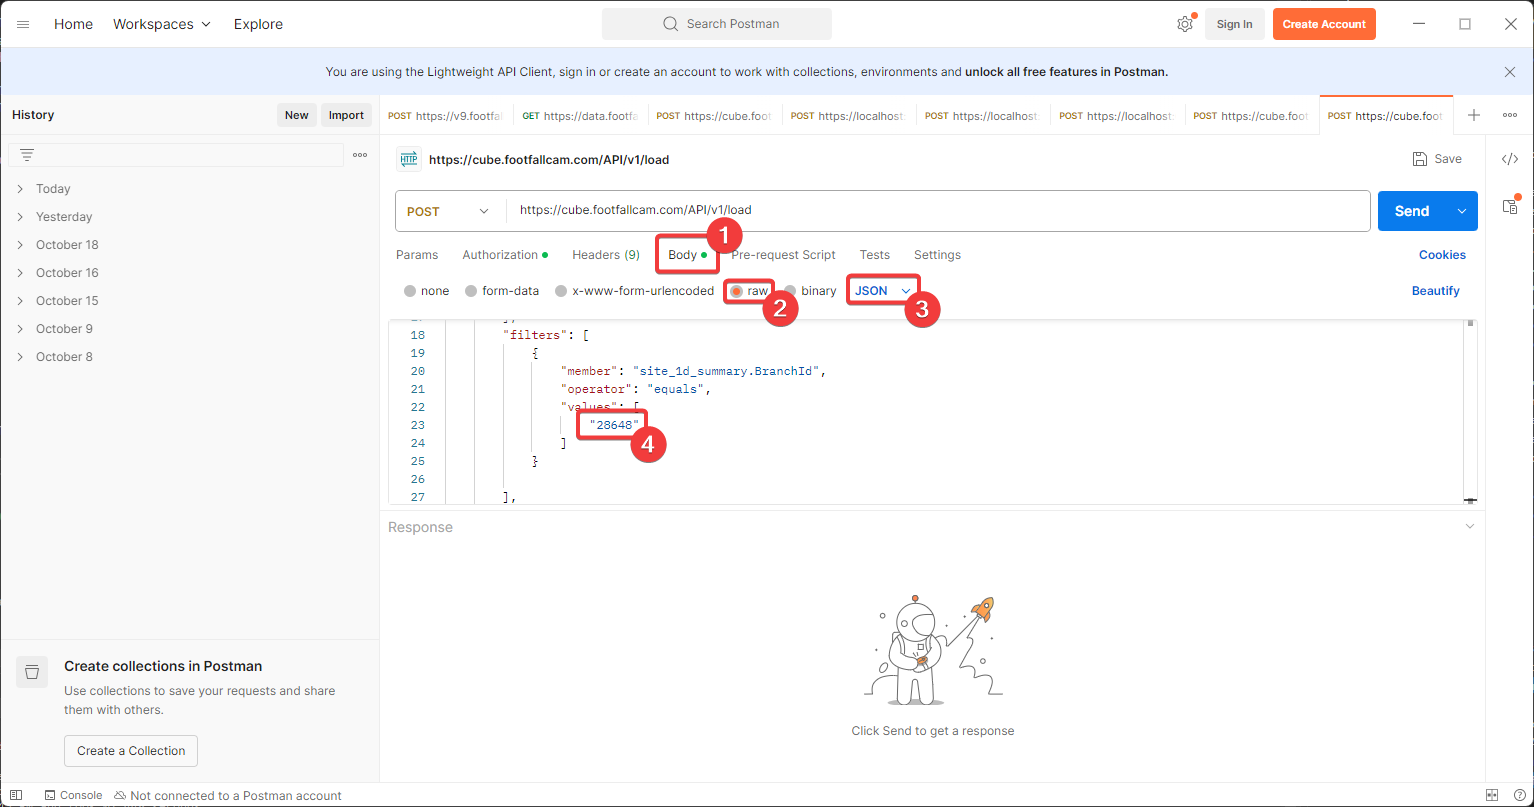
Step 6 - Move to the Body tab.
Step 7 - Select "raw" and select "JSON".
Step 8 - Copy and paste the following content as the Body. Please refer to here to get the example of the body.
Step 9 - Within the Body, look for the "filters" section. Inside the section contains "member", "operator" and "values", this section aims to filter the result based on branch Id. Replace the value with the branch ID that you have copied in the previous query, it is highlighted in the sample code provided in Step 8.
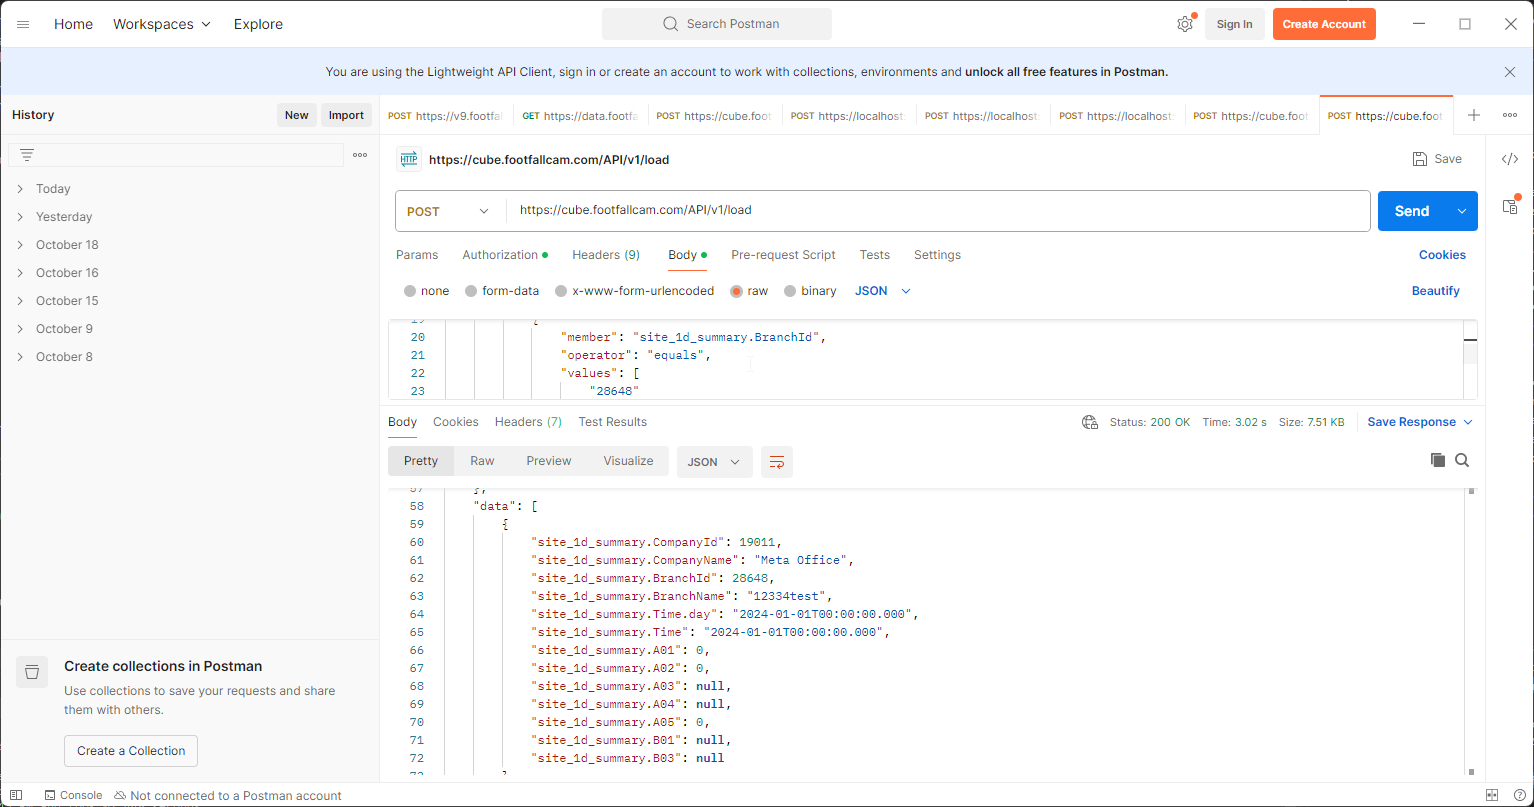
Step 10 - Click on Send. The output of the query will be long. Look for the "data" section within the output. Details regarding the company name and ID, branch name and ID, along with the associated metrics will be shown. Above is a sample output.
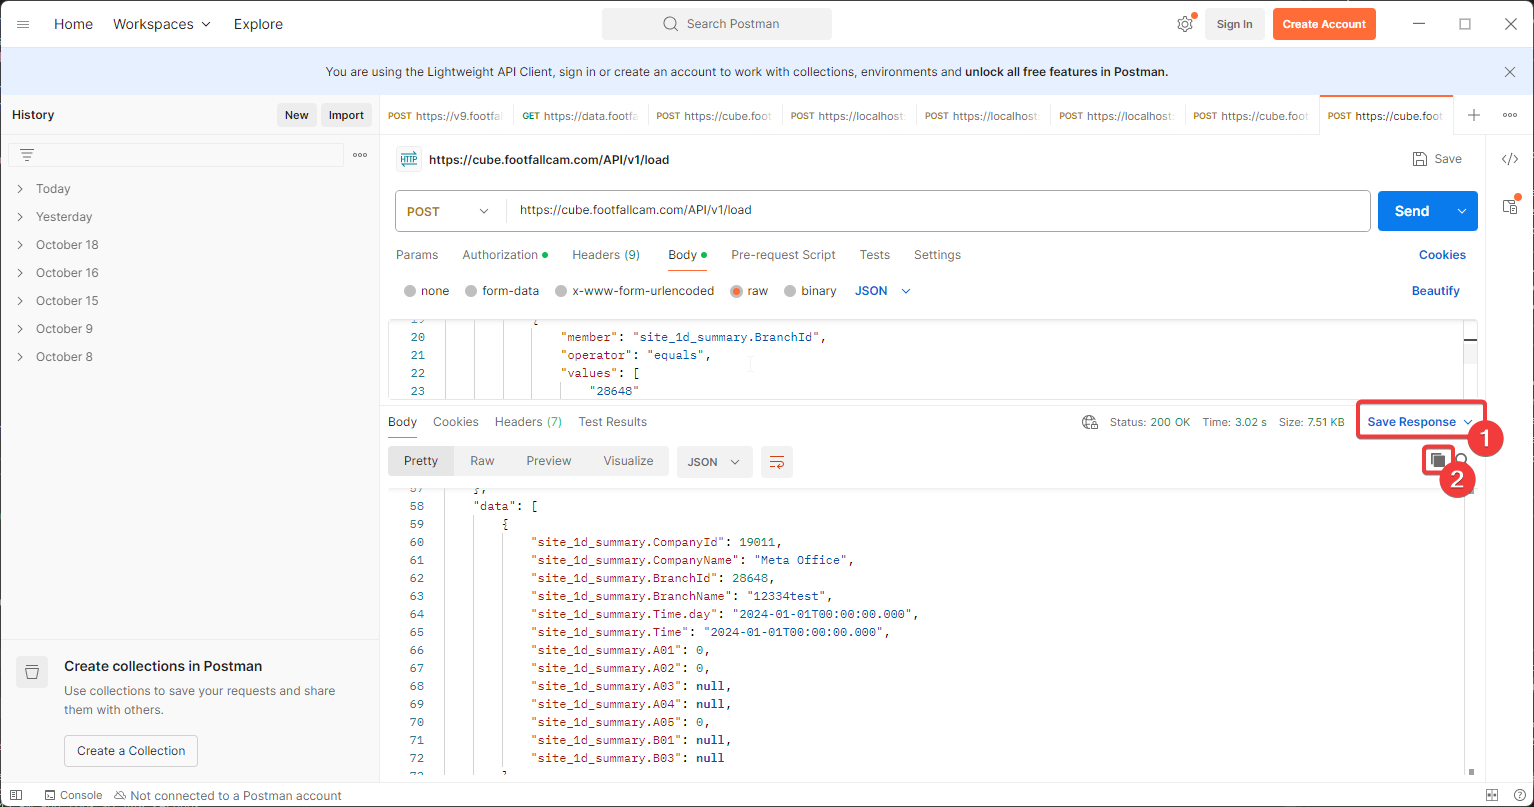
Step 11 - There are 2 ways to save the output:
- On the right side of the output panel, click on Save Response > Save to a file. This allows you to save the output of the query into a JSON file for future usage.
- Alternatively, you may click on the Copy icon right below the "Save Response" text to copy the output into the clipboard.
For the list of Cube available, kindly refer to Appendix: List of Cube.
For a list of Metrics that are available in Cube, kindly refer to Appendix: Metric Documentation V2.
1.7 SQL
This section requires a database administration tool such as DBeaver. You may get DBeaver here. The queries that are described in this section will be done via DBeaver, but you may utilize other tools to execute the queries as well.
The following guide will show how to set up the cube in DBeaver to allow the user to proceed with query data.
| Step | Description |
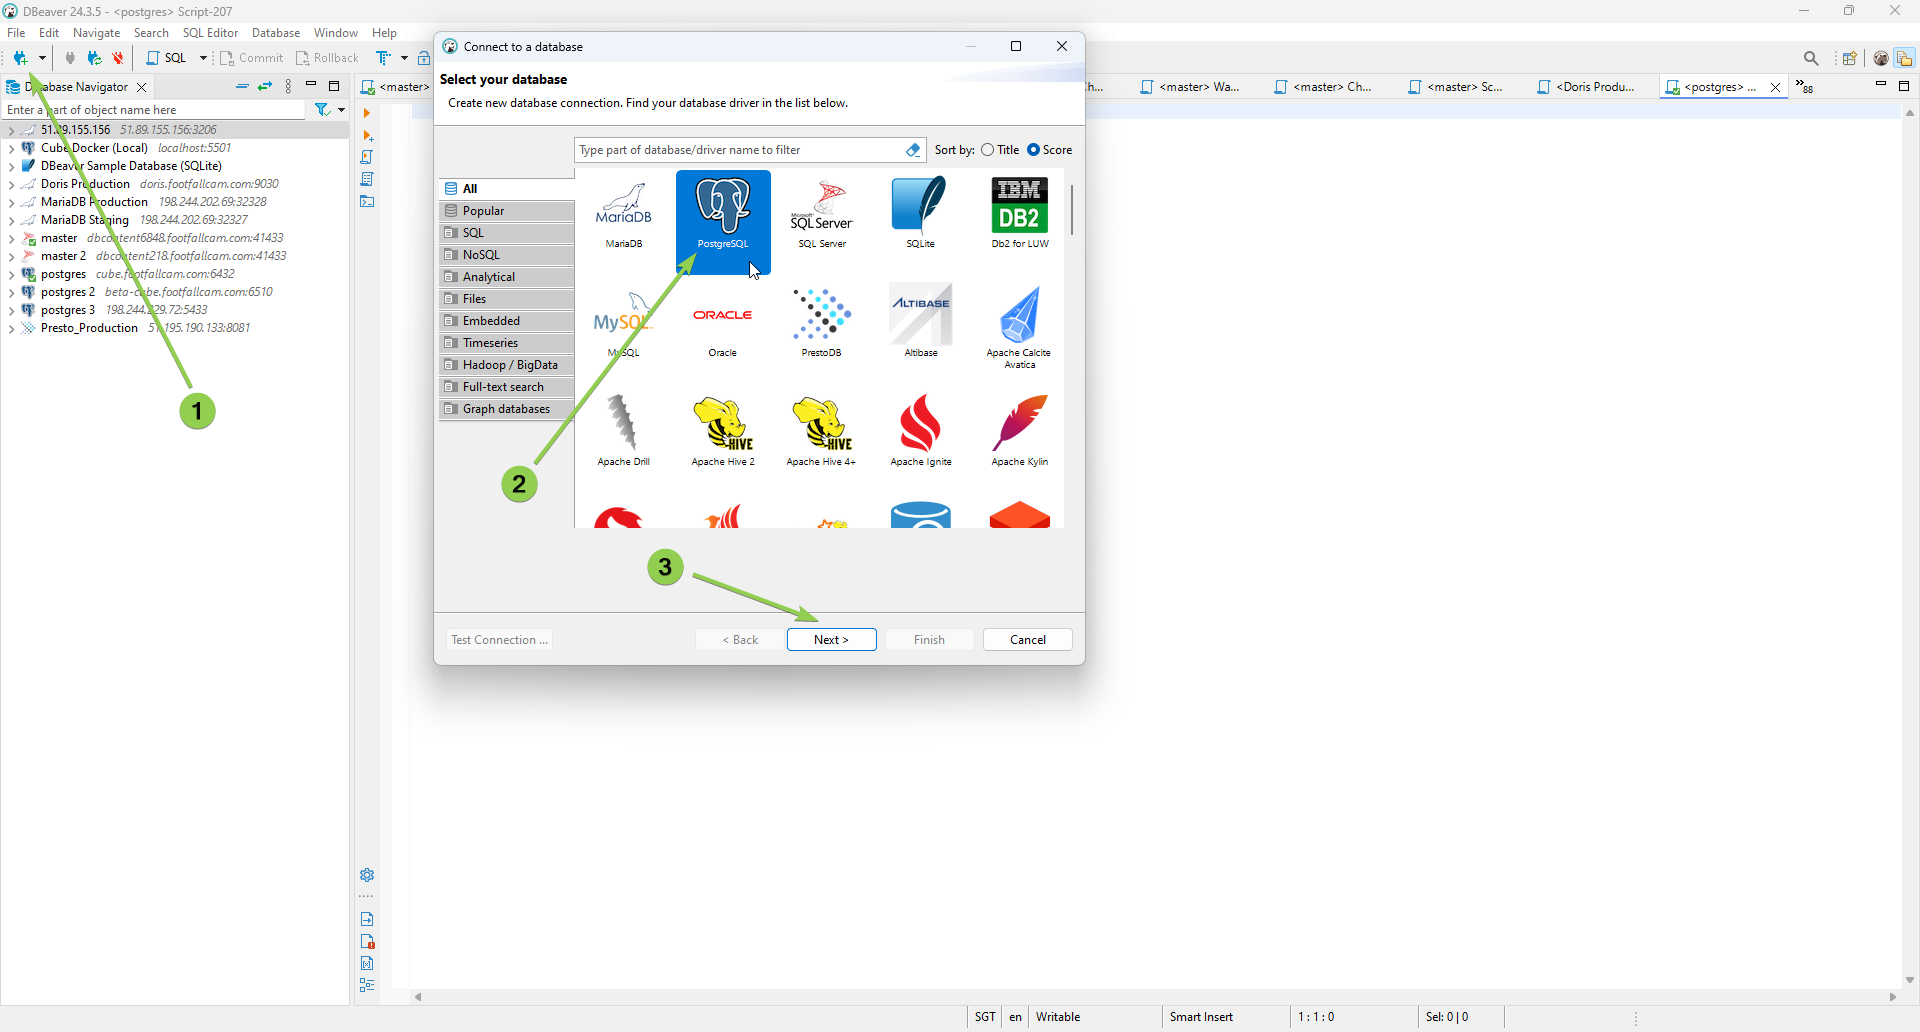
| Step 1 | Click on the Database on the top navigation bar and select New Database Connection. |
| Step 2 | Select PostgreSQL and press the Next button |
| Step 3 | Click next to proceed to the connection setting page |
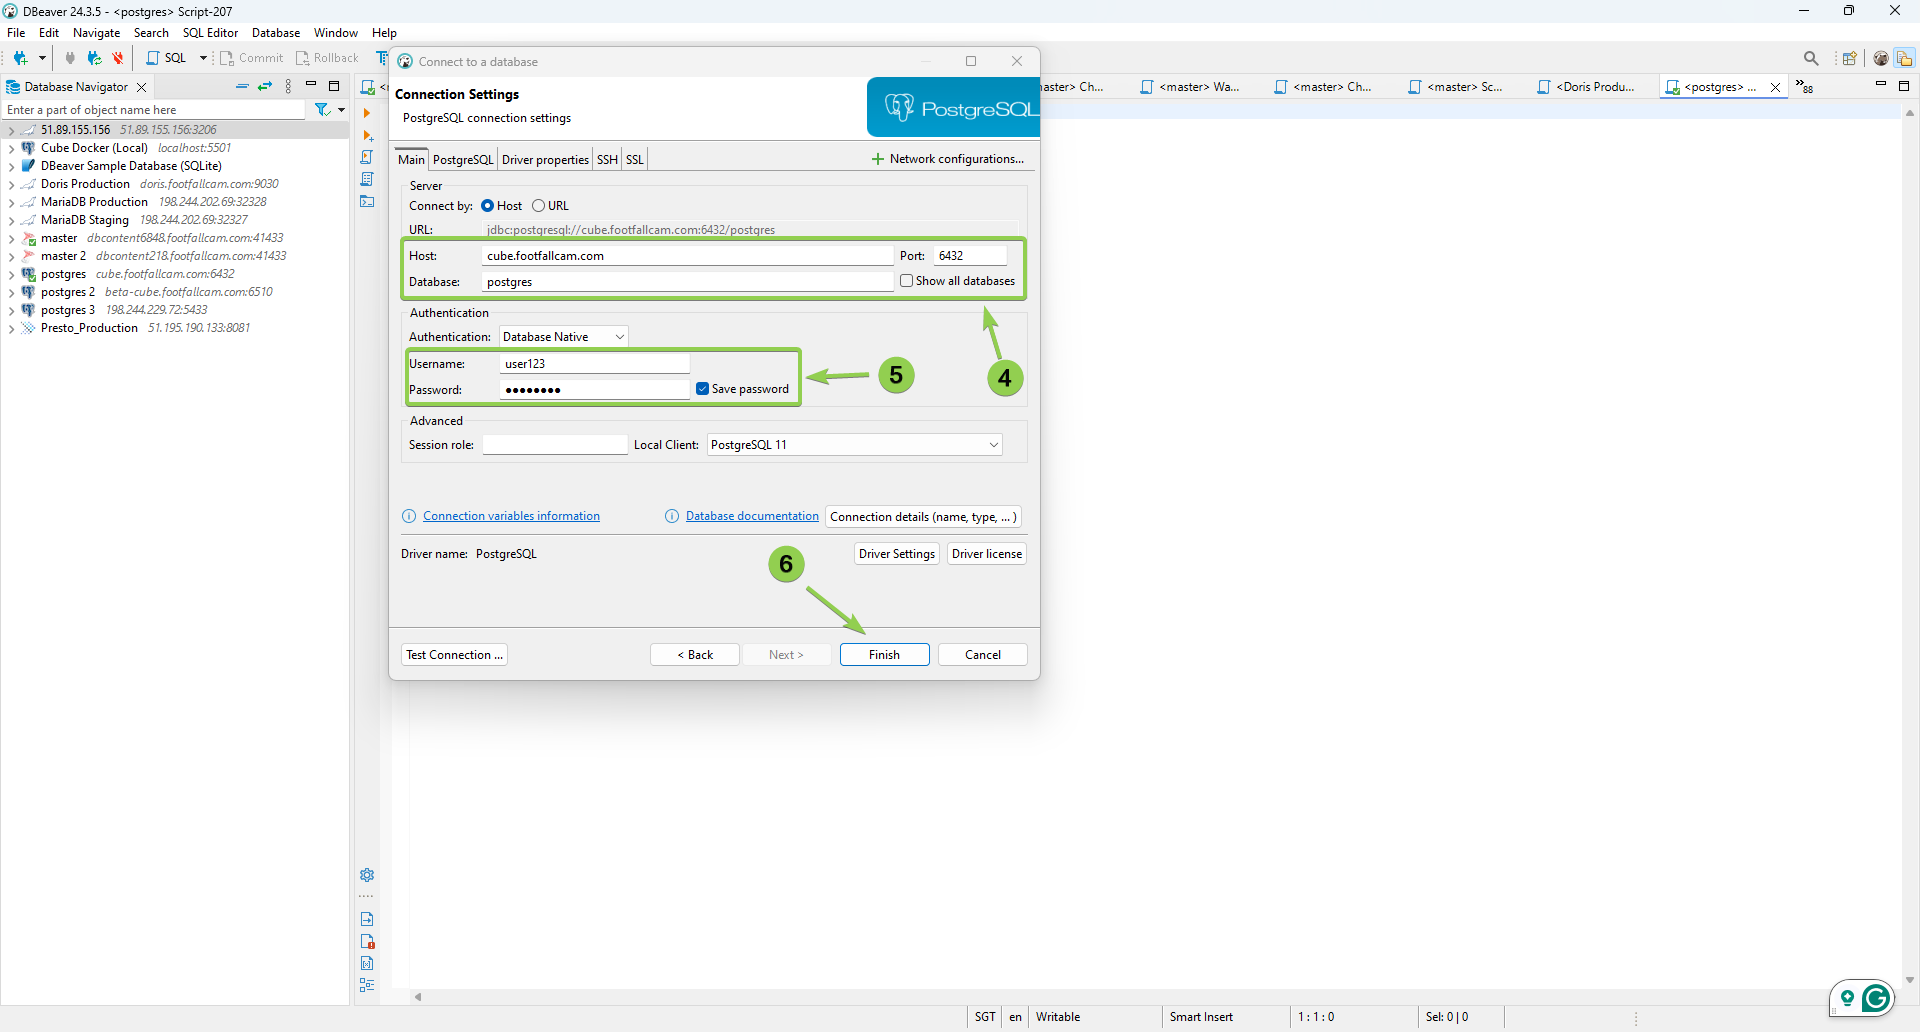
| Step | Field | Description |
| Step 4 | Host | cube.footfallcam.com |
| Port | 6432 | |
| Step 5 | Username | Please refer to steps 1 - 3 in this guide here to get the username. |
| Password | Please refer to steps 1 - 3 in this guide here to get the password. | |
| Step 6 | Click to finish the settings and begin the query |
For a list of Cube available, kindly refer to Appendix: List of Cube.https://www.footfallcam.com/people-counting/knowledge-base/v9-server-api/
For a list of Metrics that are available in Cube, kindly refer to Appendix: Metric Documentation V2.
| Sample 1 - How to get Area Footfall Count IN and OUT daily data by Site | |
| Description | To retrieve Area Footfall Count IN and OUT daily data by Site. |
| Function Name | area_1d_summary |
| Sample SQL | SELECT Time, A01, A02, AreaName FROM area_1d_summary WHERE BranchId = 'xxx' and Time BETWEEN '2023-09-21' and '2023-09-26' ORDER BY Time |
| Sample Result | 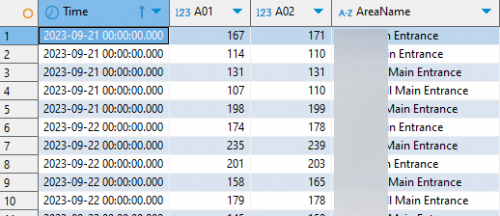 |
| Sample 2 - How to get Site Footfall Count IN and OUT hourly data by Site Group | |
| Description | To retrieve Site Footfall Count IN and OUT hourly data by Site Group. |
| Function Name | site_1h_summary |
| Sample SQL | SELECT Time, A01, A02, , BranchName as SiteName FROM site_1h_summary where SiteGroupID = 'xxx' and Time BETWEEN '2023-09-21 10:00:00' and '2023-09-26 16:00:00' ORDER BY Time |
| Sample Result | 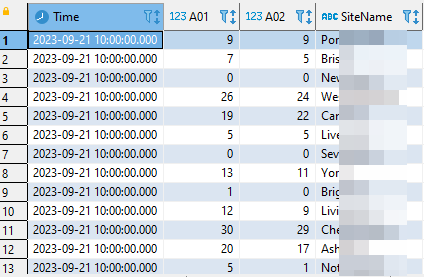 |
| Sample 3 - How to get Area Footfall Count IN and OUT minute data by selected Area | |
| Description | To retrieve Area Footfall Count IN and OUT minute data by selected Area. |
| Function Name | area_1m_summary |
| Sample SQL | SELECT Time, A01, A02, AreaName FROM area_1m_summary where AreaId = 'xxx' and Time BETWEEN '2023-09-21 13:00:00' and '2023-09-21 14:00:00' ORDER BY Time |
| Sample Result | 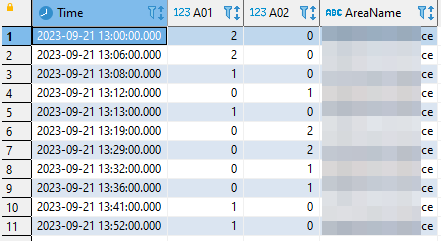 |
| Sample 4 - How to get Live Area Footfall Count IN and OUT data by Site Group | |
| Description | To retrieve Live Area Footfall Count IN and OUT data by Site Group. |
| Function Name | site_live_summary |
| Sample SQL | SELECT A01, A02, AreaName FROM site_live_summary where SiteGroupId = 'xxx' |
| Sample Result | 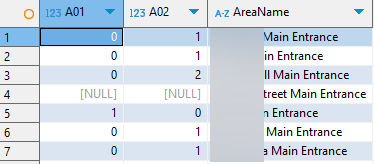 |