This chapter mainly explains how data can be exported from device. The methods of exporting data from device include MQTT, REST API, Web Socket, and BACNET, where the involved steps will be explained below.
2.1 MQTT
Step 1 - Once logged in to the device, on the home page click on settings to head to the settings page.

Step 2 - On Settings page. Open up the Advanced IT Settings dropdown.

Step 3 - Head Towards the MQTT Module and click on Enable MQTT.

Step 4 - Fill in the necessary field and click 'Save' on Save Changes below.
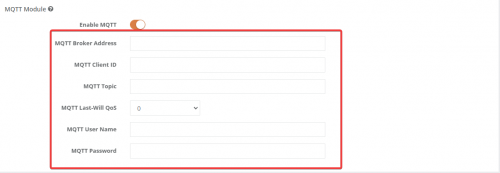
Example Configuration
| MQTT Broker Address |
mqtt://broker.hivemq.com:1883 or mqtt://your.broker.server.com:1883 |
|
MQTT Client ID |
client_123 #default is ChipSerial of device |
| MQTT Topic | your/topic #default setting is /status/{ChipSerial} |
| MQTT Last Will QoS |
0 #send and forget (currently only support this QoS) |
| MQTT User Name | #requires basic authentication to establish a connection |
| MQTT Password | #requires basic authentication to establish a connection |
| Sample 1 - Occupancy Data |
|
{
"RoiId": 1,
"CombineObjectTypeId": 1,
"ObjectCount": 0, # 1 for Occupied and 0 for None
"Timestamp": 1672889540, #UTCtime
"LocalTime": "2023-01-05 11:32:20",
"UTCTime": "2023-01-05 03:32:20",
"OccupancyTypeId": 1,
"ObjectCountUnit": 1,
"CameraSerial": "100000008c76409d"
}
|
| Sample 2 - Counting Data |
|
{
"CombineObjectTypeId": 11,
"EventEndLocalTime": "2022-11-25 04:47:49",
"EventEndTime": 1669351669,
"EventEndUTCTime": "2022-11-25 04:47:49",
"EventStartLocalTime": "2022-11-25 04:47:49",
"EventStartTime": 1669351669,
"EventStartUTCTime": "2022-11-25 04:47:49",
"MetricId": 2,
"PeopleId": 1,
"PeopleTypeId": 1,
"RoiId": 1,
"CameraSerial": "000000007b77a260"
}
|
2.2 REST API
Step 1 - Generate URL: http://[insert Internal IP]/cgi-bin/access_token.cgi?username=[insert Username] &password=[insert Password]
| Item | Description |
| Internal IP | Retrieve the Internal IP.
(Info: For more information on Internal IP, please refer to Section 6.2.) |
| Username |
admin |
| Password | (Info: Same password used to login to Counter Setup Wizard, therefore it is counter-dependent. NOT the password used to login to counter Wi-Fi) |
Video link on how to generate access tokens:
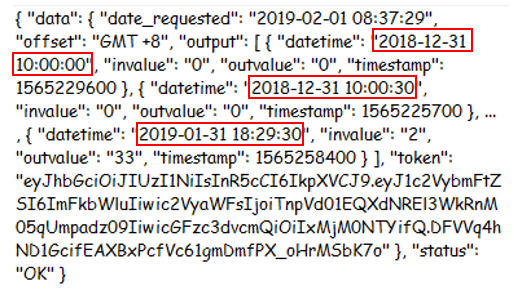
Step 2 - Run the URL and the access token received will be shown below.
| URL | Output |
| http://192.168.2.123/cgi-bin/access_token.cgi?username=admin&password=[password] |  |
Step 3 - Retrieve data using access token received. Generate URL with the selected parameter listed as below: http://[insert Internal IP]/cgi-bin/apiCount_cgi?data_type=[insert Data Type]&data_format=[insert Data Format]&resolution_min=[insert Resolution Minutes]&date_start=[insert Date Start]&date_end=[insert Date End]&time_start=[insert Time Start]&time_end= [insert Time End]&access_token=[insert Token]
| Parameter | Description | Value | Sample |
| Data Type | Type of the data. | json, xml | data_type=xml |
| Data Format | Format of the data. | hour, minute, second | data_format=second |
| Resolution Minutes | The minutes data's resolution. | 1, 5, 10, 15, 30, 60 | resolution_min=15 |
| Resolution Second | The second data's resolution. | 1, 5, 10, 15, 30, 60 | resolution_sec=1 |
| Date Start | Start date of the data. | YYYYMMDD | date_start=20181231 |
| Date End | End date of the data. | YYYYMMDD | date_end=20190131 |
| Time Start | To set the start time range of the API | HHmmss | time_start=103000 |
| Time End | To set the end time range of the API | HHmmss | time_end=223300 |
- The Websocket Server should receive a JSON test data with the topic 'generic-test-topic'.
2.3 Web Socket
|
Requirement |
|
|
Websocket Server Address |
Data MUST be acknowledged with OK upon receiving them, otherwise, FootfallCam counter will assume the sending has failed and keep re-sending the same data. |
|
Basic Authentication (Optional) |
Username and Password |
Step 1 - In your Counter's Control Panel, navigate to the Settings tab and scroll down to find 'Websocket Module'
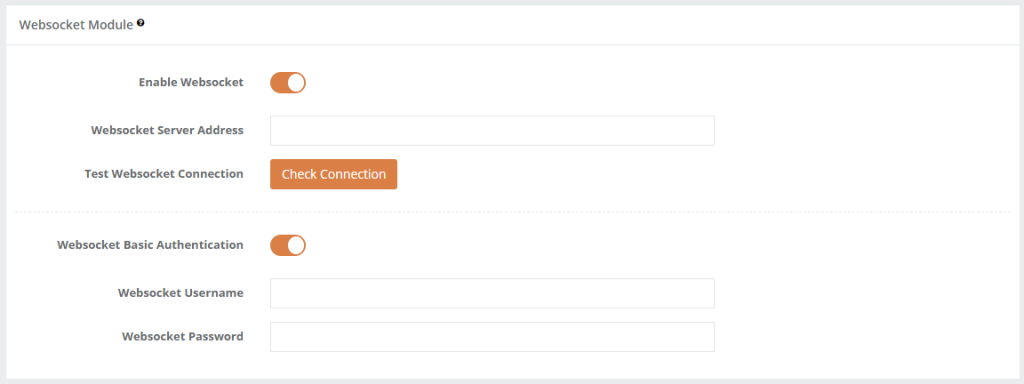
Step 2 - Once "Enable Websocket" is enabled, you can fill in your Websocket Address in the field provided. If Basic Authentication is enabled in your Server, you may toggle the option and fill in the details. Otherwise, this option is optional.
Step 3 - Every time the setting is changed, Check Connection must be clicked before saving it to allow the Counter to test the connection.
- The Websocket Server should receive a JSON test data with the topic 'generic-test-topic'.
- The Websocket Server must return "OK".
Websocket Module: Data Explanation
|
Parameter |
Description |
Value |
|
Topic |
Name of the payload which IN / OUT data will send to server. |
ffc-eventrawdata |
|
CameraSerial |
Unique ID. (Info: You may obtain the CameraSerial by getting the Chipset Code from Home page.) |
00000000xxxxxxxx |
|
EventStartUTCTime |
Start of Event in UTC Timezone. |
YYYY-MM-DD HH:MM:SS |
|
EventEndUTCTime |
End of Event in UTC Timezone. |
YYYY-MM-DD HH:MM:SS |
|
EventStartTime |
Event Start Time in Linux Timestamp |
YYYY-MM-DD HH:MM:SS |
|
EventEndTime |
Event End Time in Linux Timestamp |
YYYY-MM-DD HH:MM:SS |
|
EventStartLocalTime |
Event Start in Local Time. |
YYYY-MM-DD HH:MM:SS |
|
EventEndLocalTime |
Event End in Local Time. |
YYYY-MM-DD HH:MM:SS |
|
UploadedUTCDateTime |
UTC Time of when the Data is published to be sent. |
YYYY-MM-DD HH:MM:SS |
|
UploadedLocalDateTime |
Local Time of when the Data is published to be sent. |
YYYY-MM-DD HH:MM:SS |
|
MetricId |
To indicates kind of event triggered such as Value IN or Value Out. |
1 = ValueIN 2 = ValueOut |
|
PeopleTypeId |
To indicate which kind of people were detected. |
1 = Visitor 2 = Staff |
|
Roild |
Temporarily ONLY for Internal Use. |
N / A |
|
PeopleId |
To indicate the people are being tracked. Example, multiple people will be indicate with different IDs. |
numeric |
| Sample 1 - Value IN Data |
| {'Topic': 'ffc-eventrawdata', 'Data': {'EventStartUTCTime': '2020-06-17 03:16:41', 'EventEndLocalTime': '2020-06-17 11:16:41', 'EventStartTime': 1592363801, 'MetricId': 1, 'RoiId': 1, 'CameraSerial': '000000006afce315', 'PeopleId': 1, 'EventEndUTCTime': '2020-06-17 03:16:41', 'UploadedLocalDateTime': '2020-06-17 11:16:45', 'EventEndTime': 1592363801, 'EventStartLocalTime': '2020-06-17 11:16:41', 'UploadedUTCDateTime': '2020-06-17 03:16:45', 'PeopleTypeId': 1}} |
| Sample 2 - Value OUT Data |
| {'Topic': 'ffc-eventrawdata', 'Data': {'EventStartUTCTime': '2020-06-17 03:20:18', 'EventEndLocalTime': '2020-06-17 11:20:18', 'EventStartTime': 1592364018, 'MetricId': 2, 'RoiId': 1, 'CameraSerial': '000000006afce315', 'PeopleId': 1, 'EventEndUTCTime': '2020-06-17 03:20:18', 'UploadedLocalDateTime': '2020-06-17 11:20:21', 'EventEndTime': 1592364018, 'EventStartLocalTime': '2020-06-17 11:20:18', 'UploadedUTCDateTime': '2020-06-17 03:20:21', 'PeopleTypeId': 1}} |
2.4 BACNET
Step 1 - Connect FFC device to Bacnet Router.
Step 2 - Connect Computer to same network as FFC device.
Step 3 - Configure FFC device's ip address through counter setup wizard.
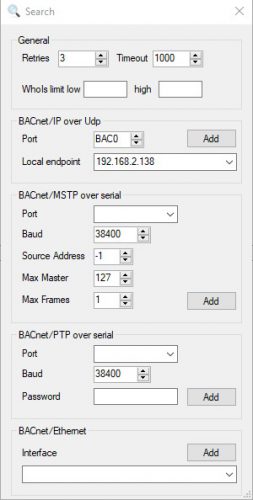
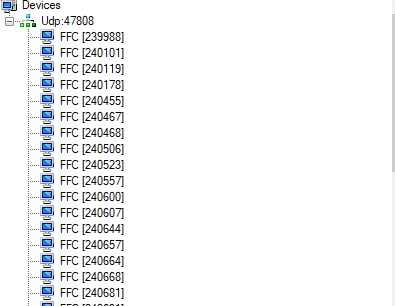
Step 4 - Connect computer/master device to Bacnet network with BAC0 protocol and Port 47808.
Example Setting to connect using YABE software
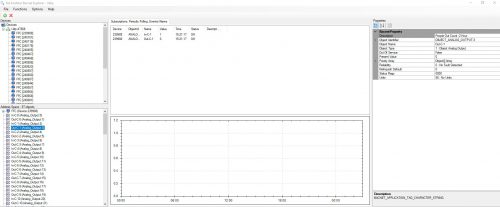
Step 5 - Get data from device's properties with device's name FFC and device's ID with last six digits of company serial.
Example display of connected device using Bacnet
Step 6 - After the device connected to Bacnet network, the counting data were inside properties. And there are two type of data which is In-C-X and Out-C-X. In-C-X and Out-C-X which represented In count and Out count, and X represented current hour - X hours. There are total 96 data which represent last 48 hours in and out count for the devices.

