We encourage end user to provide floor plan to FFC Team, so that we can plot and mark the devices on it. This will getting the installation easier, and if the installer can mark the device serial on the floor plan, it will ease the support process in the future for issue diagnostics if required.
10.1 Create New Floor Plan
STEP 1 - Access to FootfallCam Analytic Manager V9™: http://v9.footfallcam.com via Google Chrome.
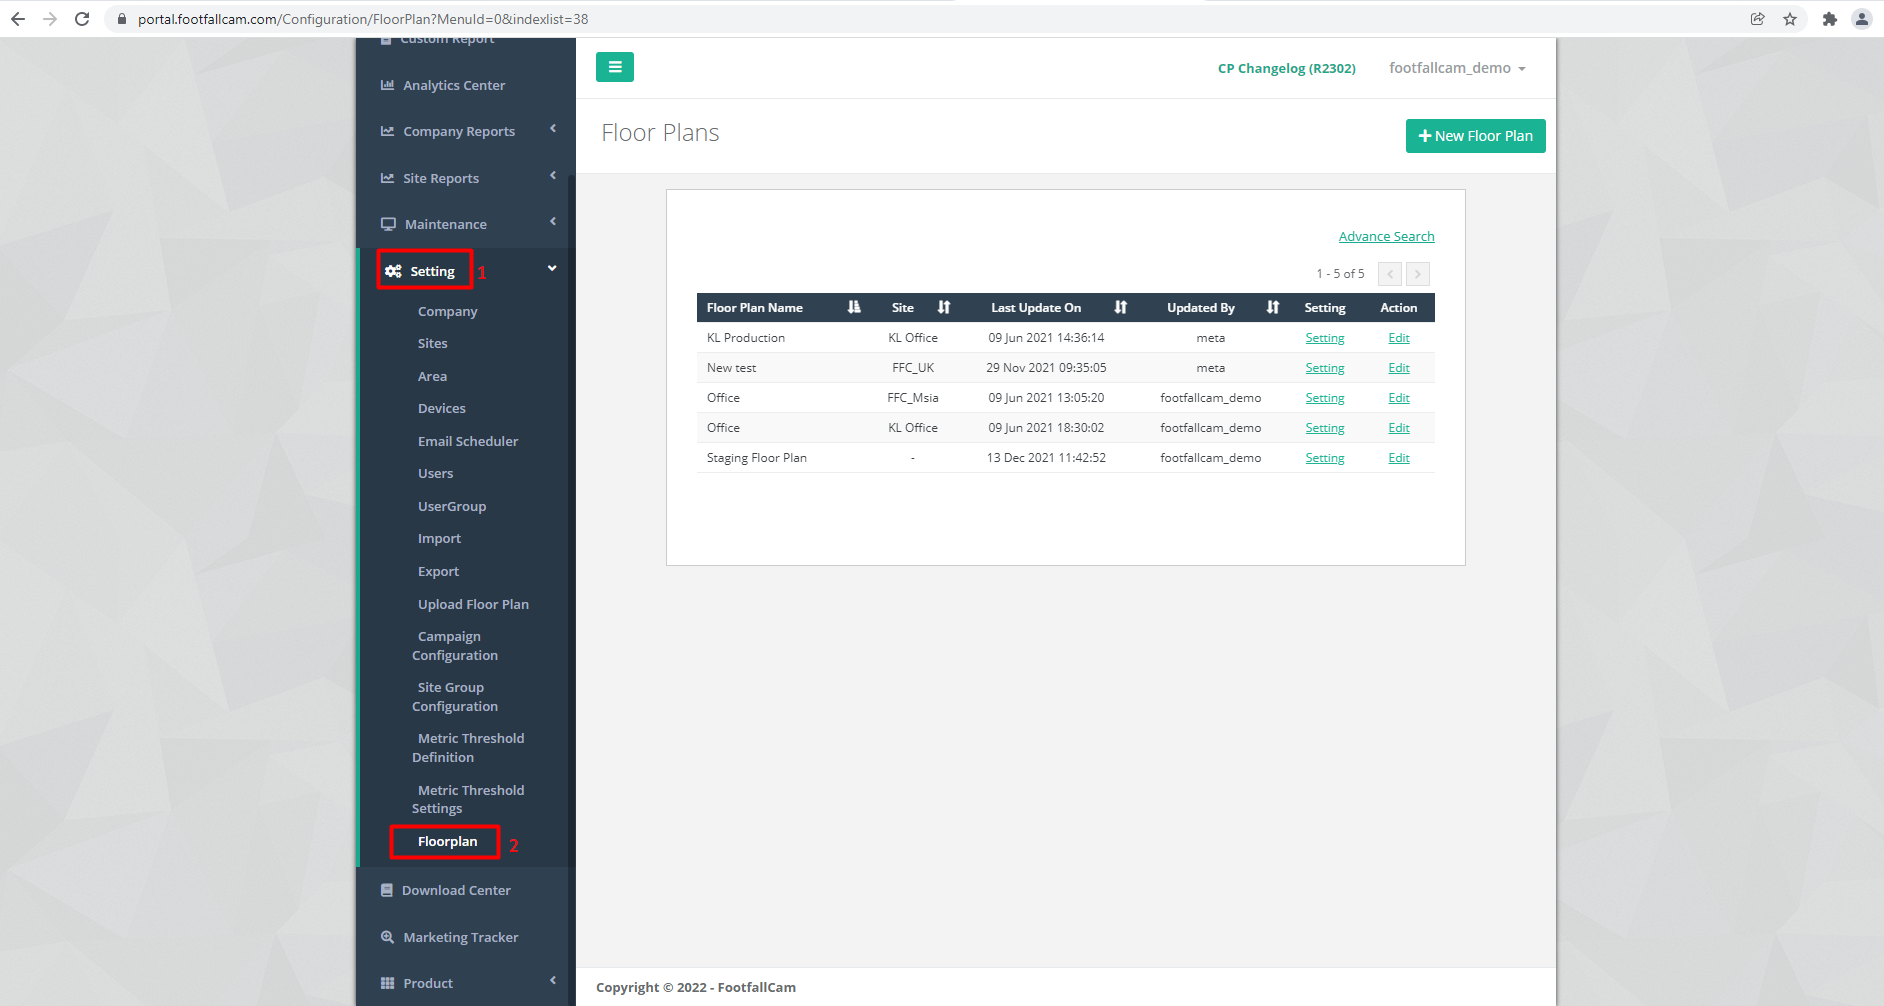
STEP 2 - Click on Setting > Floorplan to access the Floor Plans page.
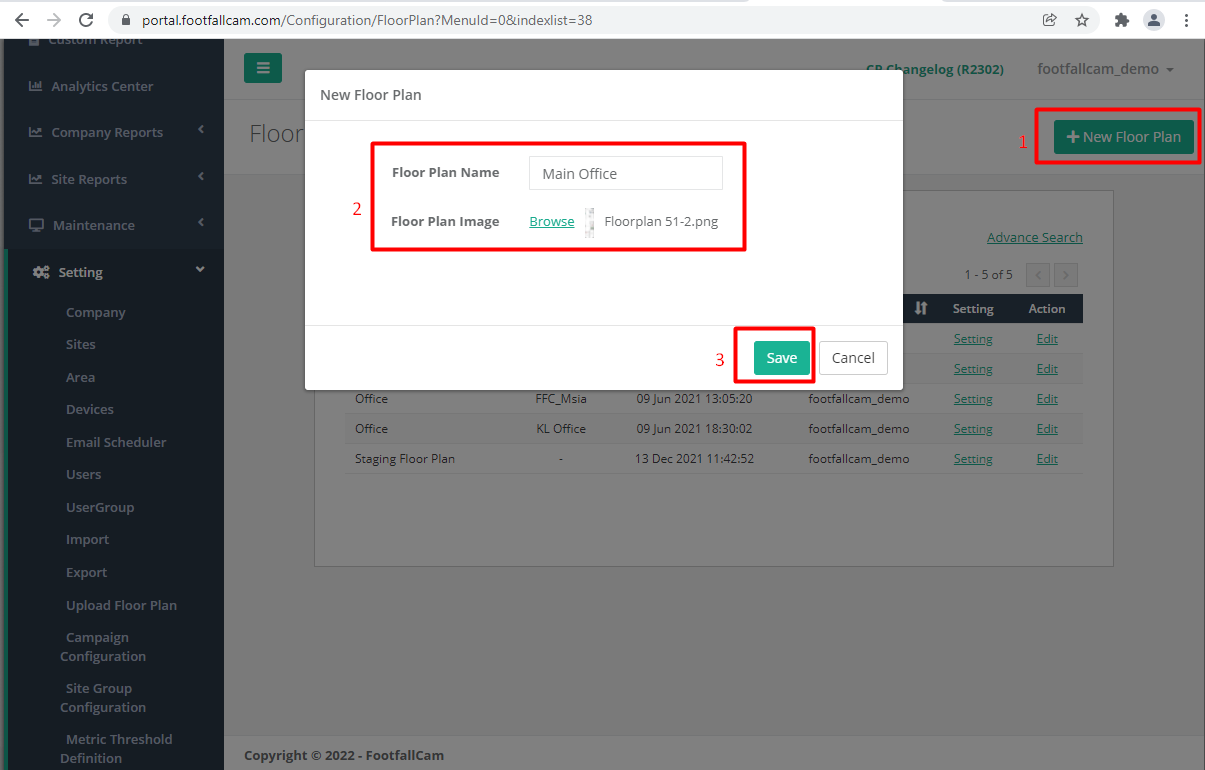
STEP 3 - Click on + New Floor Plan button to access the Floor Plans Design Tool page.
STEP 4 - Enter the Floor Plan Name and Browse the floor plan you want to upload.
STEP 5 - Click on Save button to save the floor plan. After the floor plan is saved, the system will direct you to the Floor Plan Design Tool page.
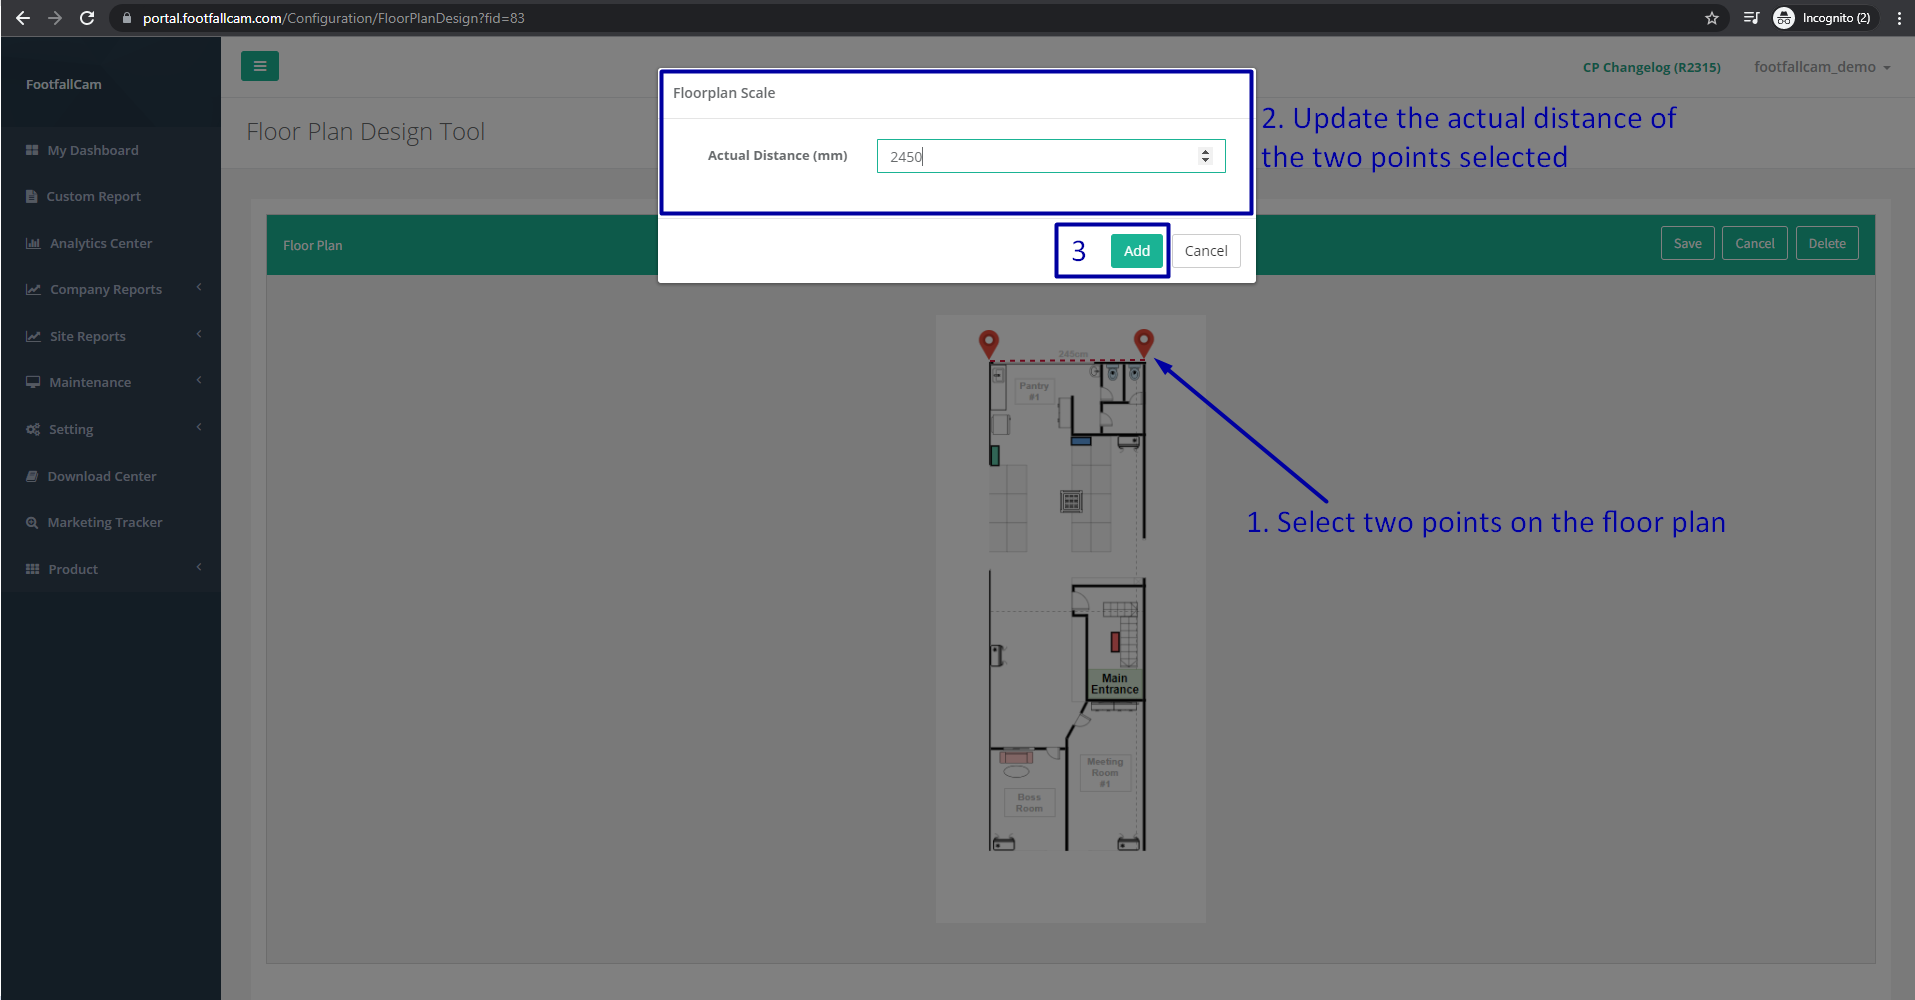
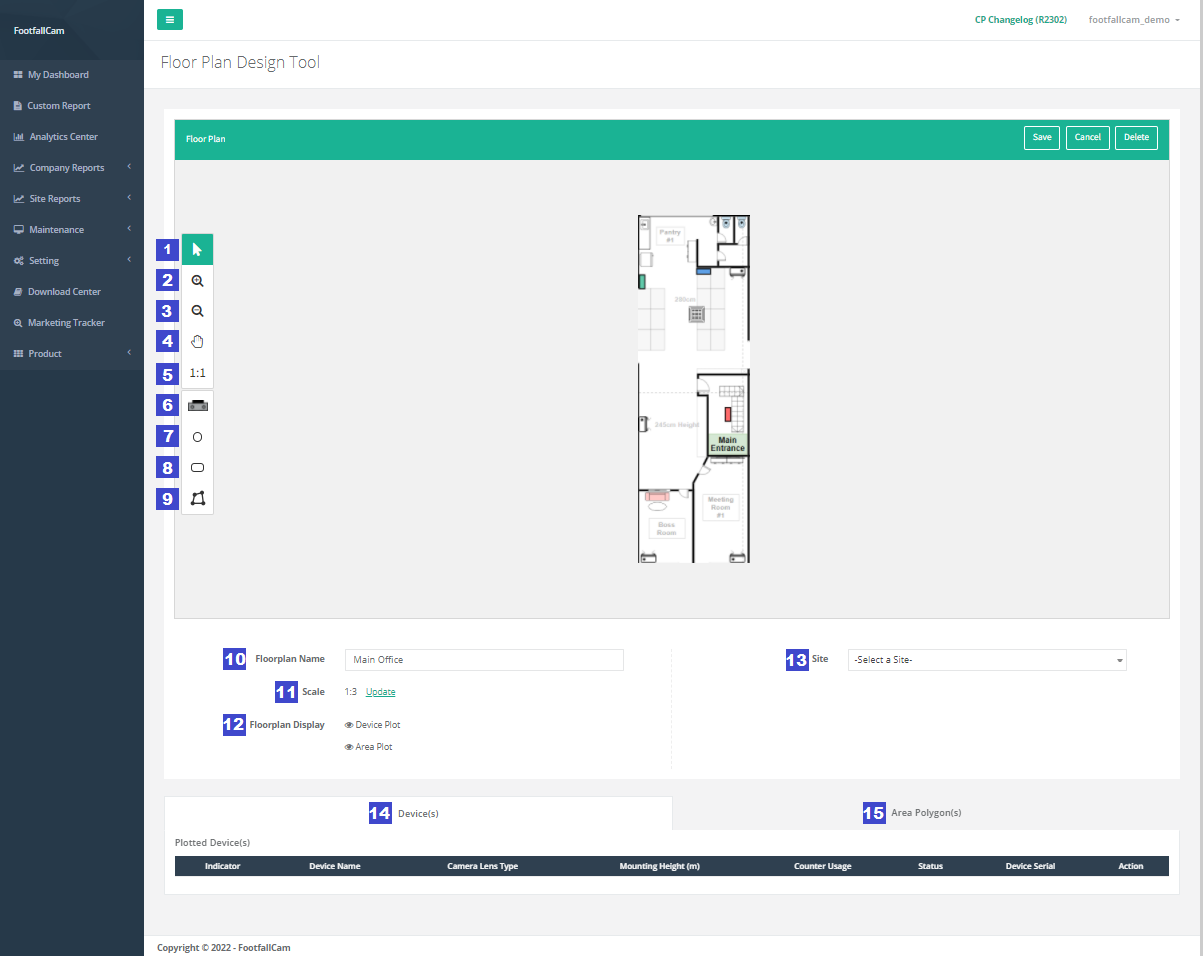
STEP 6 - Select 2 points on the floor plan, and update the actual distance (mm) to scale the floor plan.
| Item | Description |
| 1. Select Cursor | Use to select the item you want and drag to move the item |
| 2. Zoom In | Enlarge the canvas |
| 3. Zoom Out | Minimise the canvas |
| 4. Drag Canvas | Drag to move the canvas |
| 5. Reset Canvas Zoom | Reset canvas zoom to original scale |
| 6. Device | To add device on the floor plan |
| 7. Ellipse | To create ellipse on the floor plan for area setting |
| 8. Rectangle | To create rectangle on the floor plan for area counting |
| 9. Polygon | To create polygon on the floor plan for area counting |
| 10. Floorplan Name | To show the floorplan name, editable |
| 11. Scale | To show the floor plan scale versus actual scale, able to edit by click on Update link |
| 12. Floorplan Display | To hide or show the devices or area polygon plotted |
| 13. Site | To link the floor plan to the selected site |
| 14. Devices | List of device(s) which has been plotted on the floor plan (Please refer to How to Plot the Device in Floor Plan) |
| 15. Area Polygons | List of area polygon(s) which has been plotted on the floor plan |
STEP 7 - After all setting are done, click on Save button to save the floorplan.
10.2 Edit Floor Plan
STEP 1 - Access to FootfallCam Analytic Manager V9™: http://v9.footfallcam.com via Google Chrome.
STEP 2 - Click on Setting > Floorplan to access the Floor Plans page.
STEP 3 - Navigate to the floorplan you wanted to edit , click on the Edit button to access Floor Plan Design Tool page.
STEP 4 - Edit the floorplan accordingly and click on Save button to save the floor plan.
10.3 How to Plot the Devices in Floor Plan
10.3.1 Add New Device
STEP 1 - In Floor Plan Design Tool page, click the device logo at the left panel.
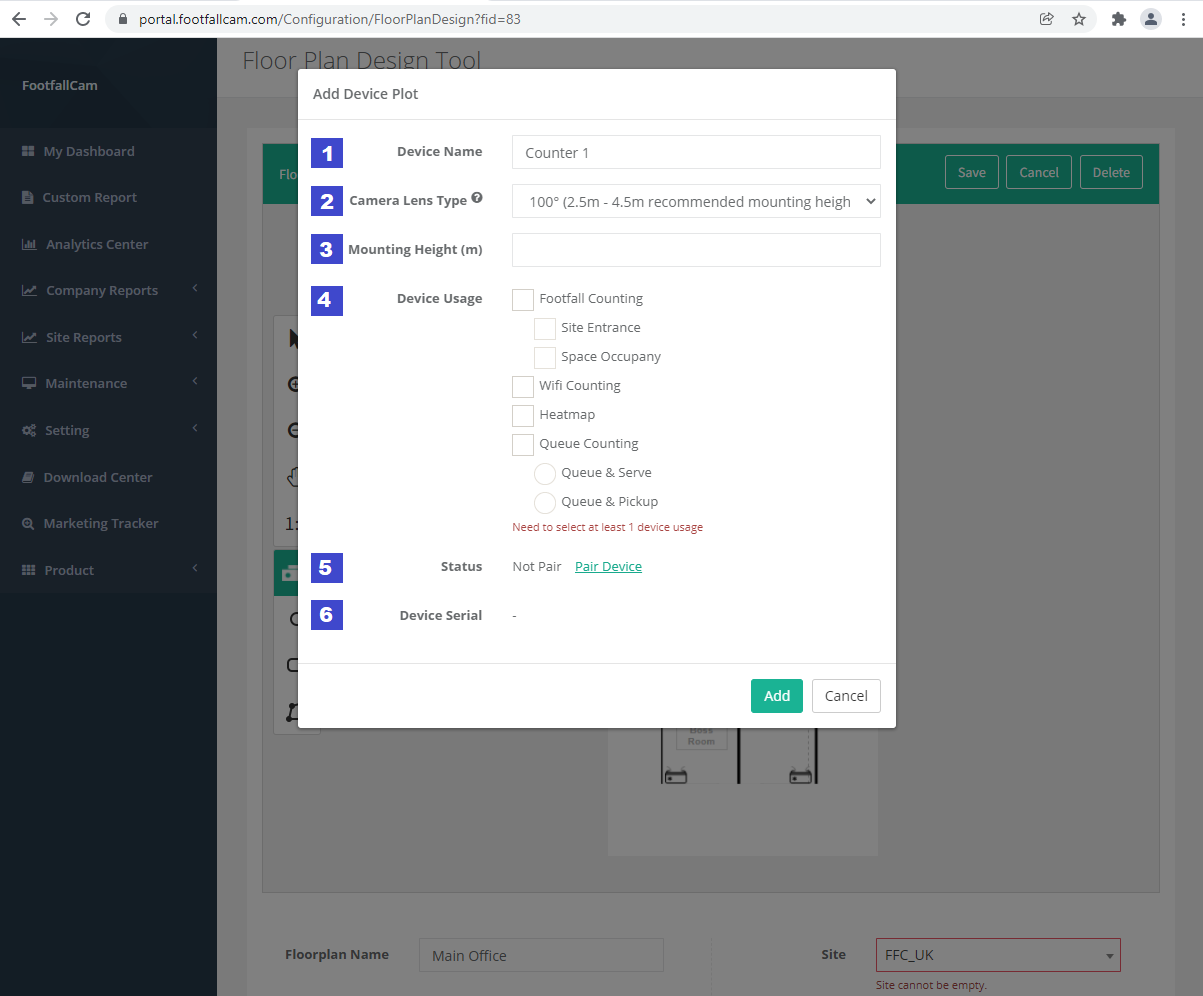
STEP 2 - Fill up the required information.
| Item | Description |
| 1. Device Name | Enter the device name |
| 2. Camera Lens Type | Select the camera lens type of the device installed or to be installed Note: Refer to the silver label at the back of the counter for the lens type |
| 3. Mounting Height (m) | Enter the mounting height in meter |
| 4. Device Usage | Tick the device usage for the device plot |
| 5. Status | To show the status of the device plot whether it is paired to an allocated device. You may pair or unpair the device from the device setting |
| 6. Device Serial | To show device serial if the device plot is paired |
STEP 3 - Click Add button to add the device.
STEP 4 - A device logo with the coverage area will be added into the floor plan, and a row of the device information will be added into the Plotted Device(s) table. You may move the device to the optimum location depending on usage.
STEP 5 - Click the Save button at the top right corner of the floor plan to save the floor plan.
10.3.2 Edit Device
STEP 1 - In Floor Plan Design Tool page, navigate to the device to be edited, click on the Edit button.
STEP 2 - Update the necessary field and click the Save button to save the changes.
STEP 3 - Click the Save button at the top right corner of the floor plan to save the floor plan.
10.3.3 Delete Device
STEP 1 - In Floor Plan Design Tool page, navigate to the device to be deleted, click on the Edit link.
STEP 2 - Click on the Delete button to delete the device.
STEP 3 - Click the Save button at the top right corner of the floor plan to save the floor plan.
10.3.4 Pair Device
If you have allocated the device(s) in the portal, you may pair the device to the plotted device in floor plan. This will ease the communication if you have more than 1 device in the store.
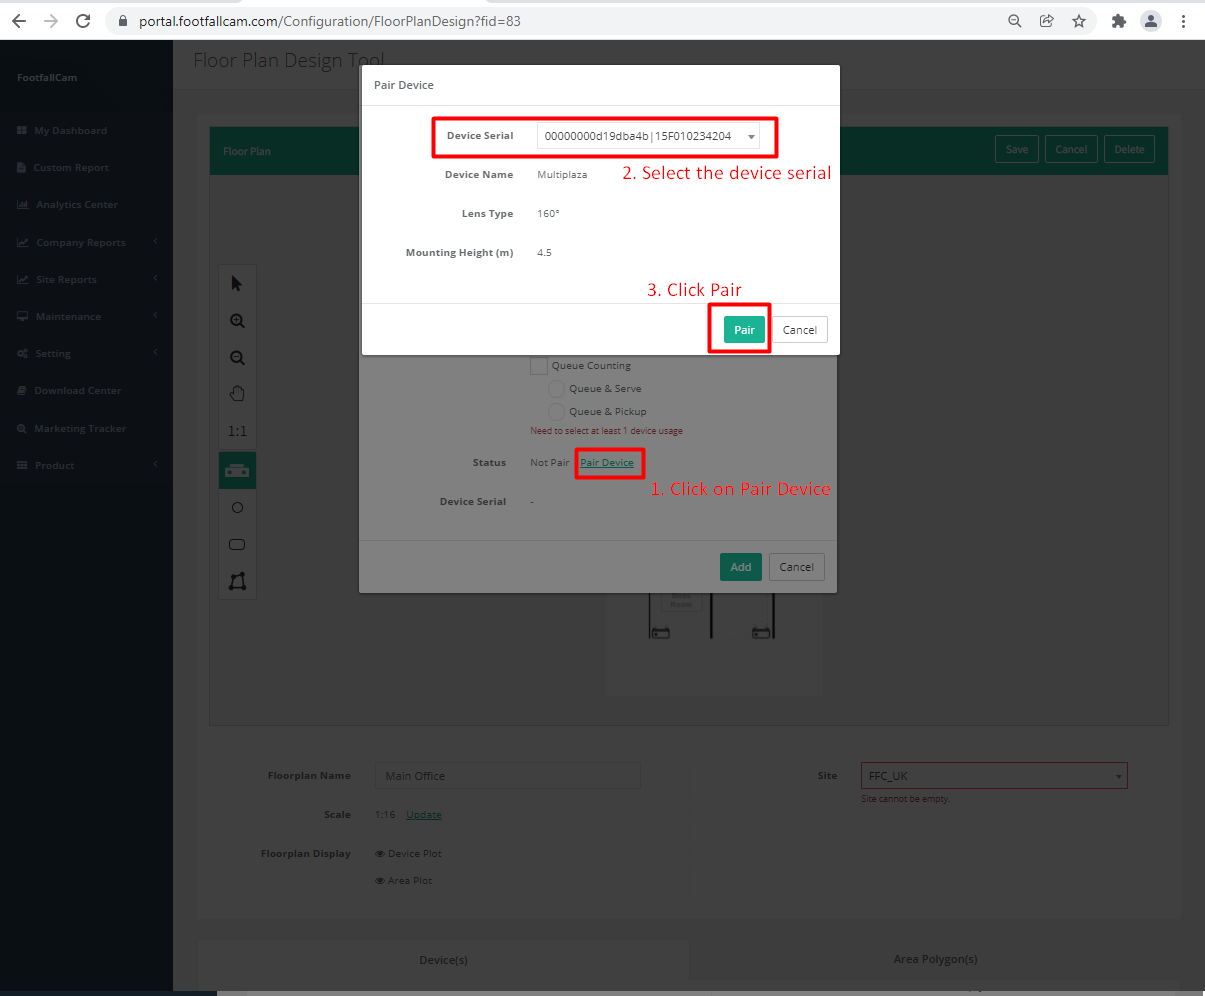
STEP 1 - In Floor Plan Design Tool page, navigate to the plotted device to be paired, click on the Edit link.
STEP 2 - Click on the Pair Device button at the Status field.
STEP 3 - Select the device to be paired and click on Pair button to pair the device.
STEP 4 - Click the Save button to save the changes.
STEP 5 - Click the Save button at the top right corner of the floor plan to save the floor plan.
10.3.5 Unpair Device / Change Paired Device
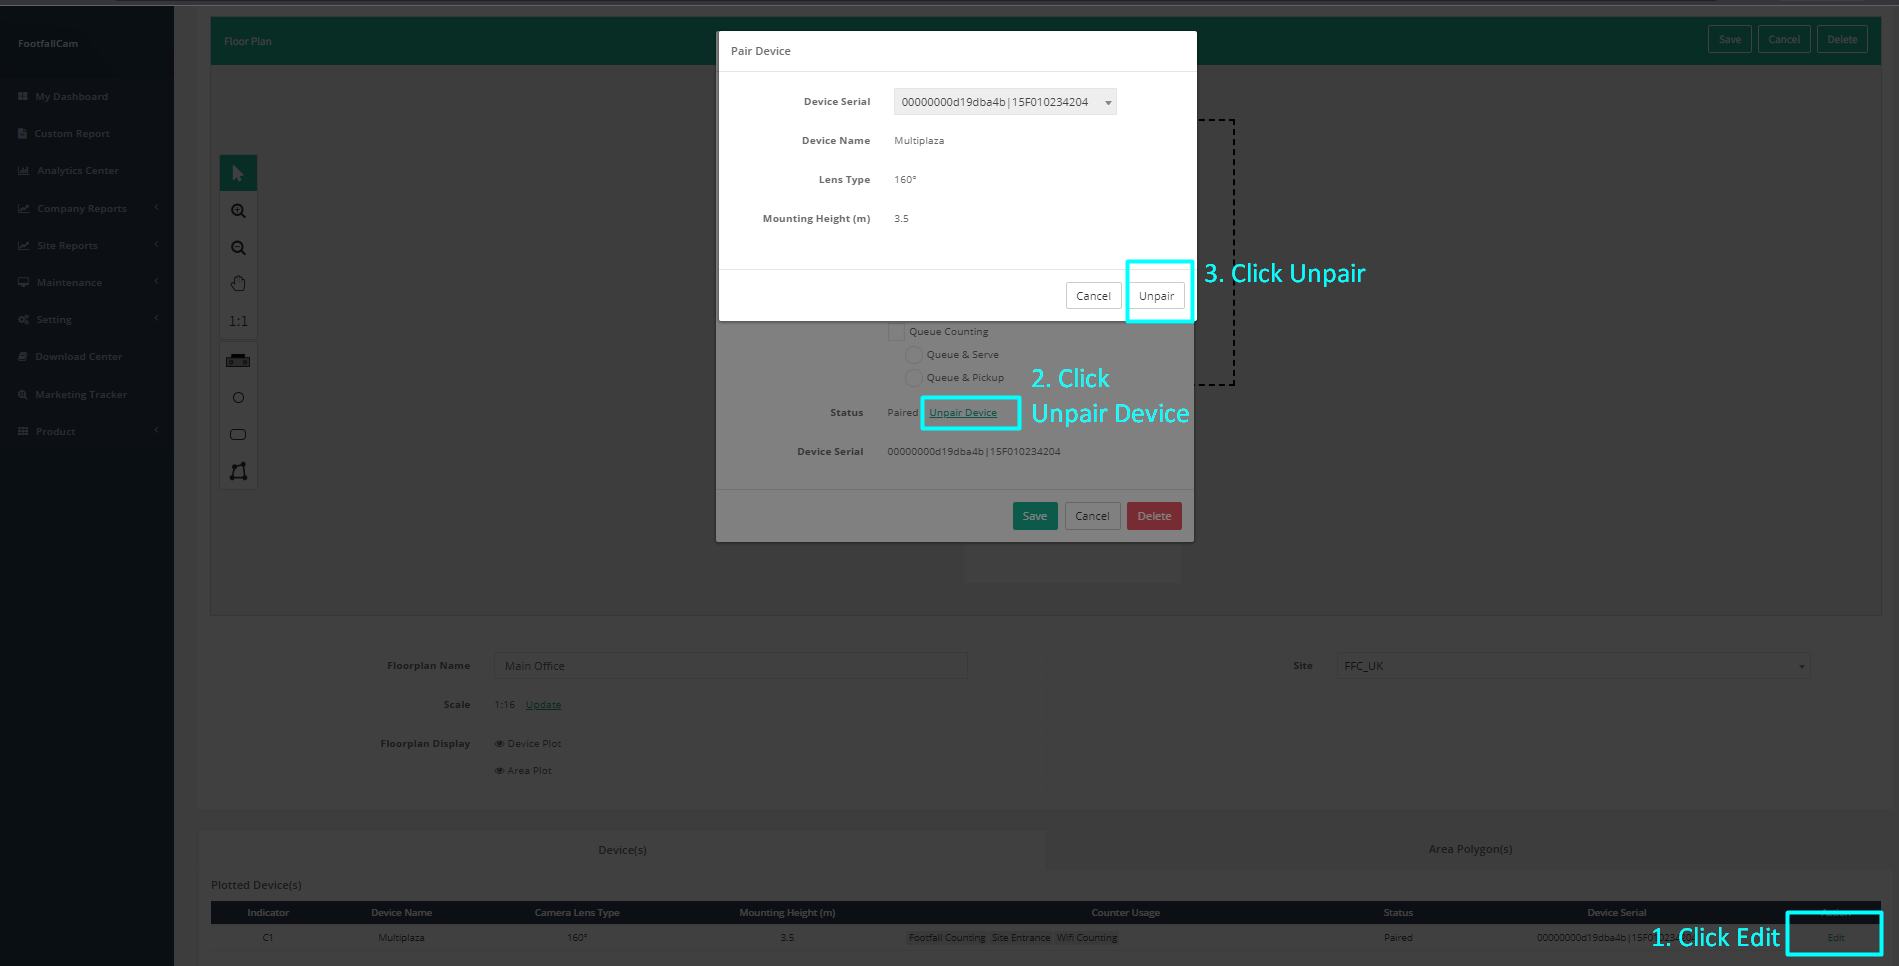
If you would like to change the paired device, you need to unpair the device and pair again. Below are the steps to unpair the device in the floor plan.
STEP 1 - In Floor Plan Design Tool page, navigate to the device you wish to unpair, click on the Edit link.
STEP 2 - Click on the Unpair Device button at the Status field.
STEP 3 - Click on the Pair Device button to unpair the device.
STEP 4 - Update the device information if required. Click on the Save button to save the changes.
STEP 5 - Click the Save button at the top right corner of the floor plan to save the floor plan.
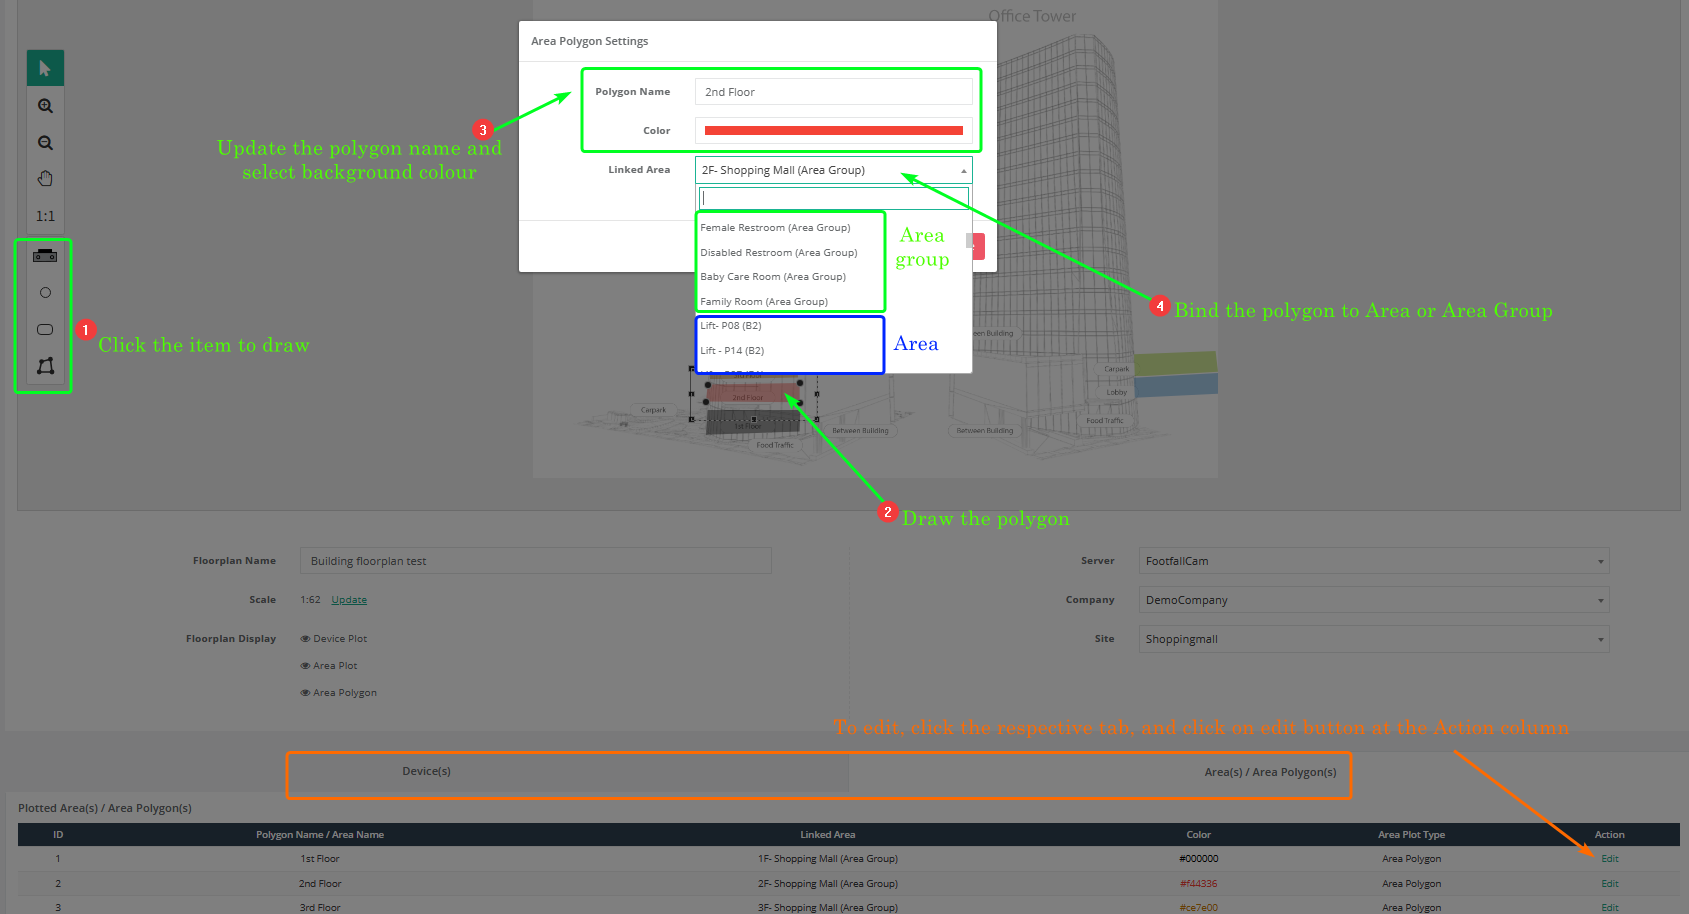
10.4 How to Plot the Area Polygons in Floor Plan
Besides devices, you may also plot the area polygon in the floor plan. The plotted area polygon will then be linked to an area (can be configured in Area Configuration page) to present the data of the selected metrics in Floor Plan widget, indicating the coverage area on the floor plan for the selected metric.
10.4.1 Create Area Polygon
STEP 1 - Click on the Ellipse or Rectangle or Polygon button to draw an area.
STEP 2 - Drag on the floor plan for the area to be covered by the polygon.
STEP 3 - Fill in the Polygon Name and select the polygon Colour.
STEP 4 - If you wish to link the polygon to an area or area group, can fill up the dropdown accordingly.
STEP 5 - Click on the Save button to save the polygon plotted.
STEP 6 - You can move or resize the polygon if you wish to.
STEP 7 - Click the Save button at the top right corner of the floor plan to save the floor plan.
10.4.2 Edit Area Polygon
STEP 1 - Click on the Area Polygon(s) tab to access the Area Polygon list.
STEP 2 - Navigate to the polygon you would like to edit and click on the Edit button.
STEP 3 - Update the field(s) and click on the Save button to save the changes.
STEP 4 - Click the Save button at the top right corner of the floor plan to save the floor plan.
10.4.3 Delete Area Polygon
STEP 1 - Click on the Area Polygon(s) tab to access the Area Polygon list.
STEP 2 - Navigate to the polygon you would like to delete and click on the Delete button.
STEP 3 - Click the Save button at the top right corner of the floor plan to save the floor plan.

