In order to access the Analytics Manager V9 portal, every individual required to have a user account, with the accessible site or site group control to limit the data access of each user. User group defined the role of the user, enable admin to restrict the page accessibility and permission of each user. The details and setup steps for user management, contact management, report scheduler, notifications, email server, Active Directory Server, security and data configuration can be obtained from the subchapter below.
5.1 User Account Configuration
In this section, we will explain about the procedures to create, update and delete user and user group.
5.1.1 User Group Settings
User Group is used to categorize users into different groups to ease the permission granting procedure to the users in a specific group.
Note:
-
There are 2 default user groups:
-
Admin (hierarchy =1)
Given all accesses for all sites and site groups data and all available page permissions, including company management, user management and user group management. -
User (hierarchy = 2)
Given basic page permissions and the site access referring to user configuration.
-
-
The first user that registered in the company is auto-assigned to the Admin user group, while other new users created can user group is assigned by the admin who created the user.
5.1.1.1 How to Create New User Group
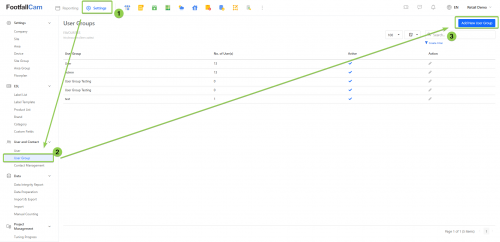
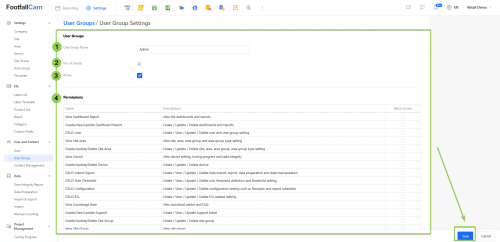
Step 1 - Click on Settings > User and Contact > User Group > Add New User Group button to access the User Group Settings page.
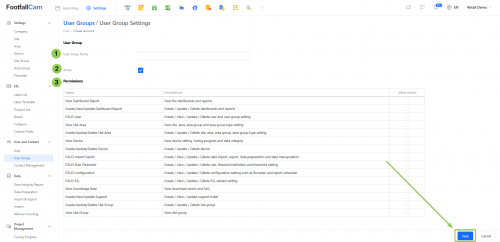
Step 2 - Fill up the necessary details and granted the page permission then click on Save button to save the user group.
|
Item |
Description |
| 1. User Group Name | Enter a preferred name. |
| 2. Active | Indicator of whether the user group is active or inactive. |
| 3. Page Permissions |
Enable the page permission for the user group. Refer to Chapter for the complete page permission list. |
5.1.1.2 How to Update Existing User Group
Step 1 - Click on Settings > User and Contact > User Group > Edit button in Action column to access the User Group Settings page.
Step 2 - Update the relevant information and click on Save button to save the changes.
|
Item |
Description |
| 1. User Group Name | Enter a preferred name. |
| 2. No. of User(s) | Display the number of users under this user group |
| 3. Active | Indicator of whether the user group is active or inactive. |
| 4. Page Permissions |
Enable the page permission for the user group. Refer to Chapter for the complete page permission list. |
5.1.1.3 How to Remove Existing User Group
Note: The default user groups (Admin and User) are unable to be removed.
You may select to disable the user group or totally remove it. Disabling a user group keeps it in the portal but makes it inactive, allowing you to enable it again when needed. On the other hand, removing a user group permanently deletes it, meaning it will no longer exist. If you may need to use the group in the future, we recommend disabling it instead of removing it.
5.1.1.3.1 Disable User Group
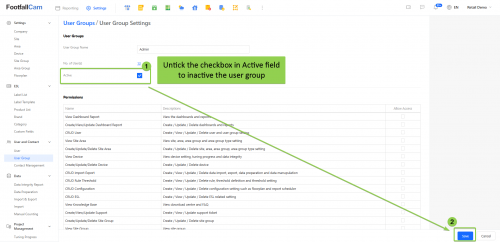
Step 1 - Click on Settings > User and Contact > User Group > Edit to access the User Group Settings page.
Step 2 - Untick Active field and click Save button to save the changes.
5.1.1.3.2 Remove User Group
Step 1 - Reassign all users in the user group that need to be deleted.
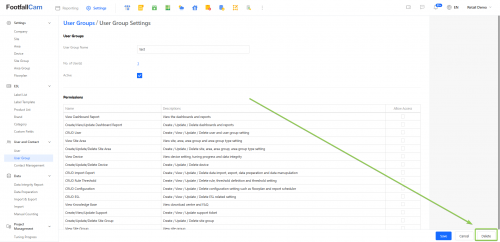
Step 2 - Click on Settings > User and Contact > User Group > Edit to access the User Group Settings page.
Step 3 - Click on the Delete button to remove the user group.
5.1.1.4 Page Permission List
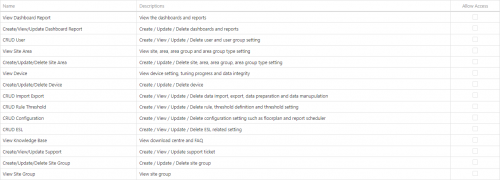
Each page in the Analytics Manager V9 portal has its own permission, below is the list of pages with its permission:
|
Permission |
Description |
Page Access |
|
1. View Dashboard Report |
View the dashboards and reports | All Dashboards, All Reports with read-only access |
|
2. Create/Update/Delete Dashboard Report |
Create / Update / Delete dashboards and reports | All Dashboards, All Reports |
| 3. CRUD User | Create / View / Update / Delete user and user group setting | User, User Group and its setting page |
| 4. View Site Area | View site, area, area group and area group type setting | Site, Area, Area Group and its setting page with read-only access |
| 5. Create/Update/Delete Site Area | Create / Update / Delete site, area, area group, area group type setting | Site, Area, Area Group and its setting page |
| 6. View Device | View device setting, tuning progress and data integrity | Device, Tuning Process and its setting page with read-only access, |
| 7. Create/Update/Delete Device | Create / Update / Delete device | Device and its setting page |
| 8. CRUD Import Export | Create / View / Update / Delete data import, export, data preparation and data manipulation | Import & Export, Data Preparation |
| 9. CRUD Rule Threshold | Create / View / Update / Delete rule, threshold definition and threshold setting | Rule Settings, Threshold Settings |
| 10. CRUD Configuration | Create / View / Update / Delete configuration setting such as floorplan and report scheduler | Contact Management, Recipient Group, Report Scheduler |
| 11, GRUD ESL | Create / View / Update / Delete ESL related setting | ESL |
| 12. View Knowledge Base | View download centre and FAQ | FAQ |
| 13. Create/View/Update Support | Create / View / Update support ticket | Support Ticket, Service Request, Installation Support Chat |
| 14. Create/Update/Delete Site Group | Create / Update / Delete site group | Site Group and its setting page |
| 15. View Site Group | View site group | Site Group and its setting page with read-only access |
5.1.1.5 Page Access and Permission Control
Page access and permission control define user authority levels, allowing specific users to access designated pages and manage their respective permissions on FootfallCam V9™. Different page permissions can be assigned based on user roles. For example, an administrator can grant a Human Resources manager the ability to create, view, update, and delete user and user group settings on the User page, while a business manager may be given access to create, view, and update dashboard reports on the View Dashboard page.
Setting permission controls is essential to prevent issues that could negatively impact company administration and evaluation. Without proper configuration, certain users may obtain unintended permissions beyond their authority, or high-level employees might be unintentionally restricted from accessing pages necessary for their management responsibilities.
Step 1 - Click on Settings > User and Contact > User Group > Edit button in the Action column to access the User Group Settings page.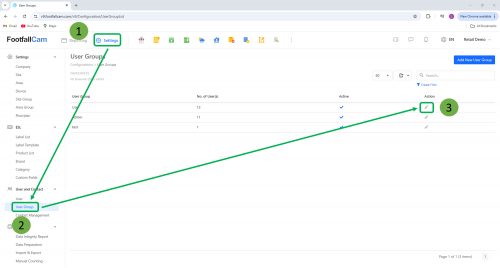
Step 2 - At Permissions, tick one or multiple permissions, click the Save button to save the change.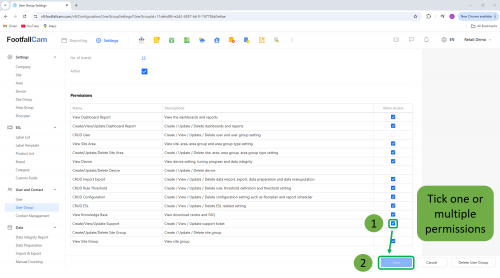
Step 3 - A message will show to indicate a successful change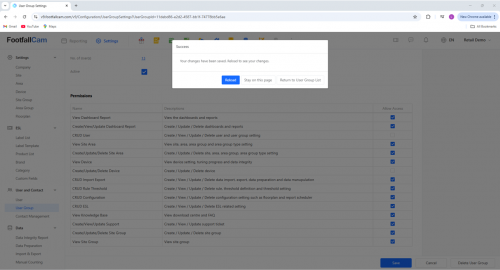
5.1.2 User Settings
Note:
-
Only default Admin user group can manage the user configuration (create, edit or delete) which belongs to the company.
5.1.2.1 How to Create New User
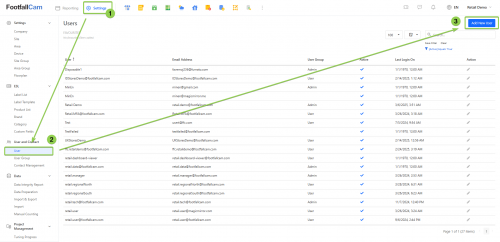
Step 1 - Click on Settings > User and Contact > User > Add New User button to access the User Settings page.
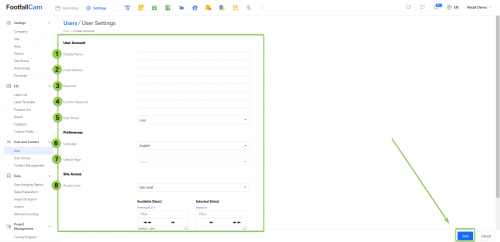
Step 2 - Fill up the necessary details and click on Save button to create the user.
|
Item |
Description |
| 1. Display Name | Enter a preferred display name. |
| 2. Email Address |
Enter a preferred unique email address. (Info: Confirmation email will be sent to the email address. Email need to be unique and do have any associated portal account with FootfallCam) |
| 3. Password | Enter a preferred password. |
| 4. Confirm Password | Enter to confirm the password field entered. |
| 5. User Group |
Select the preferred user group. (Info: If default Admin is selected, the access type is auto-selected to Site Group Level and all Site Groups are selected to allow access) |
| 6. Language | Select a preferred language. |
| 7. Default Page | Select the preferred login landing page. |
| 8. Access Level | Select the entity granularity and the respective entity to be visible by the user. |
5.1.2.2 How to Update Existing User Details
Step 1 - Click on Settings > User and Contact > User > Edit button in Action column to access the User Settings page.
Step 2 - Update the relevant information and click on Save button to save the changes that have been made.
5.1.2.3 How to Update Existing User Site Access and Site Group Access
Site Access and Site Group Access are levels of user authority that grant users full access to specific site groups or sites. A user can be granted "Site Group level" or "Site Level" access. The former allows users to access site groups and pages that are exclusive to users with site group access while the latter allows a user to access individual sites. These authorities can be granted to different users according to their roles. For example, a region manager will have "Site Group Level" access and can access multiple site groups, while a low-level store manager will only have "Site Level" access to view a single site.
Setting these access/authorities accurately is crucial to avoid scenarios that will adversely affect the company's administration and evaluation. Examples of such scenarios include certain users obtaining unintended access to some sites beyond their authority, or when a high-level employee is unintentionally restricted from accessing a site group under his management.
Step 1 - Click on Settings > User and Contact > User > Edit button in the Action column to access the User Settings page.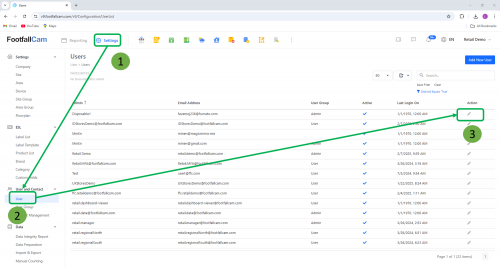
Step 2 - At Site Access, change Access Level to Site Level.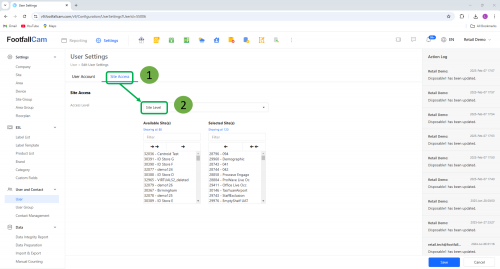
Step 3 - Select and move a site from the Available Site(s) to the Selected Site(s), click the Save button to save the change.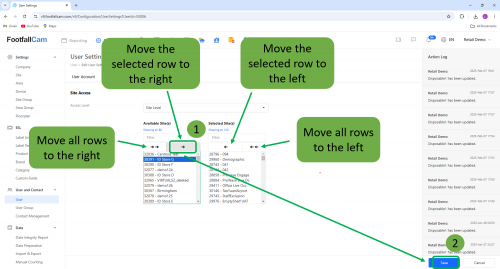
Step 4 - A message will show to indicate a successful change.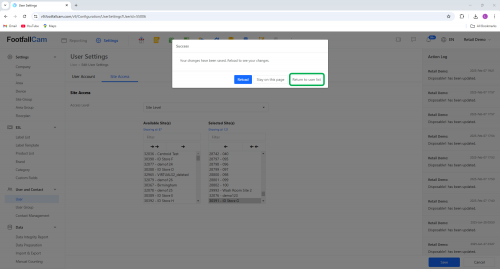
Step 5 - At Site Access, change Access Level to Site Group Level.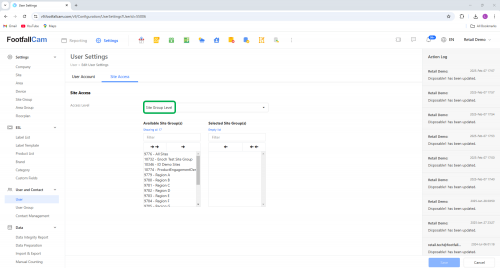
Step 6 - Select and move multiple or all sites from the Available Site Group(s) to the Selected Site Group(s), click the Save button to save the change.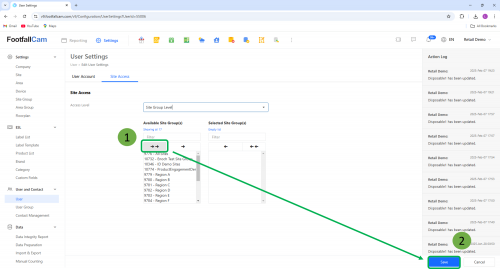
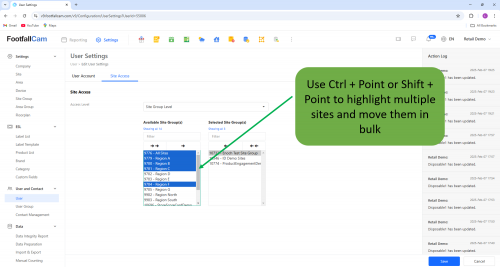
Step 7 - A message will show to indicate a successful change.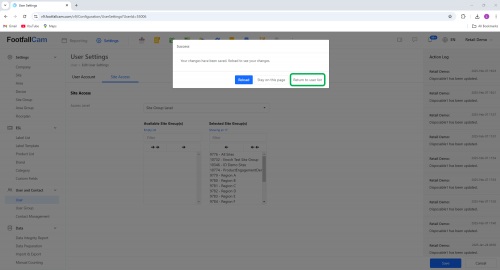
5.1.2.4 How to Remove Existing User
User that has been created cannot be deleted, but you may inactive the user so that they are unable to login to the portal anymore.
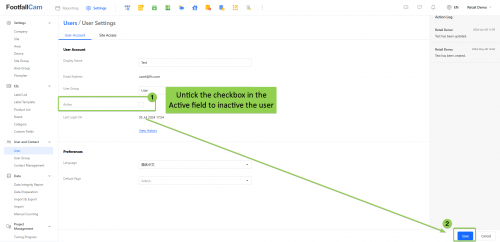
Step 1 - Click on Settings > User and Contact > User > Edit button in Action column to access the User Settings page.
Step 2 - Untick Active field and click Save button to save the changes.
5.2 Contact Management
What is Contact Management?
Contact management aims to streamline and facilitate communication processes by ensuring that pertinent information, updates, and notifications are directed to the appropriate individuals among various contact types, based on their job roles and responsibilities. This framework fosters efficient collaboration, decision-making, and optimised overall business operations.
Who is it for?
The following types of individuals would benefit from contact management
-
Operation
-
Technician
-
Data
-
Commercial
What is the Consequence if Contact Management is not set?
1. Missed Notifications: Important alerts or updates may not reach the relevant individuals, leading to delayed responses or unresolved issues.
2. Extended Downtime: Without prompt notifications to the appropriate contacts, issues might take longer to resolve, affecting business operations and customer satisfaction.
5.2.1 Contact Groups
| Contact Group | Descriptions |
| Operation Contacts | Individuals are responsible for receiving information about updates or support related to the system, project management, account management, company settings, backup policies, and more. |
| Technical Contacts | Members of the technical team who manage and maintain technical aspects of the project. They handle device management, health checks, RMA procedures, site installations, configurations (network etc), server availability, and other technical matters. |
| Data Contacts | Members of the data team who are responsible for maintaining data quality and integrity. They will receive notifications and updates regarding data health checks, accuracy tuning, and other data-related tasks. |
| Commercial Contacts | Individuals are responsible for financial aspects of the business, including billing for service requests and hardware purchases. They manage new device purchases, configuration fees, installation fees, configuration fees and other financial matters. |
5.2.2 Add or Remove User from Contact Group
System administrator can manage the contact group by adding contacts or removing contacts.
Step 1 - Access to FootfallCam Analytic Manager V9™: http://v9.footfallcam.com/Account/Login via Google Chrome.
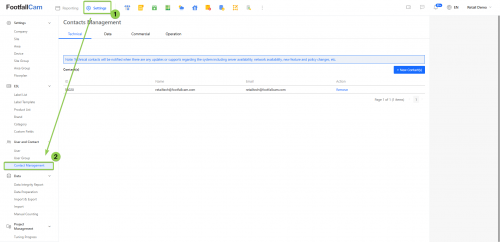
Step 2 - Navigate to Settings > User and Contact > Contacts Management to access the Contacts Management page.
5.2.2.1 To Add Contact(s)
Step 1 - At Contacts Management page, select the tab of the contact group which you intended to add contact.
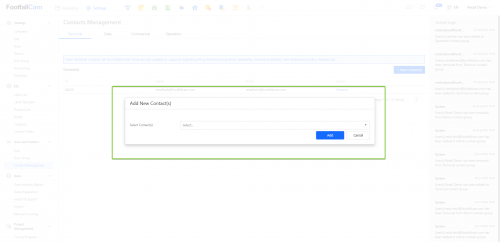
Step 2 - Click on + Add Contacts button to trigger the Add New Contact(s) prompt.
Step 3 - Click the dropdown and select the user(s) to be added into the contact group, multiple selection is allowed.
Step 4 - Click outside of the selection bar to close the dropdown and click on the Add button to save the changes.
5.2.2.2 To Remove Contact(s)
Step 1 - At Contacts Management page, at the tab of the contact group which you intended to remove the contact.
Step 2 - Click on Remove link at the Action column of the selected contact to remove it from the contact group.
5.3 Recipient Group
What is a Recipient Group?
A Recipient Group is a defined list of users belonging to a company who are grouped to receive certain updates.
Who is it for?
This feature allows business analysts to conveniently send reports to a collection of recipients in one go.
What is the Consequence if the Recipient Group is Not Set??
The recipient group feature is utilized in pages such as Report Schedule, Import & Export, Device Offline alerts, and more. If the recipient group is not configured, clients will be unable to select the appropriate email addresses to receive specific notifications or documents when configuring these features.
Where can I see it?
Step 1 - Access to FootfallCam Analytic Manager V9™: http://v9.footfallcam.com/Account/Login via Google Chrome.
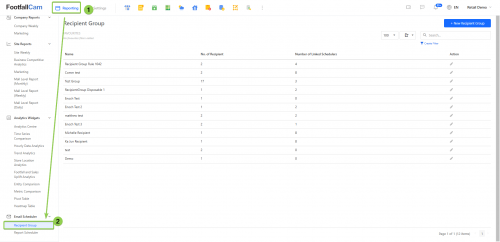
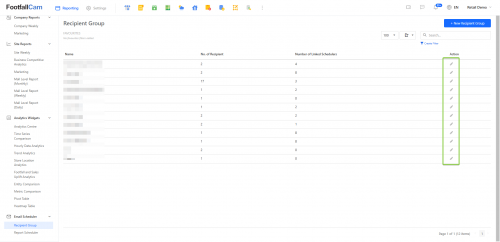
Step 2 - Navigate to Settings > Email Scheduler > Recipient Group to access the recipient group page.
5.3.1 How can I create and configure a new group?
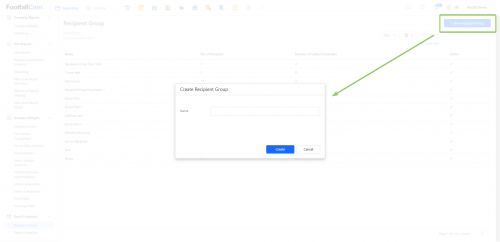
Step 1 - At Recipient Group page, click on "+ New Recipient Group" button.
Step 2 - Fill up the necessary details and click "Create" button to continue.
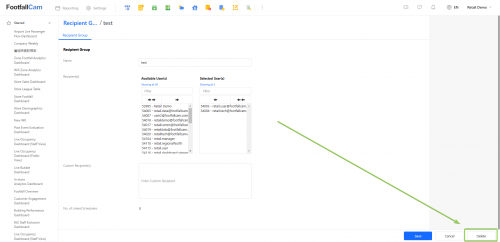
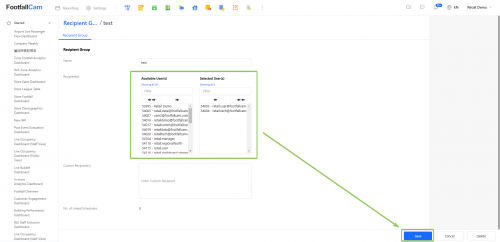
Step 3 - Fill up the necessary details and click "Save" button to create the recipient group.
5.3.2 How can I remove an existing recipient group?
Step 1 - At Recipient Group page, navigate to the recipient group you wish to make changes and click on the grey pen of the "Action" column to go into the Recipient Group Setting page.
Step 2 - Click on the "Delete" to delete the recipient group.
5.3.3 How can I update an existing recipient group?
Step 1 - Click on the grey pen of the "Action" column to go into the Recipient Group Setting page.
Step 2- You may update the details accordingly and click on the "Save" to save your changes.
5.4 Report Scheduler
What is a Report Scheduler?
The report scheduler allows the user to schedule a certain report to be delivered to selected recipients.
Who is it for?
The report scheduler allows business analysts to schedule recurring reports to observe the trend of data over time.
Where can I see it?
Step 1 - Access to FootfallCam Analytic Manager V9™: http://v9.footfallcam.com/Account/Login via web browser.
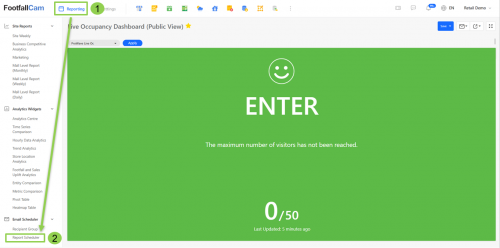
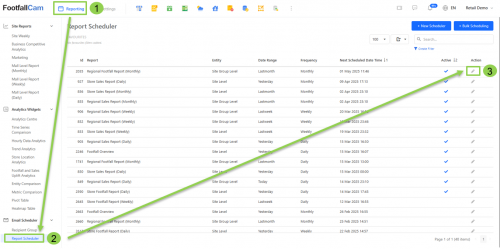
Step 2 - Navigate to Settings > Report Scheduler to access the Report Scheduler list.
5.4.1 How can I create a new scheduler?
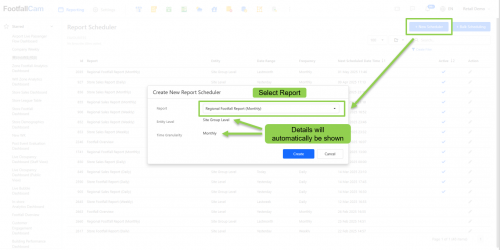
Step 1 - At Report Scheduler page, click on "+ New Scheduler" button.
Step 2 - Select a report then fill up the entity level and time granularity details and click "Create" button to continue.
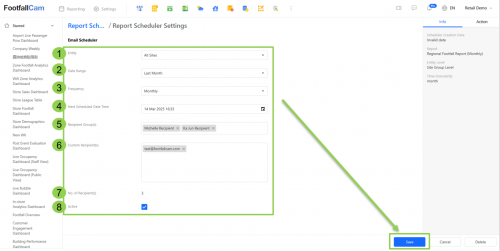
Step 3 - In the Report Scheduler Settings page, user is required to fill up more details then click on "Save" button to create the report scheduler job.
| Item | Description |
| 1. Entity | Select the entity to be included in the report. |
| 2. Date Range | Select the date range of the data. |
| 3. Frequency | How frequent should the report should be generated. |
| 4. Next Scheduled Date Time | Select the next date time to start scheduling report. |
| 5. Recipient Group(s) | Select saved recipients to receive the report. |
| 6. Custom Recipient(s) | Select custom recipients to receive the report. |
| 7. No. of Recipient(s) | Number of recipients that will receive the report. |
| 8. Active | Tick to active the report scheduler. |
5.4.2 How can I update the details of a scheduler?
Step 1 - At Report Scheduler page, navigate to the report scheduler job that you wish to update and click on the pen icon to go into report scheduler settings page.
Step 2 - Select a report then fill up the entity level and time granularity details and click "Create" button to continue.
Hint : You can utilize the "Search" or "Filter" function to obtain the required scheduler if the list is too long.
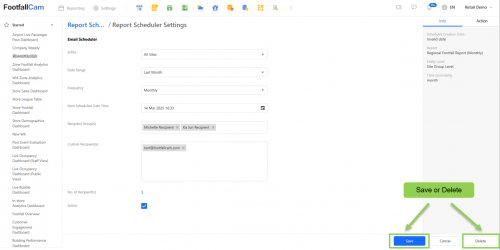
Step 3 - Update the details you wish and click on the "Save" button to save your changes.
5.4.3 How can I delete a scheduler?
Step 1 - At Report Scheduler page, navigate to the report scheduler job that you wish to delete and click on the pen icon to go into report scheduler settings page.
Step 2 - Click on the "Delete" button to delete the report scheduler job.
5.4.4 Can I bulk-schedule for multiple entities?
Yes! You can bulk create the report scheduler for multiple entities.
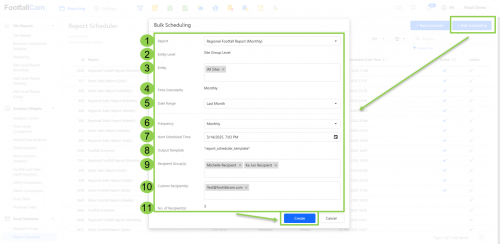
Step 1 - At Report Scheduler page, click on the "+ Bulk Scheduling" button.
Step 2 - Fill up the necessary details then click on "Create" button to create schedulers. For each of the "Entity" that you've selected, a scheduler will be created.
| Item | Description |
| 1. Report | Select a type of report to generate. |
| 2. Entity Level | Auto generated based on selected report type. |
| 3. Entity | Select the entity to be included in the report. |
| 4. Time Granularity | Auto generated based on the selected report type. |
| 5. Date Range | Select the date range of the data. |
| 6. Frequency | How frequent should the report should be generated. |
| 7. Next Scheduled Time | Select the next date time to start scheduling report. |
| 8. Output Template | Auto generated based on selected report type. |
| 9. Recipient Group(s) | Select saved recipients to receive the report. |
| 10. Custom Recipient(s) | Select custom recipients to receive the report. |
| 11. No. of Recipient(s) | Number of recipients that will receive the report. |
5.4.5 What will I receive?
At the scheduled time, you will receive an email from the FootfallCam Postmaster with an attached report in PDF format.
5.5 Security and Privacy Settings
5.5.1 Data Privacy Policy
FootfallCam is committed to protecting the privacy and confidentiality of personal data of clients, business partners and other identifiable individuals. As part of this commitment, this privacy policy governs FootfallCam actions relating to the collection, use and disclosure of personal data. Each employee bears a personal responsibility for complying with this policy in the fulfilment of their responsibilities at FootfallCam.
You may refer to Data Privacy Policy of Footfallcam for more details.
5.5.2 Data Integrity Policy
Data Integrity Policy describes the data flow of Foofallcam solution, types and usages of raw data, retention period of data, as well as description of metrices.
You may refer to Data Integrity Policy of Footfallcam for more details.
5.5.3 Information Security and Risk Management Policy
Information security and risk management refers to the process of managing the assets and associated risks through established procedures, standards and controls. The goal of this process is to protect the confidentiality, integrity and availability of assets (information) from threats and vulnerabilities.
You may refer to Information Security and Risk Management Policy of Footfallcam for more details.
5.6 Backup Settings
5.6.1 Server Failover
FootfallCam has two server setups: web server and database server as a full hot-standby server during any server failover. This FootfallCam setup ensures a full hot-standby server and network redundancy to support continuous operation in the event of a server failure.
The following outlines the Data Backup and Restore Plan by FootfallCam.
-
Any data failed to be stored will automatically be pushed to the hot-standby server.
-
FootfallCam technical team will receive an automated notification by the system to carry out the necessary support to diagnose and resolve the issue.
-
When the default server finally is up and running, the data will be exported back to the original server automatically.
Hence, the counters will still be collecting footfall data with no disruption or data loss for users in the process.
5.6.2 Backup Procedure
-
If Client deploys FootfallCam Cloud Server, FootfallCam is required to perform Full Back up on behalf of the Client
-
In the event that FootfallCam Cloud Server encounters any form of destruction, FootfallCam Shall restore using the redundant backup for counter functioning purpose
-
Backup must be located in separated locations to maintain its availability and functionality.
-
FootfallCam ensures that all backups are performed as scheduled and reviews the backup process on all servers daily. Logs are maintained to verify the amount of data backed up and the unsuccessful backup occurrences.
-
FootfallCam Servers are located at Germany, United Kingdom and Malaysia. Client can select which of the three FootfallCam servers they would like host their backup.
5.6.3 Backup Frequency
Full Back up is performed daily and retained for seven (7) days. Subsequently, daily Full Back up from 14 days, 21 days, 96 days and 360 days prior to the current date will be retained for reference purpose. Redundant backup will be performed daily and only the latest three copies of redundant backup will be retained.
|
Types |
Location |
Backup Frequency |
Time / Hours of Backup |
|
Full Backup |
Client Server / FootfallCam Cloud Server |
Daily |
Monday, Tuesday, Wednesday, Thursday, Friday, Saturday and Sunday G.M.T +0 3:00 A.M |
|
Redundant Backup |
FootfallCam Cloud Server |
Daily |
Monday, Tuesday, Wednesday, Thursday, Friday, Saturday and Sunday G.M.T +0 3:30 A.M |
|
Contingent Full Backup |
FootfallCam Sub Server |
Weekly |
Every week G.M.T +0 3:00 A.M |
5.6.4 Backup Content
System
System file shall be backup in the latest version.
Data
|
Backup |
Type of Data |
Size |
|
Full Backup |
All Data including customer data, footfall data, Wi-Fi data and Counter Configuration Data |
Varied with the number of counters |
|
Redundant Backup |
Counter Configuration Data including: a. Server Details b. Company Settings c. Site / IT Details d. User Access & Details e. Counter & Camera Settings f. Verification Status |
Varied with the number of counters |
|
Contingent Full Backup |
Counter Configuration Data including: a. Server Details b. Company Settings c. Site / IT Details d. User Access & Details e. Counter & Camera Settings f. Verification Status |
Varied with the number of counters |
Size & Storage
Total server storage suggested is 500GB with RAID.
Overview (per 2000 counters)
|
Component |
Size per Counter / Backup |
Frequency |
Total Size |
Percentage |
|
Video (Verification) |
100MB |
2000 |
200GB |
56.3% |
|
Live Server |
-- |
-- |
100GB |
28.2% |
|
Full Backup |
5GB |
7 Days |
35GB |
9.9% |
|
14 Days prior |
5GB |
1.4% |
||
|
21 Days prior |
5GB |
1.4% |
||
|
96 Days prior |
5GB |
1.4% |
||
|
360 Days prior |
5GB |
1.4% |
||
|
Total |
-- |
-- |
355GB |
100% |
Server Level Data (per counter)
|
Type of Data |
Data Size |
|
|
Raw Data |
Counting Data |
Varied with the number of counters |
|
MAC Address Wi-Fi Data |
Varied with the number of counters |
|
|
Aggregated Data |
Counting Data + Wi-Fi Data |
Varied with the number of counters |
Counter Level Data (per counter)
Each counter comes with 4GB storage
|
Component |
Size |
Percentage |
|
OS |
1600MB |
40.0% |
|
Backup |
1500MB |
37.5% |
|
Data / Video |
400MB |
10.0% |
|
Others |
380MB |
9.5% |
|
Boot Partition |
60MB |
1.5% |
|
Safe Mode |
60MB |
1.5% |
|
Total |
4000MB |
100% |
5.6.5 Backup Retention
Server and Counter level data housekeeping starts at G.M.T +0 4:00AM daily.
Server Level Data
| Type of Data |
Retention Period |
Housekeeping Rule |
|
|
Raw Data |
MAC Address |
30 Days |
For MAC Address > 30 days |
|
Aggregated Wi-Fi |
Lifetime |
-- |
|
|
Video Data |
Normal Video |
7 Days |
For video is unverified > 7 days |
|
Pending Video |
7 Days |
For failed video upload to server |
|
|
Broken Video |
7 Days |
For video duration < 5 minutes |
|
|
Health Check Data |
Counter Heartbeat |
30 Days |
For counter heartbeat > 30 days |
Counter Level Data
| Type of Data | Retention Period | Housekeeping Rule | |
|
Raw Data |
Counting Data |
7 Days |
For successful data upload to server |
|
180 Days |
For unsuccessful data upload to server |
||
|
MAC Address Wi-Fi Data (Semi Aggregated) |
7 Days |
For successful data upload to server |
|
|
14 Days |
For unsuccessful data upload to server |
||
|
Video Data |
Normal Video |
-- |
For successful video upload to server |
|
3 Days |
For unsuccessful video upload to server. All videos will be cleared if unsuccessful attempts for more than 3 days |
||
|
Health Check Data |
Counter Heartbeat |
30 Days |
For counter heartbeat > 30 days |
5.6.6 Backup Failure
In the event of an unsuccessful backup, Client will receive email notification and shall take the following immediate actions:
-
Investigate the backup on the client, checking backup logs and resolve the issue
-
Resume backup and monitor the backup progress to be performed as usual
-
To perform manual backup if the backup fails repeatedly
-
Send email request to [email protected] if issue persists
5.6.7 Restoration
Restore Type
The option to restore data from which server (Client Server, FootfallCam Cloud Server, FootfallCam Sub Server) depends on whether the Client uses own Client Server or FootfallCam Cloud Server.
|
|
Situations where: |
Restore with: |
|
1. |
HDD Failure |
Full Back up from Client Server / FootfallCam Cloud Server |
|
2. |
Server Accessible |
Full Back up from FootfallCam Cloud Server |
|
3. |
Server Failure / Not Accessible |
Full Back up from FootfallCam Cloud Server |
|
4. |
Server Migration |
Full Back up from FootfallCam Cloud Server |
|
5. |
Total Server Destruction |
Full Back up from FootfallCam Sub Server Redundant Backup from FootfallCam Cloud Server |
Procedures
Full Restoration:
-
Full configurations will be restored from the backup server and controlled through Client server control panel.
-
In the case of corrupted data download, loaded data will be automatically deleted. Re-download will be prompted.
Partial Restoration is not available by any means.
5.6.8 Contingency Plan
In the event of serious data destruction (e.g. server destruction), one copy of Full Backup will be available from FootfallCam Sub server for recovery purpose. This Full Backup is scheduled weekly to FootfallCam Sub Server.
Only three (3) copies of latest Full Backup (7 days, 14 days and 28 days before current date) will be kept.
5.7 Company Settings
In this chapter, you will be briefed through the steps to edit company account such as update the company name, logo and account type and also edit the settings which will be applied to report feature. In addition, you can obtain the steps to setup public holiday of the company under this section.
5.7.1 How to Edit Company Account
Below are the steps to edit the details of your company account:
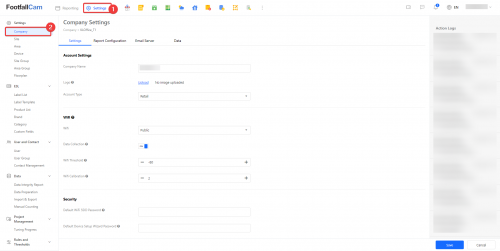
STEP 1 - Access to FootfallCam Analytic Manager V9™: http://v9.footfallcam.com/Account/Login via Google Chrome.
STEP 2 - Navigate to Settings > Company to access the Company Settings Page.
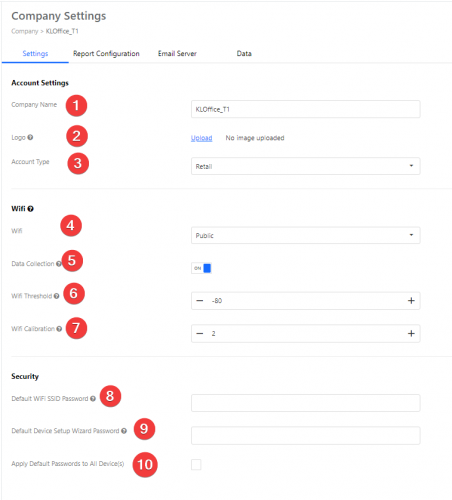
STEP 3 - Update the required fields and click on "Save" button to save the changes that have been made (if any).
| Item | Description |
| 1. Company Name |
Enter the company name for the FootfallCam Analytic Manager V9™ account. (Info: Company name inserted will be apply to reports in FootfallCam Analytic Manager V9™.) |
| 2. Company Logo |
Upload the company logo for your account with the .png format of 150px*30px by clicking on the Browse button. (Info: The logo inserted will be replace the default logo set on the top left of the portal.) |
| 3. Account Type |
Select the type of account applicable to your industry. (Info: This setting will be applied to report feature.) |
| 4. Wifi |
Public: Wifi module is turned on and the SSID can be seen publicly |
| 5. Data Collection |
Enabling this allows the device to collect Wifi counting data and send to the server |
| 6. Wifi Threshold |
Wifi threshold determines the detection range (minimum: 2m; maximum: 100m) for Wifi counting - the higher the value, the larger the detection range. This value will be applicable to all counter(s) under your company. However, users can go to Settings > Sites > Counter Details page to manually adjust the Wifi threshold for each counter. |
| 7. Wifi Calibration |
Scaling factor that you would adjust to multiply the MAC detection |
| 8. Default WiFi SSID Password |
This password is required when the onsite person need to connect to the device via the counter WiFi SSID before they can access the device setup wizard. |
| 9. Default Device Setup Wizard Password |
This password is required for the onsite person to login to the device setup wizard. This default password will be imposed to the counter(s) which has been allocated to server if "Apply Default Passwords to all Device(s)" is enabled. |
| 10. Apply Default Passwords to All Device(s) |
Select to apply default password to all device(s). |
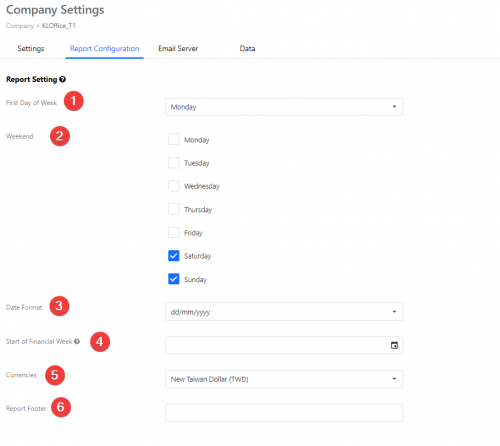
5.7.2 How to Edit Report Setting
Below are the steps for the set up which will be applied to the report feature:
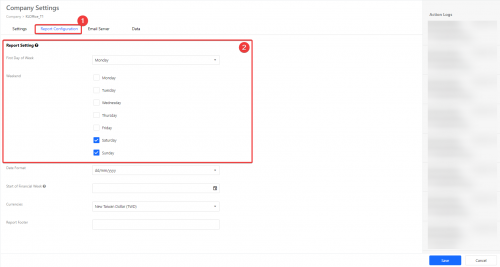
STEP 1 - At Company Settings page, click on the Report Configuration section.
STEP 2 - Update the required fields in Report Setting and click on Save button in the Company Settings page to save the changes.
| Item | Description |
| 1. First day of the week | Select the first day of the week. |
| 2. Weekend | Select the weekend of the week. |
| 3. Date Format | Select the preferred date format. |
| 4. Start of Financial Week | Select the first day of your company's financial week. |
| 5. Currencies | Select the applicable currency. |
| 6. Report Footer | Enter the context as report footer. |
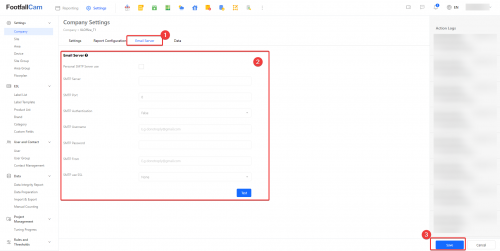
5.7.3 How to Send Automated Emails to Specific Email Address
This only applicable for customer who have completed server installation. Users need to configure email server details to send automated emails from own server to specific email address according to email scheduler.
STEP 1 - At the Company Settings Page, click on the Email Server section.
STEP 2 - Update the required fields and click on Save button to save the changes.
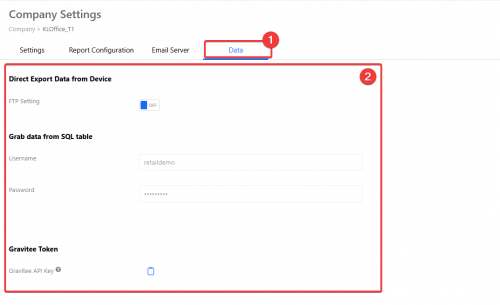
5.7.4 How to Configure Direct Export Data from Device
This page is designed to enable customers to directly export data from their devices while showing the additional data information.
STEP 1 - At the Company Settings Page, click on the Data section.
STEP 2 - Enable the FTP setting to display the relevant configuration options. Complete all the required fields and click on the Save button to apply and save.
5.8 Server Setup
You can choose to host FootfallCam Solution into your on-premise servers. This option enables you to further securely store and complete control of data in their own premises, with the same methodology and functionality as the Cloud Servers provided by FootfallCam.
5.8.1 System Requirements
To host FootfallCam™ Solution on-premise, you must prepare 2 server instances for hosting whole FootfallCam™ Solution: -
-
Microsoft Windows Server 2016+ (Window Server)
-
Ubuntu Server 20.04 (Ubuntu Server)
A correct servers' specification is important to ensure the FootfallCam™ Solution is running reliably and consistently without compromised performance. Table below shows the system requirements for hosting FootfallCam™ Solution, corresponding to the number of FootfallCam™ Devices being supported: -
| Item / Size | Small | Medium | Large |
| FootfallCam™ Devices Count | Up to 100 devices | Up to 500 devices | Up to 1000 devices |
| PRIMARY SERVER | |||
| CPU | 8 Cores 64-bit | 12 Cores 64-bit | 16 Cores 64-bit |
| Memory | 32GB or above | 64GB or above | 128GB or above |
| Storage** | 500GB or above | 1TB or above | 2TB or above |
| Operating System | Windows Server 2016 or above (Standard or Datacenter Edition) | ||
| SQL Server License | Microsoft SQL Server 2016 or above (Standard or Enterprise Edition) | ||
| SECONDARY SERVER | |||
| CPU | 16 Cores 64-bit | 24 Cores 64-bit | 32 Cores 64-bit |
| Memory | 128GB or above | 256GB or above | 512GB or above |
| Storage** | 1TB or above | 2TB or above | 3TB or above |
| Operating System | Ubuntu Server 20.04 LTS or above | ||
You may provide a Domain / Sub Domain Name and SSL Certificate from a DNS Provider such as Cloudflare, Fasthosts etc, and create the following A records shown below: -
| Type | Name** | Target Server | TTL |
| A record | portal-ffc.mydomain.com | <<Primary Server Public IP Address>> | Auto |
| A record | ws-ffc.mydomain.com | <<Secondary Server Public IP Address>> | Auto |
For more information regarding server installation and list of applications to be installed, kindly refer to this link.
5.8.2 Procedures
FootfallCam™ Solution installation and setup can only be done by our FootfallCam™ Technical Specialists. Hence, you are required to order a Software Installation Service from us with one-off installation fee.
Below are the overall steps on deploying FootfallCam™ on-premise server on client site.
STEP 1 - Identify/consult FootfallCam™ on on-premise server requirements and prepare server(s).
STEP 2 - Order Software Installation Service and submit Server Installation Form to [email protected].
STEP 3 - FootfallCam™ to schedule for server inspection and verify server hardware/network requirements.
STEP 4 - FootfallCam™ to schedule and perform Software Installation session.
STEP 5 - Setup account and bind devices in FootfallCam™ Analytic Manager in their server(s).
More information regarding the server installation procedure can be found in Server Installation Form
5.8.3 Backup Procedure for Client Server
-
If Client deploys own server (Client Server), Client is required to perform their own Full Backup
-
FootfallCam will not perform Full Back up on behalf of the Client in FootfallCam Cloud Server
-
FootfallCam will provide Client with the backup function to run their own backup
-
In the event that Client Server encounter any forms of destruction, FootfallCam shall restore using the redundant backup for counter functioning purpose
-
Backup must be located in separated locations to maintain its availability and functionality

